跳转到主内容

Merch Source Projector Entertainment II Outer Casing Replacement

仅作为前提条件
本指南仅提供前提条件!本指南是另一个程序的一部分,不能单独使用。

你所需要的

  1. Merch Source Projector Entertainment II Outer Casing Replacement, Outer Casing: 步骤 1 中的图像 1,2 Merch Source Projector Entertainment II Outer Casing Replacement, Outer Casing: 步骤 1 中的图像 2,2
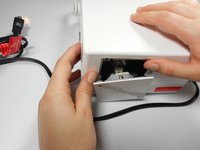
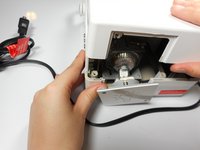
    • Flip the projector onto its back and unscrew the nine 15mm screws using the Phillips #0 screw driver.

  2. Merch Source Projector Entertainment II Outer Casing Replacement: 步骤 2 中的图像 1,1
    • Flip the projector right side up and unscrew the two 12mm screws on the light bulb panel located at the rear of the projector with a Phillips #0 screw head.

    • The bottom right panel screw does not come completely out the panel door.

  3. Merch Source Projector Entertainment II Outer Casing Replacement: 步骤 3 中的图像 1,2 Merch Source Projector Entertainment II Outer Casing Replacement: 步骤 3 中的图像 2,2
    • Using your hands, gently pry the top and bottom of the projector casing apart.

结论

To reassemble your device, follow these instructions in reverse order.

团队

Cal Poly, Team 18-3, Maness Winter 2015 Cal Poly, Team 18-3, Maness Winter 2015 的会员

CPSU-MANESS-W15S18G3

3 名成员

创作了4篇指南

0指南评论

添加评论

浏览统计数据:

过去 24 小时: 1

过去 7 天: 1

过去 30 天: 2

总计 133