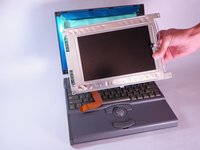
跳转到主内容

Macintosh PowerBook 165c Display Replacement

你所需要的

  1. Macintosh PowerBook 165c Display Replacement, Display: 步骤 1 中的图像 1,1
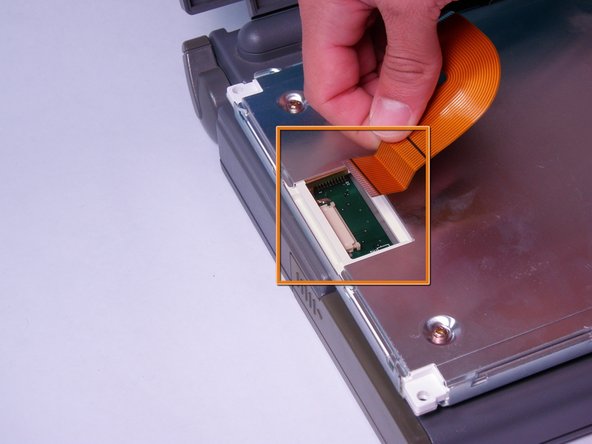
    • Orientate the computer right side up and open the display case to reveal the display.

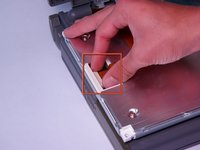
    • Use a plastic opening tool to remove the two small plastic plugs located on the display case just below the display.

  2. Macintosh PowerBook 165c Display Replacement: 步骤 2 中的图像 1,1
    • Use a T8 torx screwdriver to remove the two, 7.7mm long screws that were revealed by removing the plastic plugs.

    • Twist counterclockwise to remove the screw.

    • Caution: Once the screws are removed, the display is only held by two screws. Handle delicately.

  3. Macintosh PowerBook 165c Display Replacement: 步骤 3 中的图像 1,1
    • Grip the two bottom corners of the plastic display cover and gently pull towards yourself so that the display cover rotates about the top of the display case.

    • The display cover should release from top.

    • Remove the display case.

  4. Macintosh PowerBook 165c Display Replacement: 步骤 4 中的图像 1,1
    • Locate the black connector on the right of the display. The connector can be identified by the pink, light blue, and white wires protruding from its side.

    • Remove the black connector from the circuit board by pulling it away from its adapter.

  5. Macintosh PowerBook 165c Display Replacement: 步骤 5 中的图像 1,1
    • Using a T8 torx screwdriver, remove the four, 10.8mm long screws from the corners of the display.

    • Caution: The display is no longer supported and must be handled with care.

  6. Macintosh PowerBook 165c Display Replacement: 步骤 6 中的图像 1,1
    • Carefully tilt the display downwards and rest it on the keyboard.

  7. Macintosh PowerBook 165c Display Replacement: 步骤 7 中的图像 1,3 Macintosh PowerBook 165c Display Replacement: 步骤 7 中的图像 2,3 Macintosh PowerBook 165c Display Replacement: 步骤 7 中的图像 3,3
    • Locate the orange ribbon cable on the back of the display.

    • Open the white tab fastener by pulling it outward.

    • Remove the orange ribbon cable by gently pulling it away from the opened tab fastener.

    • The display is now free.

结论

To reassemble your device, follow these instructions in reverse order.

Jason

于10/12/11注册

89 声望

创作了4篇指南

团队

Cal Poly, Team 6-3, Regan Fall 2011 Cal Poly, Team 6-3, Regan Fall 2011 的会员

CPSU-REGAN-F11S6G3

4 名成员

创作了12篇指南

0条评论

添加评论

浏览统计数据:

过去 24 小时: 0

过去 7 天: 2

过去 30 天: 12

总计 2,198