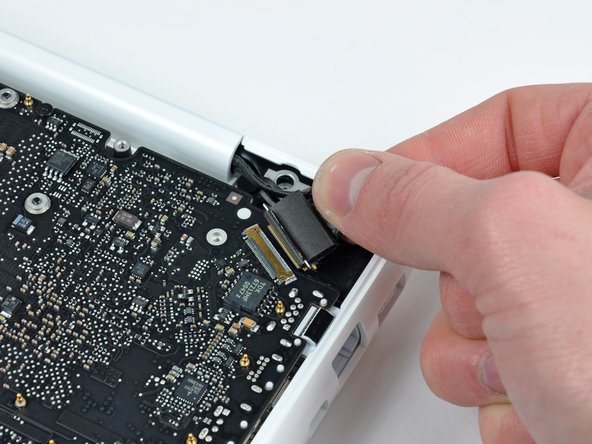
Grab the plastic pull tab secured to the display data cable lock and rotate it toward the DC-In side of the computer.
There is also a thin metal lock clip under the plastic tab that has to be released ( Use the tip of a spudger ) before you can disconnect the display data cable.
Open your MacBook so the display is perpendicular to the upper case.
Place your opened MacBook on a table as pictured.
While holding the display and upper case together with your left hand, remove the remaining 7.8 mm with lock washer T8 Torx screw from the lower display bracket.
Be sure to hold the display and upper case together with your left hand. Failure to do so may cause the freed display/upper case to fall, potentially damaging each component.
Remove the last remaining T8 Torx screw securing the display to the upper case.
Grab the upper case with your right hand and rotate it slightly toward the top of the display so the upper display bracket clears the edge of the upper case.
The display data cable may cause the upper display bracket to get caught on the upper case. It may be helpful to slightly rotate the upper case away from the display for more clearance.
Rotate the display slightly away from the upper case.
Use the flat end of a spudger to pry the front display bezel off the top edge of the display assembly.
It may be helpful to insert and twist the flat end of your spudger to enlarge the gap between the front & rear display bezels as you work your way around the edge of the display.
Continue separating until the top edge of the front display bezel is free from the display assembly.
Be careful when prying near the iSight camera board, as it has exposed circuitry and is delicate.
Use your spudger to pry the left side of the front display bezel away from the display assembly.
Carefully pry up the area behind the left clutch hinge.
During reassembly, be sure the small plastic pegs on the front display bezel mate up with the holes in the rear display bezel (shown in red). Failure to do so will prevent the front display bezel from sitting flush against the rear bezel.
Remove the front display bezel from the display assembly.
To help the adhesive avoid losing is tackiness, do not excessively handle the adhesive and be sure to keep it clean until you are ready for installation.