跳转到主内容

当前版本的文档还未经巡查,您可以查看最新的已查核版本

你所需要的

  1. , 底壳: 步骤 1 中的图像 1,1
    • 移除8颗4mm将底壳与MacBook相固定的八颗十字螺丝。

  2. : 步骤 2 中的图像 1,3 : 步骤 2 中的图像 2,3 : 步骤 2 中的图像 3,3
    • 下壳由橡胶涂层的铝构成。 在拆卸过程中不要过度弯曲铝壳,因为任何永久变形会导致重新组装后的公差问题。

    • 从散热口附近处稍微提起。

    • 继续在下方和上方之间使用你的手指,直到顶壳从卡扣中弹出。

    • 这三个的位置显示在第三张图片中。

  3. , 电池: 步骤 3 中的图像 1,1
    • 为了避免放电,我们建议您从逻辑板上断开电池连接器。这一步是可选的,不是必需的。

    • 使用一个平头的撬棒将电池插口从主板上的插座中取出。

    • 用指甲在插口的两侧抬起可能会更容易。

  4. 这个步骤还没有翻译 帮忙翻译一下

    : 步骤 4 中的图像 1,1
    • Remove the following screws from the optical drive side of the rear vent:

    • Two 10 mm T8 Torx

    • Two 5.2 mm Phillips

  5. 这个步骤还没有翻译 帮忙翻译一下

    : 步骤 5 中的图像 1,1
    • Remove the following screws from the port side of rear vent:

    • Two 10 mm T8 Torx

    • Two 5.2 mm Phillips

  6. 这个步骤还没有翻译 帮忙翻译一下

    : 步骤 6 中的图像 1,1
    • Carefully lift the rear vent out of the upper case.

  7. 这个步骤还没有翻译 帮忙翻译一下

    : 步骤 7 中的图像 1,1
    • Remove the single 3 mm Phillips screw securing the AirPort/Bluetooth antenna ground strap to the rear speaker.

  8. 这个步骤还没有翻译 帮忙翻译一下

    : 步骤 8 中的图像 1,2 : 步骤 8 中的图像 2,2
    • Use the tip of a spudger to pry the AirPort and Bluetooth antenna connectors (3 total) up off the AirPort/Bluetooth card.

    • De-route the long antenna from its channel in the rear speaker housing.

  9. 这个步骤还没有翻译 帮忙翻译一下

    : 步骤 9 中的图像 1,2 : 步骤 9 中的图像 2,2
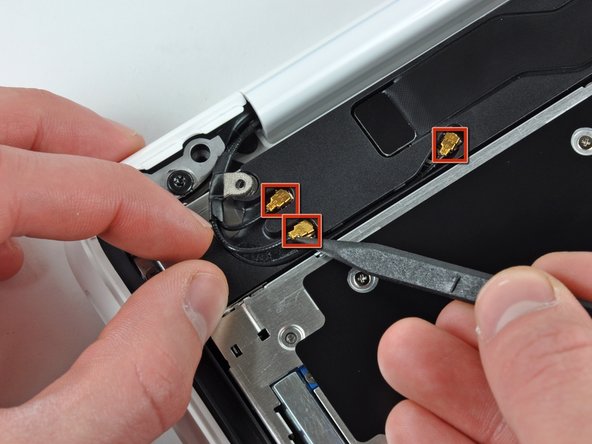
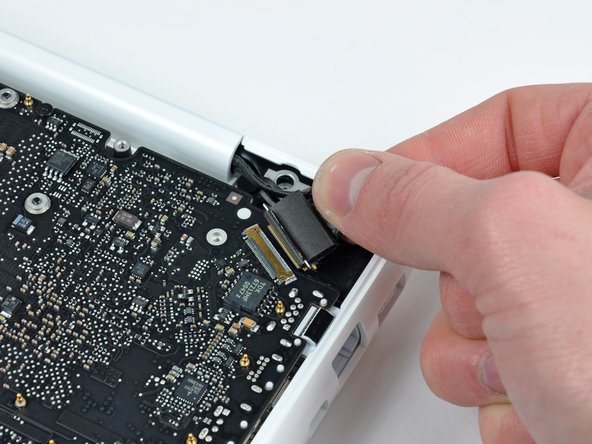
    • Grab the plastic pull tab secured to the display data cable lock and rotate it toward the DC-In side of the computer.

    • There is also a thin metal lock clip under the plastic tab that has to be released ( Use the tip of a spudger ) before you can disconnect the display data cable.

  10. 这个步骤还没有翻译 帮忙翻译一下

    : 步骤 10 中的图像 1,2 : 步骤 10 中的图像 2,2
    • Gently pull the display data cable connector away from its socket on the logic board.

    • Pull the socket parallel to the face of the logic board.

    • The display data cable socket is made of very thin metal and is easily bent. Be sure to pull the connector straight away from its socket.

  11. 这个步骤还没有翻译 帮忙翻译一下

    : 步骤 11 中的图像 1,1
    • Open your MacBook so the display is perpendicular to the upper case.

    • Place your opened MacBook on a table as pictured.

    • While holding the display and upper case together with your left hand, remove the remaining 7.8 mm with lock washer T8 Torx screw from the lower display bracket.

  12. 这个步骤还没有翻译 帮忙翻译一下

    : 步骤 12 中的图像 1,1
    • Be sure to hold the display and upper case together with your left hand. Failure to do so may cause the freed display/upper case to fall, potentially damaging each component.

    • Remove the last remaining T8 Torx screw securing the display to the upper case.

  13. 这个步骤还没有翻译 帮忙翻译一下

    : 步骤 13 中的图像 1,2 : 步骤 13 中的图像 2,2
    • Grab the upper case with your right hand and rotate it slightly toward the top of the display so the upper display bracket clears the edge of the upper case.

    • The display data cable may cause the upper display bracket to get caught on the upper case. It may be helpful to slightly rotate the upper case away from the display for more clearance.

    • Rotate the display slightly away from the upper case.

  14. 这个步骤还没有翻译 帮忙翻译一下

    : 步骤 14 中的图像 1,1
    • Lift the display up and away from the upper case, minding any brackets or cables that may get caught.

  15. 这个步骤还没有翻译 帮忙翻译一下

    : 步骤 15 中的图像 1,3 : 步骤 15 中的图像 2,3 : 步骤 15 中的图像 3,3
    • Insert the flat end of a spudger between the thin rubber strip surrounding the front display bezel and the rear display bezel.

    • Do not try to insert the spudger between the thin rubber strip and the plastic face of the front display bezel.

    • Use the flat end of your spudger to carefully pry the front display bezel away from the adhesive securing it to the rear display bezel.

    • Do not pry against the fragile glass LCD panel. Also, do not excessively bend the plastic as it may permanently deform.

    • Continue prying until the front display bezel is free along the right side of the display and behind the right clutch hinge.

  16. 这个步骤还没有翻译 帮忙翻译一下

    : 步骤 16 中的图像 1,2 : 步骤 16 中的图像 2,2
    • Use the flat end of a spudger to pry the front display bezel off the top edge of the display assembly.

    • It may be helpful to insert and twist the flat end of your spudger to enlarge the gap between the front & rear display bezels as you work your way around the edge of the display.

    • Continue separating until the top edge of the front display bezel is free from the display assembly.

    • Be careful when prying near the iSight camera board, as it has exposed circuitry and is delicate.

  17. 这个步骤还没有翻译 帮忙翻译一下

    : 步骤 17 中的图像 1,2 : 步骤 17 中的图像 2,2
    • Use your spudger to pry the left side of the front display bezel away from the display assembly.

    • Carefully pry up the area behind the left clutch hinge.

    • During reassembly, be sure the small plastic pegs on the front display bezel mate up with the holes in the rear display bezel (shown in red). Failure to do so will prevent the front display bezel from sitting flush against the rear bezel.

  18. 这个步骤还没有翻译 帮忙翻译一下

    : 步骤 18 中的图像 1,3 : 步骤 18 中的图像 2,3 : 步骤 18 中的图像 3,3
    • Slowly work your way across the lower edge of the front display bezel until it is free from the display assembly.

    • Be sure to pry up as far away from the LCD as possible, as it extends below the edge of the front display bezel.

    • When you get about half way across, pry up from the other side of the front display bezel's lower edge to ease the process.

  19. 这个步骤还没有翻译 帮忙翻译一下

    : 步骤 19 中的图像 1,1
    • Remove the front display bezel from the display assembly.

    • To help the adhesive avoid losing is tackiness, do not excessively handle the adhesive and be sure to keep it clean until you are ready for installation.

  20. 这个步骤还没有翻译 帮忙翻译一下

    : 步骤 20 中的图像 1,1
    • Remove the two 3 mm Phillips screws securing the clutch cover to the rear display bezel.

  21. 这个步骤还没有翻译 帮忙翻译一下

    : 步骤 21 中的图像 1,3 : 步骤 21 中的图像 2,3 : 步骤 21 中的图像 3,3
    • Insert the flat end of a spudger into the open end of the clutch cover and pry up to release it from the rear display bezel.

    • Pry up from both sides of the clutch cover until it is completely free from the display assembly.

  22. 这个步骤还没有翻译 帮忙翻译一下

    : 步骤 22 中的图像 1,1
    • Remove the clutch cover from the display assembly.

  23. 这个步骤还没有翻译 帮忙翻译一下

    : 步骤 23 中的图像 1,1
    • Remove following six screws securing the LCD to the rear display bezel:

    • Four 3.4 mm Phillips.

    • Two 3 mm Phillips.

  24. 这个步骤还没有翻译 帮忙翻译一下

    : 步骤 24 中的图像 1,1
    • Do not try to remove the LCD yet. The circuitry along its lower edge is wedged in a gap along the lower edge of the display recess in the plastic display assembly.

    • Hold the display vertically and tip it enough to grab the top edge of the LCD and rotate it slightly out of the display assembly, being careful not to break the circuitry off its lower edge.

  25. 这个步骤还没有翻译 帮忙翻译一下

    : 步骤 25 中的图像 1,1
    • Peel the piece of tape covering the display data cable connector away from the edge closest to the LCD.

  26. 这个步骤还没有翻译 帮忙翻译一下

    : 步骤 26 中的图像 1,2 : 步骤 26 中的图像 2,2
    • Use the tip of a spudger to flip up the thin steel retaining clip securing the display data cable to its socket on the LCD.

    • Pull the display data cable straight away from its socket on the LCD.

    • Lift the LCD out of the display assembly and set it aside.

  27. 这个步骤还没有翻译 帮忙翻译一下

    : 步骤 27 中的图像 1,1
    • Remove the two small pieces of black tape securing the display data/camera cable to the rear display bezel.

  28. 这个步骤还没有翻译 帮忙翻译一下

    : 步骤 28 中的图像 1,2 : 步骤 28 中的图像 2,2
    • Use the pointed tip of a spudger to pry the camera board off the display assembly.

    • Disconnect the camera cable by pulling its connector away from the socket on the camera board.

  29. 这个步骤还没有翻译 帮忙翻译一下

    : 步骤 29 中的图像 1,1
    • De-route the display data/camera cable from the slot cut into the rear display bezel.

  30. 这个步骤还没有翻译 帮忙翻译一下

    : 步骤 30 中的图像 1,1
    • Carefully pull the display data/camera cable out from under the frame attached to the rear display bezel and remove it from the display assembly.

  31. 这个步骤还没有翻译 帮忙翻译一下

    : 步骤 31 中的图像 1,1
    • Remove the two small pieces of black tape securing the antenna cables to the rear display bezel.

  32. 这个步骤还没有翻译 帮忙翻译一下

    : 步骤 32 中的图像 1,1
    • Remove the four 2.3 mm Phillips screws securing the antennas to the rear display bezel.

  33. 这个步骤还没有翻译 帮忙翻译一下

    : 步骤 33 中的图像 1,1
    • Remove the single 3.3 mmm Phillips screw securing the lower antenna ground to the rear display bezel.

  34. 这个步骤还没有翻译 帮忙翻译一下

    : 步骤 34 中的图像 1,2 : 步骤 34 中的图像 2,2
    • De-route the antenna cables from the groove cut into the rear display bezel.

    • Carefully pull the antenna cables out from under the frame attached to the rear display bezel and remove them from the display assembly.

  35. 这个步骤还没有翻译 帮忙翻译一下

    : 步骤 35 中的图像 1,1
    • Remove the three Phillips screws securing the center antenna to the rear display bezel.

  36. 这个步骤还没有翻译 帮忙翻译一下

    : 步骤 36 中的图像 1,1
    • Remove the center antenna from the rear display bezel.

  37. 这个步骤还没有翻译 帮忙翻译一下

    : 步骤 37 中的图像 1,2 : 步骤 37 中的图像 2,2
    • Remove the three 4.7 mm T6 Torx screws securing the right clutch hinge to the rear display bezel.

    • Remove the right clutch hinge.

  38. 这个步骤还没有翻译 帮忙翻译一下

    : 步骤 38 中的图像 1,2 : 步骤 38 中的图像 2,2
    • Remove the three 4.7 mm T6 Torx screws securing the left clutch hinge to the rear display bezel.

    • Remove the left clutch hinge.

    • Rear display bezel remains.

终点

10等其他人完成本指南。

2条评论

Guide is 100% accurate! My friend's macbook lid was cracked and scratched...looked awful. Bought a new one for about $30 and replaced it in under 1 hour for free. Didn't have a spudger, and as I'm sure you all know, you can't buy one at any store that I've found. So, I used a plastic putty knife from lowe's that I got for $0.98, and it worked great! The one thing I have to add is as follows: If your computer is rather old, have some additional adhesive to place on the front LCD bezel. The adhesive does not reapply very well. Double sided 3M tape will work great, but it will be a bit more difficult to remove a second time. Thanks iFixIt! Couldn't have done this without your help.

Jacob - 回复

Anyone know what epoxy is used to secure the metal frame to the plastic cover? It's a green epoxy, but that's all I know. The same green epoxy is also used to secure the top case plastic to the metal frame

Nicholas Ouimet - 回复

添加评论

浏览统计数据:

过去 24 小时: 2

过去 7 天: 11

过去 30 天: 32

总计 18,701