跳转到主内容

MacBook Pro 17" Models A1151 A1212 A1229 and A1261 Keyboard Replacement

你所需要的

  1. MacBook Pro 17" Models A1151 A1212 A1229 and A1261 Keyboard Replacement, Battery: 步骤 1 中的图像 1,1
    • Use your fingers to push both battery release tabs away from the battery and lift the battery out of the computer.

  2. MacBook Pro 17" Models A1151 A1212 A1229 and A1261 Keyboard Replacement, RAM Shield: 步骤 2 中的图像 1,1
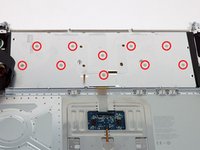
    • Remove the four identical Phillips 3.4 mm screws from the memory door. These screws have 4 mm diameter heads rather than the 3 mm heads on the body screws.

  3. MacBook Pro 17" Models A1151 A1212 A1229 and A1261 Keyboard Replacement: 步骤 3 中的图像 1,1
    • Lift the memory door up enough to get a grip on it, and slide it toward you, pulling it away from the casing.

  4. MacBook Pro 17" Models A1151 A1212 A1229 and A1261 Keyboard Replacement, Upper Case: 步骤 4 中的图像 1,1
    • Remove the three Phillips screws in the battery compartment near the latch. Apple was nice enough to tilt these screws at a slight angle to make them easier to remove. On the A1261 these screws have 4 mm diameter heads rather than the 3 mm heads on the body screws.

  5. MacBook Pro 17" Models A1151 A1212 A1229 and A1261 Keyboard Replacement: 步骤 5 中的图像 1,1
    • Remove the following six screws:

    • Two 14.5 mm T6 Torx screws on either side of the RAM slot.

    • Four 3.4 mm Phillips screws along the hinge.

  6. MacBook Pro 17" Models A1151 A1212 A1229 and A1261 Keyboard Replacement: 步骤 6 中的图像 1,1
    • Remove the four 3.4 mm Phillips screws on the port side of the computer.

  7. MacBook Pro 17" Models A1151 A1212 A1229 and A1261 Keyboard Replacement: 步骤 7 中的图像 1,1
    • Rotate the computer 90 degrees and remove the two Phillips screws from the rear of the computer.

  8. MacBook Pro 17" Models A1151 A1212 A1229 and A1261 Keyboard Replacement: 步骤 8 中的图像 1,1
    • Rotate the computer 90 degrees again and remove the four Phillips screws from the side of the computer.

  9. MacBook Pro 17" Models A1151 A1212 A1229 and A1261 Keyboard Replacement: 步骤 9 中的图像 1,1
    • Do not yank the upper case off quickly. The case is attached to the logic board via a ribbon cable.

    • Lift up the back of the case and work your fingers along the sides, freeing the case as you go. Once you have freed the sides, you may need to rock the case up and down to free the front of the upper case.

  10. MacBook Pro 17" Models A1151 A1212 A1229 and A1261 Keyboard Replacement: 步骤 10 中的图像 1,1
    • Disconnect the trackpad and keyboard ribbon cable from the logic board.

    • Remove the upper case.

  11. MacBook Pro 17" Models A1151 A1212 A1229 and A1261 Keyboard Replacement, Keyboard: 步骤 11 中的图像 1,1
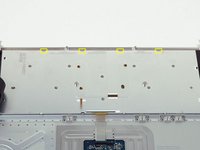
    • Use a spudger to pry up the translucent plastic sheath covering the keyboard connector.

  12. MacBook Pro 17" Models A1151 A1212 A1229 and A1261 Keyboard Replacement: 步骤 12 中的图像 1,1
    • Use the tip of a spudger to flip up the black plastic flaps locking down the keyboard and keyboard backlight ribbon cables.

  13. MacBook Pro 17" Models A1151 A1212 A1229 and A1261 Keyboard Replacement: 步骤 13 中的图像 1,1
    • Slide the orange keyboard backlight ribbon out of its connector.

  14. MacBook Pro 17" Models A1151 A1212 A1229 and A1261 Keyboard Replacement: 步骤 14 中的图像 1,1
    • Peel up the orange tape covering the keyboard backlight connector.

  15. MacBook Pro 17" Models A1151 A1212 A1229 and A1261 Keyboard Replacement: 步骤 15 中的图像 1,1
    • Use the tip of a spudger to flip up the brown plastic flap locking down the keyboard backlight ribbon cable.

  16. MacBook Pro 17" Models A1151 A1212 A1229 and A1261 Keyboard Replacement: 步骤 16 中的图像 1,1
    • Use a spudger or your finger to slide the keyboard backlight ribbon out of its connector.

  17. MacBook Pro 17" Models A1151 A1212 A1229 and A1261 Keyboard Replacement: 步骤 17 中的图像 1,1
    • Carefully peel up the orange ribbon cable which carries the power and sleep signals.

  18. MacBook Pro 17" Models A1151 A1212 A1229 and A1261 Keyboard Replacement: 步骤 18 中的图像 1,1
    • Peel up the two black protective sheaths on the bottom of the keyboard. It is not necessary to fully remove these, but only to peel them back enough to access the screws beneath.

  19. MacBook Pro 17" Models A1151 A1212 A1229 and A1261 Keyboard Replacement: 步骤 19 中的图像 1,2 MacBook Pro 17" Models A1151 A1212 A1229 and A1261 Keyboard Replacement: 步骤 19 中的图像 2,2
    • Remove the ten identical Phillips screws attaching the keyboard to the casing.

    • The keyboard on A1261 models is secured with twelve screws. Their locations are shown in the second picture.

  20. MacBook Pro 17" Models A1151 A1212 A1229 and A1261 Keyboard Replacement: 步骤 20 中的图像 1,2 MacBook Pro 17" Models A1151 A1212 A1229 and A1261 Keyboard Replacement: 步骤 20 中的图像 2,2
    • There are four locking tabs along the back edge of the keyboard holding it in place. These tabs must be straightened before you can remove the keyboard.

    • The keyboard on A1261 models has five locking tabs. Their locations are shown in the second picture.

  21. MacBook Pro 17" Models A1151 A1212 A1229 and A1261 Keyboard Replacement: 步骤 21 中的图像 1,1
    • The first frame shows a tab in the "locked" position and the second frame shows the same tab in the "unlocked" position.

    • Use needlenose pliers or a spudger to bend each of the four tabs so that they are all in the "unlocked" position.

  22. MacBook Pro 17" Models A1151 A1212 A1229 and A1261 Keyboard Replacement: 步骤 22 中的图像 1,1
    • Slide the keyboard ribbon out of its connector.

    • If the keyboard ribbon won't slide out, make sure that the black plastic flap holding the ribbon in place is vertical.

  23. MacBook Pro 17" Models A1151 A1212 A1229 and A1261 Keyboard Replacement: 步骤 23 中的图像 1,1
    • Place the upper casing on its edge and use a spudger to push the keyboard away from the casing, poking the spudger through the central keyboard screw hole. Grasp the keyboard as it separates from the casing.

  24. MacBook Pro 17" Models A1151 A1212 A1229 and A1261 Keyboard Replacement: 步骤 24 中的图像 1,1
    • Maintaining your hold on the keyboard, lay the casing flat and gently bow the keyboard until the two tabs on either side of the keyboard come free.

    • Slide the keyboard away from the trackpad and out of the upper case.

结论

To reassemble your device, follow these instructions in reverse order.

74等其他人完成本指南。

iRobot

于09/24/09注册

1 声望

创作了636篇指南

4条评论

I was able to complete the process but the keyboard backlight does not work. When I press the up/down buttons for the keyboard backlight intensity, the widget for showing the keybaord backlight intensity is displayed on the screen but with a zero with a slash through it and no bars for the intensity. I rechecked the two steps having to do with the backlight cable to ensure it was firmly connected but I still don't get backlight anymore. :(

rgotty - 回复

This is not a problem because your backlight is not broken in any way. Simply try again when it’s dark and it will work properly.

Max Mara -

Grazie ! Guida Eccezzionale ! Cambiata tastiera senza nessun problema !

Francesco Juan R - 回复

hi, can hi use the keyboard of macbook pro 15 A1226 for a macbook pro 17 A1229?

thanks!

posso utilizzare la tastiera del macbook pro 15 A1226 e installarla in un macbook pro 17 A1229?

Grazie!

andreaxausa - 回复

添加评论

浏览统计数据:

过去 24 小时: 1

过去 7 天: 6

过去 30 天: 25

总计 70,612