当前版本的文档还未经巡查,您可以查看最新的已查核版本。
这个步骤还没有翻译 帮忙翻译一下
With the case closed, place the Unibody top-side down on a flat surface.
Depress the grooved side of the access door release latch enough to grab the free end. Lift the release latch until it is vertical.
The access door should now be raised enough to lift it up and out of the Unibody.
在继续操作之前,请确保电池卡扣是垂直的。
抓住半透明的塑料卡扣,将电池向上拉出一体化机。
如果按下卡扣,它将把电池锁定到位。
拧下将下底壳固定到机箱的以下八颗螺丝:
一颗 5.4 mm 菲利普斯十字螺丝。
三颗 14 mm 菲利普斯十字螺丝。
四颗 3.5 mm 菲利普斯十字螺丝。
用两只手提起下底壳,使其脱离上壳体。
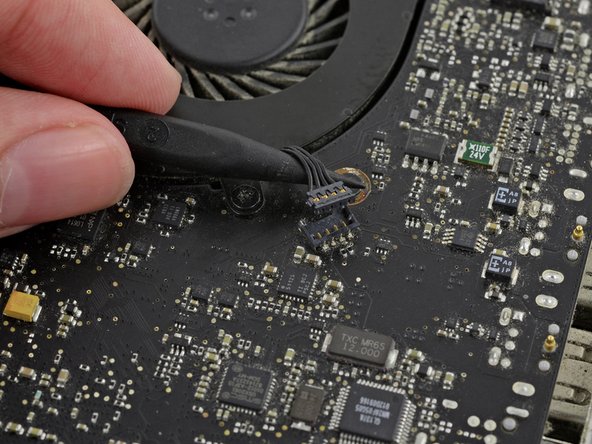
Use a spudger to pry the fan connector straight up off the logic board.
Be sure to only pry up on the connector itself not on the socket or you may damage the machine.
It is useful to twist the spudger axially from beneath the fan cable wires to release the connector.
Remove three 3.5 mm Phillips screws securing the left fan to the upper case and logic board.
Lift the fan out of the upper case.
取消:我没有完成这个指南。
94等其他人完成本指南。
与8其他贡献者
694,707 声望
创作了1,203篇指南
徽章: 54
+ 51更多徽章
Very easy to do following the instructions, Thank you. A word of caution though, The fans screws are really tight so be careful and use a good fitting screw driver. The screw heads are easily damaged.
Poppy - 2020年4月12日 回复
选择一个尺寸并复制下面的代码,将本指南作为一个小插件嵌入到你的网站/论坛中。
过去 24 小时: 2
过去 7 天: 10
过去 30 天: 24
总计 55,472