跳转到主内容

当前版本的文档还未经巡查,您可以查看最新的已查核版本

你所需要的

  1. 这个步骤还没有翻译 帮忙翻译一下

    : 步骤 1 中的图像 1,2 : 步骤 1 中的图像 2,2
    • With the case closed, place the Unibody top-side down on a flat surface.

    • Depress the grooved side of the access door release latch enough to grab the free end. Lift the release latch until it is vertical.

  2. 这个步骤还没有翻译 帮忙翻译一下

    : 步骤 2 中的图像 1,1
    • The access door should now be raised enough to lift it up and out of the Unibody.

  3. , 电池: 步骤 3 中的图像 1,1
    • 在继续操作之前,请确保电池卡扣是垂直的。

    • 抓住半透明的塑料卡扣,将电池向上拉出一体化机。

    • 如果按下卡扣,它将把电池锁定到位。

  4. , 底壳: 步骤 4 中的图像 1,1
    • 拧下将下底壳固定到机箱的以下八颗螺丝:

    • 一颗 5.4 mm 菲利普斯十字螺丝。

    • 三颗 14 mm 菲利普斯十字螺丝。

    • 四颗 3.5 mm 菲利普斯十字螺丝。

  5. : 步骤 5 中的图像 1,1
    • 用两只手提起下底壳,使其脱离上壳体。

  6. 这个步骤还没有翻译 帮忙翻译一下

    : 步骤 6 中的图像 1,2 : 步骤 6 中的图像 2,2
    • If necessary, peel the EMI gasket off the camera cable connector.

    • Disconnect the camera cable by pulling the male end straight away from its socket toward the optical drive opening.

    • Do not try to lift this connector straight up off the board. Pull the connector parallel to the face of the logic board.

    • Deroute the camera data cable from the channel in the optical drive.

  7. 这个步骤还没有翻译 帮忙翻译一下

    : 步骤 7 中的图像 1,2 : 步骤 7 中的图像 2,2
    • Remove the two Phillips screws securing the camera cable bracket to the upper case.

    • The leftmost screw may remain captive in the camera cable.

    • Seperate the camera cable bracket from the camera cable and remove it from the computer.

  8. 这个步骤还没有翻译 帮忙翻译一下

    : 步骤 8 中的图像 1,2 : 步骤 8 中的图像 2,2
    • Grab the plastic pull tab secured to the LVDS cable lock and rotate it toward the DC-in side of the computer.

    • Pull the LVDS connector straight away from its socket.

    • When disconnecting the LVDS cable, do not pull on the black tab secured to the LVDS cable lock. We recommend wiggling the cable while applying tension to slowly "walk" the connector out of its socket.

  9. 这个步骤还没有翻译 帮忙翻译一下

    : 步骤 9 中的图像 1,2 : 步骤 9 中的图像 2,2
    • Remove the 7 mm Phillips screw from the LVDS cable bracket.

    • This screw may remain captive in the LVDS cable.

    • Lift the LVDS cable bracket out of the upper case.

  10. 这个步骤还没有翻译 帮忙翻译一下

    : 步骤 10 中的图像 1,1
    • Remove the two outer 6 mm Torx screws securing each side of the display to the upper case (four screws total).

  11. 这个步骤还没有翻译 帮忙翻译一下

    : 步骤 11 中的图像 1,1
    • Open your MacBook Pro so the display is perpendicular to the upper case.

    • Place your opened MacBook Pro on a table as pictured.

    • While holding the display and upper case together with your other hand, remove the 6 mm Torx screw from the lower display bracket.

  12. 这个步骤还没有翻译 帮忙翻译一下

    : 步骤 12 中的图像 1,1
    • Be sure to hold the display and upper case together with your other hand. Failure to do so may cause the freed display/upper case to fall, potentially damaging each component.

    • Remove the last remaining 6 mm Torx screw securing the display to the upper case.

  13. 这个步骤还没有翻译 帮忙翻译一下

    : 步骤 13 中的图像 1,3 : 步骤 13 中的图像 2,3 : 步骤 13 中的图像 3,3
    • Grab the upper case with your right hand and rotate it slightly toward the top of the display so the upper display bracket clears the edge of the upper case.

    • Rotate the display slightly away from the upper case.

    • Lift the display away from the upper case, minding any brackets or cables that may get caught.

  14. 这个步骤还没有翻译 帮忙翻译一下

    : 步骤 14 中的图像 1,2 : 步骤 14 中的图像 2,2
    • In the following steps, you will use a heat gun to soften the adhesive securing the outer black border around the underside of the front glass panel to the display. The area the adhesive is applied to is shown in red in the second picture.

    • Before starting, be sure to clean the display glass with lint-free cloth moistened with a mild solution; it will make the suction cup adhere better, and will make checking for dust on reassembly easier

    • With the heat gun set to low, start by heating the outer black border near the upper right corner of the glass panel.

    • Always aim the heat gun away from the soft rubber strip around the display glass. Heating the rubber will cause it to melt slightly, turning its finish from matte to glossy. Touching overheated rubber can cause it to permanently deform.

    • Due to the heat applied, it is normal for a layer of condensation to develop on the inside of the glass panel and/or the outside of the LCD. It can be removed with glass cleaner once the glass is separated from the display.

  15. 这个步骤还没有翻译 帮忙翻译一下

    : 步骤 15 中的图像 1,3 : 步骤 15 中的图像 2,3 : 步骤 15 中的图像 3,3
    在这个步骤中使用的工具:
    Heavy-Duty Suction Cups (Pair)
    $14.95
    购买
    • With the panel sufficiently heated, fasten a heavy-duty suction cup near the upper right corner of the display glass.

    • Don't fasten the suction cup on top of the rubber strip around the edge of the display glass.

    • To attach the suction cups we sell, first position the suction cup with the movable handle parallel to the face of the glass panel. While lightly holding the suction cup against the glass, raise the movable handle until it is parallel with the other handle.

    • Slowly and gently pull the corner of the display glass up off the display assembly.

    • If only the top edge of the glass lifts up (as seen in the third picture), repeat steps one and two until you can lift up the corner of the panel.

  16. 这个步骤还没有翻译 帮忙翻译一下

    : 步骤 16 中的图像 1,3 : 步骤 16 中的图像 2,3 : 步骤 16 中的图像 3,3
    • Gently lift the corner of the display glass enough to insert a spudger between it and the display assembly.

    • Use the flat end of a spudger to gently pry up the adhesive securing the front glass to the display.

    • Pry up the glass panel a few inches away from the upper right corner along the top and right edges of the display.

  17. 这个步骤还没有翻译 帮忙翻译一下

    : 步骤 17 中的图像 1,2 : 步骤 17 中的图像 2,2
    • Use a heat gun to soften the adhesive under the black strip along the right side of the front glass panel.

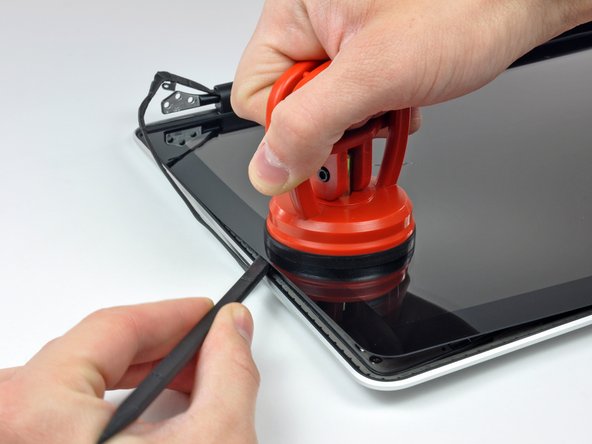
    • Attach a suction cup along the right side of the front glass panel.

    • Pull up on the glass panel while you use the flat end of a spudger to separate it from the rest of the display assembly.

    • Continue working along the right edge of the front display glass until it is separated from the display.

    • It may be helpful to use a guitar pick or another thin plastic object to keep the upper right corner of the front glass panel from sticking back down to the display assembly.

  18. 这个步骤还没有翻译 帮忙翻译一下

    : 步骤 18 中的图像 1,2 : 步骤 18 中的图像 2,2
    • Use your heat gun to soften the adhesive under the black strip along the top edge of the glass display panel.

    • Attach a suction cup near the top edge of the glass display panel and use it to pull the glass panel up off the display.

    • Work along the top edge of the glass panel, carefully using the flat end of a spudger to separate the adhesive if necessary.

  19. 这个步骤还没有翻译 帮忙翻译一下

    : 步骤 19 中的图像 1,2 : 步骤 19 中的图像 2,2
    • Use a heat gun to soften the adhesive under the black strip near the upper left corner of the glass display panel.

    • Attach a suction cup near the upper left corner of the glass display panel.

    • Pull up on the suction cup and use the flat end of a spudger to carefully pry the glass display panel out of the display assembly.

    • Once the upper left corner has been separated from the display, it may be helpful to use a guitar pick or another thin plastic object to keep the glass from sticking back down to the display assembly.

  20. 这个步骤还没有翻译 帮忙翻译一下

    : 步骤 20 中的图像 1,2 : 步骤 20 中的图像 2,2
    • Use a heat gun to soften the adhesive under the black strip along the left side of the front glass panel.

    • Attach a suction cup along the left side of the front glass panel.

    • Pull up on the glass panel while you use the flat end of a spudger to separate it from the rest of the display assembly.

    • Continue working along the left edge of the front display glass until it is separated from the display.

  21. 这个步骤还没有翻译 帮忙翻译一下

    : 步骤 21 中的图像 1,2 : 步骤 21 中的图像 2,2
    • Now that the top, left, and right edges of the glass are free from the display, slowly lift the top edge of the glass panel and gently rotate it out of the display.

    • If necessary, use the flat end of a spudger to free the bottom edge of the glass display panel from the display assembly.

    • Before reassembling, be sure to clean both the inside of the glass display panel and the LCD as any dust or fingerprints trapped inside will be annoyingly visible when the machine is on.

  22. 这个步骤还没有翻译 帮忙翻译一下

    : 步骤 22 中的图像 1,2 : 步骤 22 中的图像 2,2
    • Insert the edge of a plastic opening tool between the display glass and the camera bracket, and run it around the camera bracket to separate it from the display glass.

    • Do not forget to stick the camera bracket down to the new front display glass before reassembly.

  23. 这个步骤还没有翻译 帮忙翻译一下

    : 步骤 23 中的图像 1,3 : 步骤 23 中的图像 2,3 : 步骤 23 中的图像 3,3
    • During the glass removal process, the camera cable may stick to the adhesive on the glass panel, disconnecting it from the camera board as the panel is lifted. If your camera cable is still connected to the camera board, skip this step.

    • To reconnect the cable, first use the tip of a spudger to remove the piece of foam tape over the camera cable ZIF socket.

    • Use the tip of a spudger to flip up the ZIF cable retainer on the camera cable socket.

    • Insert the camera cable into its socket on the camera board and use the tip of a spudger to snap down the ZIF cable retainer, locking the cable in place.

    • Reapply the piece of tape covering the camera cable socket.

终点

30等其他人完成本指南。

0条评论

添加评论

浏览统计数据:

过去 24 小时: 2

过去 7 天: 6

过去 30 天: 26

总计 39,555