跳转到主内容

本指南有最近更改,您可查看未经巡查的最新版本

MacBook Pro 15" Core Duo Model A1150 Clutch Assembly Replacement

仅作为前提条件
本指南仅用作其他指南的先决条件。不能单独食用。

你所需要的

  1. MacBook Pro 15" Core Duo Model A1150 Clutch Assembly Replacement, Clutch Assembly: 步骤 1 中的图像 1,2 MacBook Pro 15" Core Duo Model A1150 Clutch Assembly Replacement, Clutch Assembly: 步骤 1 中的图像 2,2
    • Remove the pieces of yellow kapton tape from the bottom left corner of the display.

    • Peel the three green antenna ground straps off the copper tape along the bottom edge of the LCD.

    • The adhesive connecting these straps to the display is very strong. An edged tool is helpful to separate the adhesive while you peel the straps off.

    • Remove the piece of tape securing the camera cable to the LCD.

  2. MacBook Pro 15" Core Duo Model A1150 Clutch Assembly Replacement: 步骤 2 中的图像 1,2 MacBook Pro 15" Core Duo Model A1150 Clutch Assembly Replacement: 步骤 2 中的图像 2,2
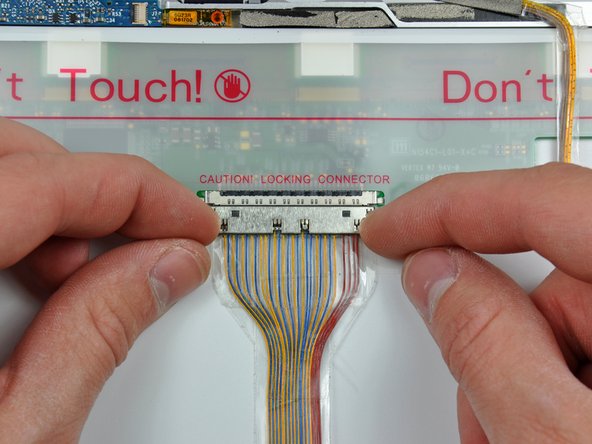
    • Remove the pieces of tape covering the display data cable and camera cable connectors.

    • Carefully peel the camera cable off the foam tape along the top edge of the LCD.

  3. MacBook Pro 15" Core Duo Model A1150 Clutch Assembly Replacement: 步骤 3 中的图像 1,2 MacBook Pro 15" Core Duo Model A1150 Clutch Assembly Replacement: 步骤 3 中的图像 2,2
    • Gently pull the camera cable away from its socket on the camera board.

    • Pull the display data cable connector away from its socket on the LCD.

    • Pull both cables parallel to the face of the logic board.

  4. MacBook Pro 15" Core Duo Model A1150 Clutch Assembly Replacement: 步骤 4 中的图像 1,2 MacBook Pro 15" Core Duo Model A1150 Clutch Assembly Replacement: 步骤 4 中的图像 2,2
    • If you have a Core Duo machine, refer to picture 1 and remove three Phillips screws connecting the clutch assembly to the lower edge of the front display bezel near the display data cable.

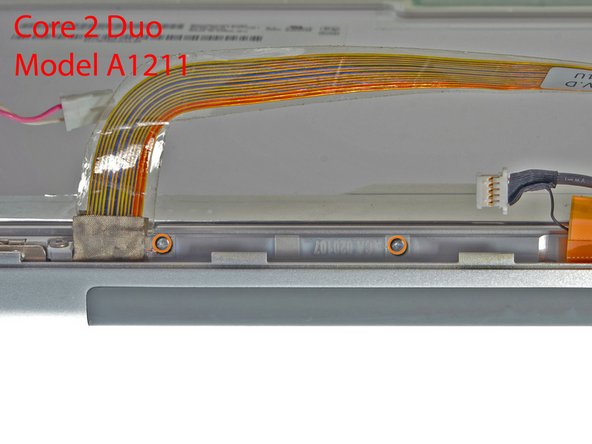
    • If you have a Core 2 Duo Model A1211 machine, refer to picture 2 and remove two Phillips screws connecting the clutch assembly to the lower edge of the front display bezel near the display data cable.

  5. MacBook Pro 15" Core Duo Model A1150 Clutch Assembly Replacement: 步骤 5 中的图像 1,1
    • Remove the small Phillips screw from behind the display data cable.

    • Remove the small rectangular steel bracket by sliding it away from the right clutch hinge.

    • If you have a Core 2 Duo Model A1211, there is no steel bracket. Simply remove the screw and continue to the next step.

  6. MacBook Pro 15" Core Duo Model A1150 Clutch Assembly Replacement: 步骤 6 中的图像 1,1
    • Remove three Phillips screws attaching the clutch assembly to the lower edge of the front display bezel.

    • The inverter cable ground loop is a very thin and delicate wire. Work gently.

  7. MacBook Pro 15" Core Duo Model A1150 Clutch Assembly Replacement: 步骤 7 中的图像 1,2 MacBook Pro 15" Core Duo Model A1150 Clutch Assembly Replacement: 步骤 7 中的图像 2,2
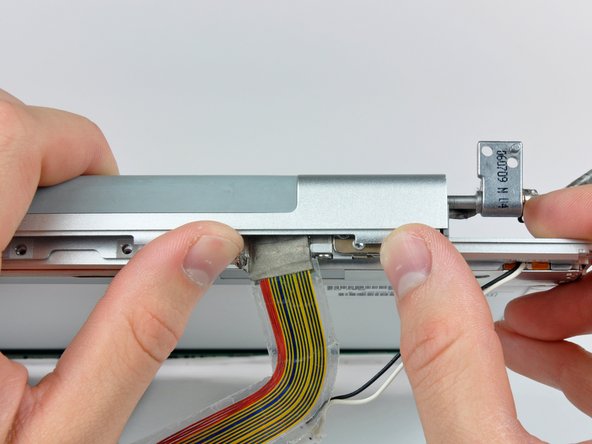
    • Push the open edge of the clutch cover away from the left clutch hinge to pop it off the clips attaching the two parts.

    • If necessary, repeat this process for the right side of the clutch assembly.

    • Remove the clutch assembly from the front display bezel.

结论

To reassemble your device, follow these instructions in reverse order.

0条评论

添加评论

浏览统计数据:

过去 24 小时: 0

过去 7 天: 0

过去 30 天: 0

总计 935