跳转到主内容

MacBook Pro 15" Core 2 Duo Models A1226 and A1260 Right Fan Replacement

你所需要的

  1. MacBook Pro 15" Core 2 Duo Models A1226 and A1260 Right Fan Replacement, Battery: 步骤 1 中的图像 1,3 MacBook Pro 15" Core 2 Duo Models A1226 and A1260 Right Fan Replacement, Battery: 步骤 1 中的图像 2,3 MacBook Pro 15" Core 2 Duo Models A1226 and A1260 Right Fan Replacement, Battery: 步骤 1 中的图像 3,3
    • Use your fingers to push both battery release tabs away from the battery, and lift the battery out of the computer.

  2. MacBook Pro 15" Core 2 Duo Models A1226 and A1260 Right Fan Replacement, RAM Shield: 步骤 2 中的图像 1,2 MacBook Pro 15" Core 2 Duo Models A1226 and A1260 Right Fan Replacement, RAM Shield: 步骤 2 中的图像 2,2
    • Remove the three identical 2mm Phillips screws from the memory door.

    • Lift the memory door up enough to grip it and slide it toward you, pulling it away from the casing.

  3. MacBook Pro 15" Core 2 Duo Models A1226 and A1260 Right Fan Replacement, Upper Case: 步骤 3 中的图像 1,1
    • Remove the two 2.8 mm Phillips screws in the battery compartment near the latch.

  4. MacBook Pro 15" Core 2 Duo Models A1226 and A1260 Right Fan Replacement: 步骤 4 中的图像 1,1
    • Remove the following 6 screws:

    • Two 10 mm T6 Torx screws on either side of the RAM slot.

    • Four 14.5 mm Phillips screws along the hinge.

  5. MacBook Pro 15" Core 2 Duo Models A1226 and A1260 Right Fan Replacement: 步骤 5 中的图像 1,1
    • Remove the four 3.2 mm PH00 Phillips screws on the port side of the computer.

  6. MacBook Pro 15" Core 2 Duo Models A1226 and A1260 Right Fan Replacement: 步骤 6 中的图像 1,1
    • Rotate the computer 90 degrees and remove the two 3.2 mm Phillips screws from the rear of the computer.

  7. MacBook Pro 15" Core 2 Duo Models A1226 and A1260 Right Fan Replacement: 步骤 7 中的图像 1,1
    • Rotate the computer 90 degrees again and remove the four 3.2 mm Phillips screws from the side of the computer.

  8. MacBook Pro 15" Core 2 Duo Models A1226 and A1260 Right Fan Replacement: 步骤 8 中的图像 1,3 MacBook Pro 15" Core 2 Duo Models A1226 and A1260 Right Fan Replacement: 步骤 8 中的图像 2,3 MacBook Pro 15" Core 2 Duo Models A1226 and A1260 Right Fan Replacement: 步骤 8 中的图像 3,3
    • Do not yank the upper case off quickly. The case is attached to the logic board via a ribbon cable.

    • Lift up at the rear of the case and work your fingers along the sides, freeing the case as you go. Once you have freed the sides, you may need to rock the case up and down to free the front of the upper case.

    • There are four plastic clips above the DVD slot, and another above and to the left of the IR sensor. These clips can be very difficult to disengage without prying. They can also be difficult to re-engage during reassembly.

    • Reassembly Tip: Press down firmly on the tip of the top case above the location of each clip until you hear a snap to reseat them in their slots.

    • Reassembly Tip: The two center DVD clips will rarely snap back into place properly without help, and downward pressure will instead simply deform the frame around the DVD slot. Support the frame by inserting a plastic spudger into the DVD slot directly under the clip location until it is snug, then press down until you hear the snap.

  9. MacBook Pro 15" Core 2 Duo Models A1226 and A1260 Right Fan Replacement: 步骤 9 中的图像 1,2 MacBook Pro 15" Core 2 Duo Models A1226 and A1260 Right Fan Replacement: 步骤 9 中的图像 2,2
    • Disconnect the trackpad and keyboard ribbon cable from the logic board, removing tape as necessary.

    • Note: It is possible to replace the hard drive without disconnecting the keyboard from the chassis, but it will need to be held upright to keep it out of the way, while still allowing you both hands to work on the drive removal.

    • Be careful when removing the keyboard-trackpad ribbon cable to ensure that the rear of the upper case is disengaged from the area near the hinge. It is easy to accidentally bend the screw receivers on either side of the keyboard.

    • Remove the upper case.

  10. MacBook Pro 15" Core 2 Duo Models A1226 and A1260 Right Fan Replacement, Right Fan: 步骤 10 中的图像 1,1
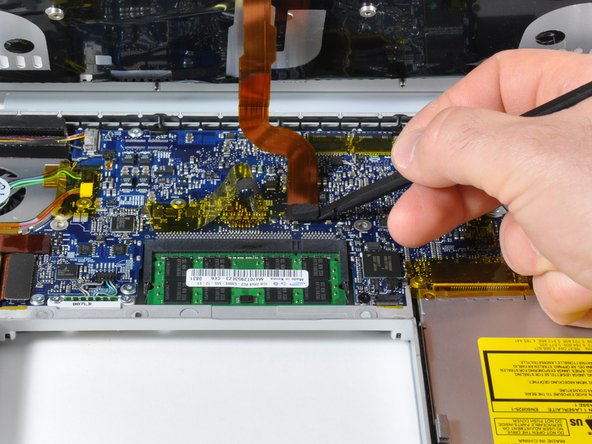
    • Disconnect the right fan cable from the logic board by placing a spudger beneath the cable and lifting up. Be sure to lift up on the right side as shown.

  11. MacBook Pro 15" Core 2 Duo Models A1226 and A1260 Right Fan Replacement: 步骤 11 中的图像 1,2 MacBook Pro 15" Core 2 Duo Models A1226 and A1260 Right Fan Replacement: 步骤 11 中的图像 2,2
    • Remove the three silver T6 Torx screws securing the right fan to the logic board and lower case.

    • Lift the right fan up and carefully peel up the tape securing the fan to the heat sink as you go.

结论

To reassemble your device, follow these instructions in reverse order.

254等其他人完成本指南。

8条评论

Excellent guide and pictures. I took the advise of several others and cleaned and lubed the fans, and had super results.

Mike Martin - 回复

ok, so i started hearing a grinding noise from my computer and i thought it was just dirty and i went online to out how to do that. i came upon this website and found out that here you can find out about anything when i came to DIY. well the grinding noise was got worse and worse and found out that the right fan was the cause and it was a common issue to this version of the macbook pro. so ig ot the part and just put it in. its so quiet now as it was when i bought it. thank you for being here. i love this website. this is so user friendly and am already recommending this website to all my friends.

nfleisher - 回复

Thanks for the awesome feedback, nfleisher! Glad to hear your repair was a success.

Andrew Optimus Goldheart -

Complete success, I downloaded a fan control app after I heard the grinding noise that I think most readers of this guide are familiar with. My fan was dropping into the 200rpm range and I had placed a box fan underneath the computer to keep the thing cool while I waited for the new fan unit to arrive. The guide was straightforward and pointed out a few of the problem areas that I might not have noticed without the prior heads up. The one addition that my IT friend pointed out to me is to make sure not to put the screws into the wrong holes during reassembly of step 5. There are two holes on either side of the DVI port and apparently once you mistakenly drop a screw into one of those holes its gone for good. Thank you so much, I could not have done this without this site.

dan - 回复

Your guides are amazing! I printed out the PDF, punched tiny holes on the red circles to place removed screws, and just followed along. 10 minutes later, POOF! No more screeching fan, and all the screws went back where they belong! Awesome!

mjsadvocate1 - 回复

添加评论

浏览统计数据:

过去 24 小时: 0

过去 7 天: 6

过去 30 天: 20

总计 89,289