跳转到主内容

当前版本的文档还未经巡查,您可以查看最新的已查核版本

你所需要的

  1. 这个步骤还没有翻译 帮忙翻译一下

    : 步骤 1 中的图像 1,3 : 步骤 1 中的图像 2,3 : 步骤 1 中的图像 3,3
    • Use your fingers to push both battery release tabs away from the battery, and lift the battery out of the computer.

  2. 这个步骤还没有翻译 帮忙翻译一下

    : 步骤 2 中的图像 1,2 : 步骤 2 中的图像 2,2
    • Remove the three identical 2mm Phillips screws from the memory door.

    • Lift the memory door up enough to grip it and slide it toward you, pulling it away from the casing.

  3. 这个步骤还没有翻译 帮忙翻译一下

    : 步骤 3 中的图像 1,1
    • Remove the two 2.8 mm Phillips screws in the battery compartment near the latch.

  4. 这个步骤还没有翻译 帮忙翻译一下

    : 步骤 4 中的图像 1,1
    • Remove the following 6 screws:

    • Two 10 mm T6 Torx screws on either side of the RAM slot.

    • Four 14.5 mm Phillips screws along the hinge.

  5. 这个步骤还没有翻译 帮忙翻译一下

    : 步骤 5 中的图像 1,1
    • Remove the four 3.2 mm PH00 Phillips screws on the port side of the computer.

  6. 这个步骤还没有翻译 帮忙翻译一下

    : 步骤 6 中的图像 1,1
    • Rotate the computer 90 degrees and remove the two 3.2 mm Phillips screws from the rear of the computer.

  7. 这个步骤还没有翻译 帮忙翻译一下

    : 步骤 7 中的图像 1,1
    • Rotate the computer 90 degrees again and remove the four 3.2 mm Phillips screws from the side of the computer.

  8. 这个步骤还没有翻译 帮忙翻译一下

    : 步骤 8 中的图像 1,3 : 步骤 8 中的图像 2,3 : 步骤 8 中的图像 3,3
    • Do not yank the upper case off quickly. The case is attached to the logic board via a ribbon cable.

    • Lift up at the rear of the case and work your fingers along the sides, freeing the case as you go. Once you have freed the sides, you may need to rock the case up and down to free the front of the upper case.

    • There are four plastic clips above the DVD slot, and another above and to the left of the IR sensor. These clips can be very difficult to disengage without prying. They can also be difficult to re-engage during reassembly.

    • Reassembly Tip: Press down firmly on the tip of the top case above the location of each clip until you hear a snap to reseat them in their slots.

    • Reassembly Tip: The two center DVD clips will rarely snap back into place properly without help, and downward pressure will instead simply deform the frame around the DVD slot. Support the frame by inserting a plastic spudger into the DVD slot directly under the clip location until it is snug, then press down until you hear the snap.

  9. 这个步骤还没有翻译 帮忙翻译一下

    : 步骤 9 中的图像 1,2 : 步骤 9 中的图像 2,2
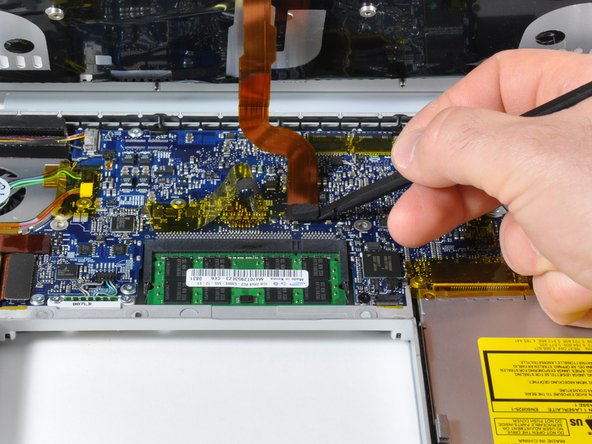
    • Disconnect the trackpad and keyboard ribbon cable from the logic board, removing tape as necessary.

    • Note: It is possible to replace the hard drive without disconnecting the keyboard from the chassis, but it will need to be held upright to keep it out of the way, while still allowing you both hands to work on the drive removal.

    • Be careful when removing the keyboard-trackpad ribbon cable to ensure that the rear of the upper case is disengaged from the area near the hinge. It is easy to accidentally bend the screw receivers on either side of the keyboard.

    • Remove the upper case.

  10. 这个步骤还没有翻译 帮忙翻译一下

    : 步骤 10 中的图像 1,1
    • Disconnect the two or three antenna cables attached to the Airport Extreme card. Depending on your model, one of the three cables may be unused and capped with a black shrink tube.

    • Apple was kind enough to include a label showing where each color antenna cable plugs in - just make sure to look at this when reconnecting the antenna cables.

  11. 这个步骤还没有翻译 帮忙翻译一下

    : 步骤 11 中的图像 1,1
    • Deroute the Airport antenna cables from their channel in the left speaker.

  12. 这个步骤还没有翻译 帮忙翻译一下

    : 步骤 12 中的图像 1,1
    • Disconnect the iSight cable from the logic board by sliding the cable to the left and out of its connector.

  13. 这个步骤还没有翻译 帮忙翻译一下

    : 步骤 13 中的图像 1,1
    • Support the display with one hand while removing the following screws:

    • One 9.5 mm silver T6 Torx screw with threads on only 3 mm of the shaft on the inside of the display hinges.

    • One 9.5 mm silver T6 Torx screw with threads on the entire shaft on the outside of the left hinge.

    • One 9.2 mm full thread T6 Torx screw securing the iSight cable ground loop to the fan.

  14. 这个步骤还没有翻译 帮忙翻译一下

    : 步骤 14 中的图像 1,1
    • Disconnect the inverter cable from the left I/O board by placing a spudger beneath the cable and lifting up.

  15. 这个步骤还没有翻译 帮忙翻译一下

    : 步骤 15 中的图像 1,2 : 步骤 15 中的图像 2,2
    • Disconnect the display data cable from the logic board.

    • Remove the foam bumper from the top of the right hinge of the display.

  16. 这个步骤还没有翻译 帮忙翻译一下

    : 步骤 16 中的图像 1,1
    • Remove the silver 9.2 mm T6 Torx securing the ground loop in the display data cable to the casing.

  17. 这个步骤还没有翻译 帮忙翻译一下

    : 步骤 17 中的图像 1,1
    • Support the display with one hand while removing the following screw:

    • One 9.5 mm silver T6 Torx screw with threads on only 3 mm of the shaft on the inside of the display hinges.

  18. 这个步骤还没有翻译 帮忙翻译一下

    : 步骤 18 中的图像 1,1
    • Grasp the display assembly on both sides and lift it up and out of the computer.

  19. 这个步骤还没有翻译 帮忙翻译一下

    : 步骤 19 中的图像 1,2 : 步骤 19 中的图像 2,2
    • Remove the 4.5 mm Phillips screws from the lower left and right corners of the display (two screws total). These screws have a .8 mm thick head.

  20. 这个步骤还没有翻译 帮忙翻译一下

    : 步骤 20 中的图像 1,3 : 步骤 20 中的图像 2,3 : 步骤 20 中的图像 3,3
    • Insert the flat end of a spudger perpendicular to the face of the display between the plastic strip attached to the rear bezel and the front bezel.

    • Do not insert your spudger between the plastic strip and the rear bezel.

    • With the spudger still inserted, rotate it away from the display to separate the front and rear bezels.

    • Work along the right edge of the display until the rear bezel is evenly separated from the front bezel.

  21. 这个步骤还没有翻译 帮忙翻译一下

    : 步骤 21 中的图像 1,2 : 步骤 21 中的图像 2,2
    • Insert your spudger between the front and rear display bezels at the lower right corner of the display.

    • Pry the rear bezel away from the front bezel to slightly separate the bottom edge of the rear display bezel.

  22. 这个步骤还没有翻译 帮忙翻译一下

    : 步骤 22 中的图像 1,2 : 步骤 22 中的图像 2,2
    • Insert the flat end of a spudger into the gap between the rear display bezel and the clutch cover.

    • Twist the spudger to separate the lower edge of the rear display bezel from the clutch cover.

    • Work along the lower edge of the rear bezel until it is evenly separated from the clutch cover.

  23. 这个步骤还没有翻译 帮忙翻译一下

    : 步骤 23 中的图像 1,3 : 步骤 23 中的图像 2,3 : 步骤 23 中的图像 3,3
    • Now that the right and bottom edges of the rear bezel are slightly separated from the front bezel, use a spudger to pop the rear bezel off the tabs near the lower right corner of the display.

  24. 这个步骤还没有翻译 帮忙翻译一下

    : 步骤 24 中的图像 1,2 : 步骤 24 中的图像 2,2
    • Insert the flat end of a spudger between the front bezel and the plastic strip attached to the rear bezel near the screw holes at the bottom corners of the display.

    • Rotate your spudger toward the rear bezel to separate it from the front bezel.

    • If necessary, continue separating the left edge of the rear bezel off the tabs on the front display bezel.

  25. 这个步骤还没有翻译 帮忙翻译一下

    : 步骤 25 中的图像 1,1
终点

20等其他人完成本指南。

0条评论

添加评论

浏览统计数据:

过去 24 小时: 2

过去 7 天: 5

过去 30 天: 10

总计 26,226