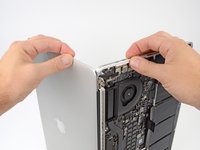
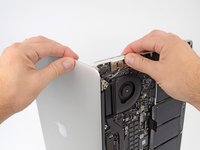
跳转到主内容

MacBook Pro 15"(2013年末)(Retina显示器)屏幕组件更换

你所需要的

  1. MacBook Pro 15"(2013年末)(Retina显示器)屏幕组件更换, 后盖: 步骤 1 中的图像 1,1
    • 将固定 MacBook Pro 后盖的 P5 五角螺丝拆掉:

    • 8颗 3.0mm 螺丝

    • 2颗 2.3mm 螺丝

  2. MacBook Pro 15"(2013年末)(Retina显示器)屏幕组件更换: 步骤 2 中的图像 1,1
    • 从后盖盖和主机壳夹扣处抬起,从 MacBook Pro上取下后盖。

    • 将取下的后盖放到一边。

  3. MacBook Pro 15"(2013年末)(Retina显示器)屏幕组件更换, 电池连接器: 步骤 3 中的图像 1,1
    • 揭开盖住电池接口的警告标签。

  4. MacBook Pro 15"(2013年末)(Retina显示器)屏幕组件更换: 步骤 4 中的图像 1,2 MacBook Pro 15"(2013年末)(Retina显示器)屏幕组件更换: 步骤 4 中的图像 2,2
    • 使用撬棒平头的那端,轻轻地将电池接口直接从逻辑板上的插座中撬出。

    • 弯曲电池电缆,确保电池接口不会意外接触逻辑板。

  5. MacBook Pro 15"(2013年末)(Retina显示器)屏幕组件更换, AirPort/相机线缆: 步骤 5 中的图像 1,1
    • 使用撬棒尖端来将三条AirPort天线线缆从 AirPort 板上的插座中径直翘起。

    • 此线缆的连接插口很脆弱。请注意分离位置是在连接器上方链接部分而不是在底插或线缆处。

    • 重新插回时可以在小心的对准插口位置后利用撬棒较宽的平面部分水平发力下按。

  6. MacBook Pro 15"(2013年末)(Retina显示器)屏幕组件更换: 步骤 6 中的图像 1,1
    • 使用撬棒的尖端来推动相机线缆位于逻辑板插座上的链接头。

    • 照片中的插头有六个接口,但有些型号是有十二个接口。这两种型号拔出插头的过程是相同的。

    • 如果相机排线的插头很难从主板上拔出,请将风扇上的橡胶盖向后折叠使相机排线露出。在轻拉排线的同时使用撬棒将插头轻轻推出插座

    • 请确保推动方向与主板相平行,先推动一侧,然后让链接头从插座中“走”出来。如果强行将其撬起则会有损坏部件的可能。

  7. MacBook Pro 15"(2013年末)(Retina显示器)屏幕组件更换: 步骤 7 中的图像 1,3 MacBook Pro 15"(2013年末)(Retina显示器)屏幕组件更换: 步骤 7 中的图像 2,3 MacBook Pro 15"(2013年末)(Retina显示器)屏幕组件更换: 步骤 7 中的图像 3,3
    • 在右侧散热风扇橡胶垫下方插入撬棒扁平的一端。

    • 在下方滑动,来分离粘合剂。

    • 抬起翻开,你就可以靠近下方的线缆了。

  8. MacBook Pro 15"(2013年末)(Retina显示器)屏幕组件更换: 步骤 8 中的图像 1,3 MacBook Pro 15"(2013年末)(Retina显示器)屏幕组件更换: 步骤 8 中的图像 2,3 MacBook Pro 15"(2013年末)(Retina显示器)屏幕组件更换: 步骤 8 中的图像 3,3
    • 使用手指来将 AirPort和摄像头线缆从风扇上剥离。

    • 线缆粘附于风扇上,所以请小心剥离以免损伤。

    • 小心地将电缆从塑料电缆导轨上卸下。

  9. MacBook Pro 15"(2013年末)(Retina显示器)屏幕组件更换, 显示器组件: 步骤 9 中的图像 1,2 MacBook Pro 15"(2013年末)(Retina显示器)屏幕组件更换, 显示器组件: 步骤 9 中的图像 2,2
    • 使用撬棒的尖端撬开铰链的盖子,设备两侧各有一个

  10. MacBook Pro 15"(2013年末)(Retina显示器)屏幕组件更换: 步骤 10 中的图像 1,2 MacBook Pro 15"(2013年末)(Retina显示器)屏幕组件更换: 步骤 10 中的图像 2,2
    • 卸下将铝制铰链盖固定到上壳的两颗 3.1 毫米 T5 Torx 螺钉。

    • 从 MacBook Pro 上卸下两个铝制铰链支架。

  11. MacBook Pro 15"(2013年末)(Retina显示器)屏幕组件更换: 步骤 11 中的图像 1,3 MacBook Pro 15"(2013年末)(Retina显示器)屏幕组件更换: 步骤 11 中的图像 2,3 MacBook Pro 15"(2013年末)(Retina显示器)屏幕组件更换: 步骤 11 中的图像 3,3
    • 使用撬棒的尖端撬起显示屏数据线锁并将其向电源接口的方向旋转。

    • 将显示数据线直接从主板上的插座中拔出。

    • 请勿抬起显示器数据线,因为其插座非常脆弱。将排线平行于主板表面拉动。

  12. MacBook Pro 15"(2013年末)(Retina显示器)屏幕组件更换: 步骤 12 中的图像 1,1
    • 拧下将显示屏固定到上壳的六颗 5.3 毫米 T8 Torx 螺钉中的四颗。

    • 我们特意让你留下一颗螺钉将显示屏固定到上壳上,以帮助后续步骤。

    • 重新组装时,确保螺钉穿过摄像头/AirPort电缆上的两个接地环。

  13. MacBook Pro 15"(2013年末)(Retina显示器)屏幕组件更换: 步骤 13 中的图像 1,1
    • 将 MacBook Pro 打开约 110 度,并将其侧放在桌子上,如图所示。

    • 用左手将显示屏和上壳固定在一起,然后从下部(靠近桌子的一侧)显示屏支架上卸下剩余的 T8 Torx 螺钉。

  14. MacBook Pro 15"(2013年末)(Retina显示器)屏幕组件更换: 步骤 14 中的图像 1,1
    • 请务必用左手握住显示屏和上壳。否则可能会导致松开的显示屏/上壳掉落,从而可能损坏每个组件。

    • 用左手将显示屏和上壳固定在一起,然后从上显示屏支架上卸下剩余的 T8 Torx 螺钉。

  15. MacBook Pro 15"(2013年末)(Retina显示器)屏幕组件更换: 步骤 15 中的图像 1,3 MacBook Pro 15"(2013年末)(Retina显示器)屏幕组件更换: 步骤 15 中的图像 2,3 MacBook Pro 15"(2013年末)(Retina显示器)屏幕组件更换: 步骤 15 中的图像 3,3
    • 握住设备的两半,两手各自握住一边

    • 轻轻向前推动设备的下半部分,将其与显示屏组件分离。

    • 小心地将每个部件放在一边,确保下半部分键盘朝下。

结论

按照相反的步骤来重新组装你的设备。

138等其他人完成本指南。

由衷感谢以下译者:

en zh

100%

我叫小灰宇_Alex-Z正在帮助我们修复这个世界! 您也想加入吗?
开始翻译 ›

团队

iFixit iFixit 的会员

Staff

135 名成员

创作了16,820篇指南

21条评论

I was a bit scared to do this... But it was actually not that hard... And I had no issues whatsoever. Thank you so much! You saved my ass hahaha.

Jasmine Shoja Ardalan - 回复

Worked perfectly for me. Thanks for the guide!

Mike Lucas - 回复

I have limited computer repair experience but I found this repair very easy and straightforward to do. If you're careful with the cables and don't force them you shouldn't have any problems! Thank you ifixit!

Kyle - 回复

Other iFixit guides worked great for me. So when my Macbook pro 15" retina late 2013 got a cracked display I bought a new one and tried assembling it with this guide. I tried this so many times, and even bought a couple of displays (both are supposed to have matched the model number of my laptop), but it didn't work for either of them. My old display, which was cracked, comes on, but the new ones I bought don't come on when I boot the computer. I've also tried those weird key combinations that they suggest for fixing a black screen elsewhere on the web. I am at my wit's end.

Ann Marie - 回复

But I might have gotten the wrong year :( Apparently the macbookpro I have is 2015, not 2013.

Ann Marie -

添加评论

浏览统计数据:

过去 24 小时: 12

过去 7 天: 88

过去 30 天: 364

总计 114,273