简介
Replacing the upper case requires the removal of nearly every component in your MacBook Pro. You will also need to transfer your old trackpad over to your new upper case.
你所需要的
-
-
Remove the following 10 screws securing the lower case to the MacBook Pro 13" Unibody:
-
Seven 3 mm Phillips screws.
-
Three 13.5 mm Phillips screws.
-
-
-
Slightly lift the lower case and push it toward the rear of the computer to free the mounting tabs.
In the introduction you should link fixers to this excellent doc: https://www.ifixit.com/Misc/HD_Software_...
It is really critical, super easy, and free(!) to clone your existing drive onto the new one you will install. I ran into one error, but SuperDuper! support replied immediately on how to fix it...Thanks ifixit and SuperDuper! (I ponied up the $28 for the software anyway, I was so impressed!)
Long story short: I drank the AppleKoolAid back in 1984 and have always left the guts of my machines up to Apple - until recently when I needed to swap the SATAs from my original MacDaddy (2009 13" MBPro that I killed in 2018 - coffee + blackout = OOOOPS) into a pristine 2009 MBPro from a Goodwill in North Carolina through eBay. I need the files from iCal and MacMail that can't be opened in my newer machines.
Well . . . I ain't never done nuttin' like that, before!
Enter Luke Miani on YouTube. He raves about you guys! So, I watched everything I could, read your site, bought the right tools and at the ripe old age of 72, I sat down, this morning and did the work. Now my original MacDaddy lives in MacDaddy2.0.
Am I allowed to cry?
Seriously, I can't thank you enough for your bitchen site and killer tools. I wish I'd'a been turned on to this shizzle 30+ years ago.
IFIXIT - IDIGIT!
kath myers - 回复
HAHAHAHAHAHAHAHAHAHA.
That was a brilliant read.
Yes, I came across ifixit a few years ago. Totally helped me out on several occasions.
Glad your Mac repair journey worked out.
:)
Cary B -
-
-
-
Use the flat end of a spudger to lift the battery connector up out of its socket on the logic board.
How do you get that battery connector back on? Do you just press it in back in place after you're done?
yes. I usually plug it in before I screw it down so I can lift the battery a bit and have enough slack to be able to go straight down on the connector, otherwise it comes in on a bit of an angle, which can't be good (though not necessarily bad).
This step almost finished me, and I did extensive damage to the battery plug. Fortunately, I later replaced the battery, and the replacement came with a new plug! :) Newbies need to know - 1. The battery plug is like a thin lip on a thicker lip, so you need to pry BETWEEN 2 thin lips to get it off, else you are trying to yank out the socket. 2. Mine was initially VERY tight, and trying to get it out broke the plastic on all sides of plug, even though I was as careful as possible. Luckily, this didn't hurt functionality and I later replaced the battery. AFTER disconnecting once, it was never so tight again,
-
-
-
Use a spudger to pry up the fan connector out of its socket on the logic board.
Thankfully there is a helpful guide in the comments on this post for fixing the socket in the likely event that you snap the sucker clean off like I did:
Broke it as well the picture is very misleading.
Local mobile repair shop soldered it back for me.. but it cost me twice as much as fan I ordered from china. They told me to use two tools in the future.. one to keep the edge down and other to gauge gently from under the cables...
Bade -
-
-
-
Grab the plastic pull tab secured to the display data cable lock and rotate it toward the DC-In side of the computer.
-
Gently pull the display data cable connector away parallel to the board.
On my system the pad on top of the connector was shifted making the bracket difficult to rotate into the up position. The bracket looks like a handle so my first instinct was to pull it straight up. Big mistake. I ended up popping the brass guard off the connector on the logic board. The instructions could benefit from an arrow indicating the direction to pull and rotation of the bracket.
-
-
-
Use the flat end of a spudger to pry the subwoofer and right speaker connector up off the logic board.
The first time i tried this on a MBP 13 I broke the connector form the board. It should be noted that you have to be very careful in this step, as the plug fits very tightly and you can easily use too much force to tear the connector from the board. Use a second spudger to hold down the connector at its border and try very gently using a second spudger to move the plug out of the connector upwards.
-
-
-
Pull the camera cable connector toward the optical drive to disconnect it from the logic board.
As mentioned, the socket can be easily damaged when re-inserting it. I didn't care enough and one pin was damaged. Wifi was not detected.
Hopefully the pin was not broken (only bent). Putting it back in its correct position, the wifi re-appeared.
-
-
-
Use your fingernail or the tip of a spudger to flip up the cable retaining flap on the ZIF socket for the keyboard ribbon cable.
-
Use your spudger to slide the keyboard ribbon cable out of its socket.
Sometimes spulger is not the best tool to slide the cable out. If it is difficult to slide, try two toothpicks to pull the cable from two sides simultaneosly.
Toothpicks did the trick, thanks
As Mateo said, replacing the zif cable is NOT easy, and in this case, will leave you with a computer that won't power on- this cable connects the power button. I learned a trick somewhere for dealing with these cables- put a piece of good sticky tape on the cable, and use it to pull it back into the connector. Works every time.
Yeah! The tape trick worked for me. Thanks!
Thank you Steve, it’s works perfectly.
-
-
-
Peel the small strip of black tape off the keyboard backlight ribbon cable socket.
Be very careful while taking this black tape off. I accidentally broke the chip off the motherboard and so my keyboard is not backlit any more.
Asim Akath - 回复
-
-
-
Use the tip of a spudger to flip up the cable retaining flap on the ZIF socket for the keyboard backlight ribbon cable.
-
Use your spudger to slide the keyboard backlight ribbon cable out of its socket.
Be especially careful as my hole socket detached from the board. It would have helped to vertically press the socket to the board with the tip of a spudger. Thus partially blocking the strap, you can first peel the free end, then change position and peel the rest. Slide the ribbon cable perfectly horizontally.
I had the same issue of trying to get the ZIF cable back in but found that if I used a piece of scotch tape, it worked. I followed this guide. MacBook unibody keyboard ribbon cable won't go in
A reassembly trick that works for me is to use some 3/4" blue painters tape to stick to the very back (lower end) of the ribbon cable so I can pull it up and back before locking the cam. Trying to get a good grip without cutting, or crimping the ribbon means no tweezers or pliers can be used.
-
-
-
-
Use the flat end of a spudger to pry the battery indicator cable connector up off the logic board.
If you’re swapping top cases, you might need to remove the battery indicator from the case and swap it to the replacement top case. It attaches with three very tiny Phillips screws. I wasn’t aware that my replacement top case didn’t have this part and got confused when reversing the steps to reassemble and I didn’t have this connector. I had to take the battery back out in order to swap the indicator over.
-
-
-
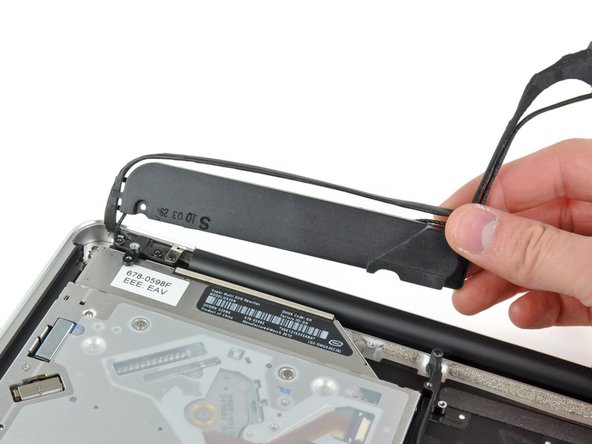
Use the tip of a spudger to pry the microphone off the adhesive attaching it to the upper case.
on the Australian/Asia version speaker cable is located underneath the logic board.
-
-
-
Lift the logic board from its left edge and raise it until the ports clear the side of the upper case.
-
Pull the logic board away from the side of the upper case and remove it, minding the DC-In board that may get caught.
Be careful while taking the board out, as the heatsink usually is caught by the optic drive.
mid 2012: Careful of the left speaker (on your right because unit is upside down). Gently remove with spudger tool before removing logic board and when reinstalling press firmly back into place with spudger. Install speaker after putting logic board in place but before installing screws.
JASON CULP - 回复
-
-
-
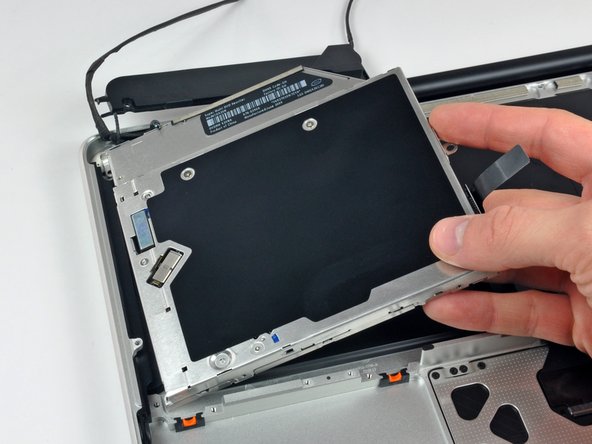
Remove two Phillips screws securing the hard drive bracket to the upper case.
-
Lift the the retaining bracket out from the upper case.
-
-
-
Remove the following four screws securing the hard drive and IR sensor cable to the upper case:
-
Two 1.5 mm Phillips screws.
-
Two 4 mm Phillips screws.
-
Slide the hard drive and IR sensor bracket away from the edge of the upper case.
-
Carefully peel the hard drive and IR sensor cable from the upper case.
-
-
-
Use the tip of a spudger to pry the right speaker up off the adhesive securing it to the upper case.
-
-
-
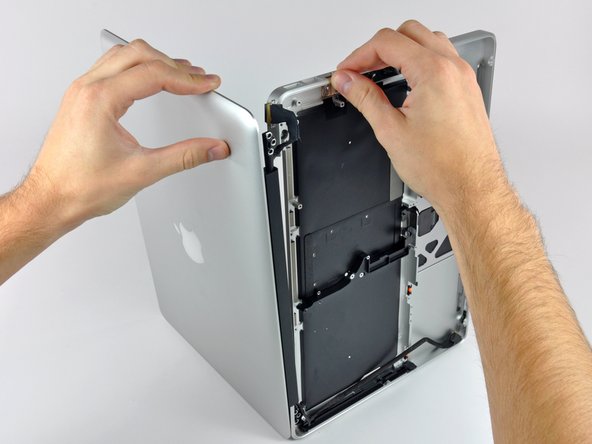
Grab the upper case with your right hand and rotate it slightly toward the top of the display so the upper display bracket clears the edge of the upper case.
-
Rotate the display slightly away from the upper case.
-
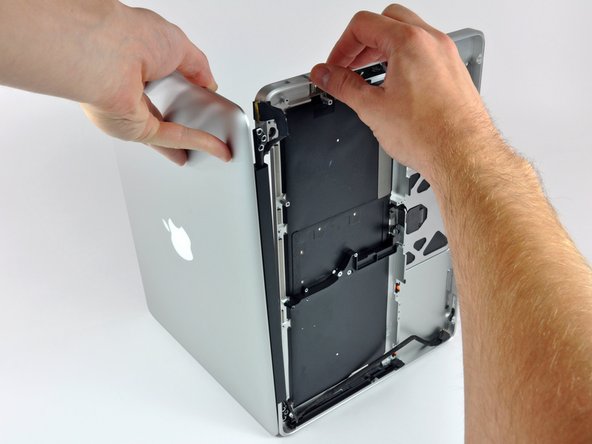
Lift the display up and away from the upper case, minding any brackets or cables that may get caught.
-
-
-
Carefully dislodge the edge of the trackpad closest to the keyboard from its recess in the upper case by pushing it away from the brackets attached to the upper case.
-
De-route the trackpad cable through its slot cut into the upper case.
I concur with Anonymous 596. There is a support wall that runs front to back, under keyboard, held down by 2 Phillips screws that will need to be removed & transferred to new upper case. You can see it being touched by index finger in this pic.
-
-
-
Pull the trackpad away from the outer edge of the upper case.
-
Remove the trackpad and set it aside.
There's a missing step here. In addition to the trackpad, there's an aluminum structural piece that sits under the center of the keyboard, that has to be migrated from old to new case. It's clearly shown to the left of the repair-person's right hand in step 44.
-
-
-
Use a T6 Torx screwdriver to loosely install the 1.1 mm set screw included with your new upper case into its tapped hole near the middle of the trackpad opening on your new upper case.
I bought a used replacement case and had to move a few parts from the old case to the replacement. This included the battery indicator cable, the clips for the trackpad and the bracket in the center of the top case. So worth it at this point to compare your old and replacement case to be sure everything you need is there.
my new case came with the set screw already installed, and i couldn’t loosen it. i didn’t want to strip it and cause a bigger problem, so i left it alone. the trackpad seems to work fine so far regardless, although i may take the bottom case off and play with it a little if i get a chance.
i also (just like Ron) had to move the trackpad clips, battery indicator and center bracket to the new case. they were not included.
-
-
-
Carefully insert the cable from your old trackpad through its slot cut into your new upper case.
-
Use one hand to hold the trackpad cable in place as you insert the two retaining tabs on the outer edge of the trackpad under the lip on the upper case.
-
Pull the trackpad cable as you seat the trackpad into its void in your new upper case.
-
-
-
Tighten the outer two screws along the inner edge of the trackpad and check the alignment of it on the outer side of the upper case.
-
If its alignment looks good, install the rest of the Phillips screws along the inner edge of the trackpad.
-
Before reassembling your machine, verify that the set screw is still installed in a position so the mouse will click correctly.
You can actually replace the keyboard alone fairly easily! I don't know why everyone says you have to replace the whole top case, because if you've got the guts to go this far, you might as well just peel back the illuminator cover and get to work pulling all those tiny screws in the keyboard... Just be careful when peeling up the black adhesive keyboard cover, because you will need to replace it. I used the edge of the ifixit Sesame tool (very thin flat metal opening tool) to carefully slip under any bits of adhesive, and had the keyboard exposed in no time. Also be careful because the clear plastic sheet is actually the keyboard illuminator. Once under all that, it's a mere 50 or so tiny screws, 2 screws in the power button backing, and you've got the keyboard out. Use a magnetized #000 phillips, it will make life much easier than anything else.
Logan Bean - 回复
Absolutely right. I just replaced a keyboard the same way without much problem but i just want to add that those tiny screws need extra care as the heads can get damaged very easily. If damaged, they become very difficult to remove.
Masood -
I did just that on my mid-2010 MacBook Pro about a month ago and sadly will have to do it to my wife's Early-2011 one next week. I was cleaning all the crap off her keyboard and apparently nuked the K and 0 keys on her keyboard. Probably my ply challenge was aligning the keyboard illuminator. It's still not aligned properly on mine so some keys are better lit than others, but otherwise it was a relatively easy fix and far cheaper than replacing the entire upper case.
I replaced my keyboard less than an hour ago. The biggest pain/most time consuming was reattaching the ZIF connector for the keyboard and backlight. No matter what I did I could not get the %#*@ thing to reattach. What sadist designs these things? I had to walk away from the project for an hour and finally success.
All those screws will make you go crosseyed!
It helps to put some tape along the cable going lengthwise to the cable, and then fold the end of the tape onto itself to give yourself something to hold onto. This will give you some leverage to get that puppy into the socket.
I’m glad you managed !!!
I’m suffering :( take a part about 5 times…… ordered new (used) keyboard, the same results. I tested logic board in my daughter MAC, board works 100% no trouble ……. what could be wrong? there a secret how to reassemble keyboard parts together? I ripped a little bit black plastic thing, not top one with tiny connectors……
In the end I have two keyboards, cleaned and taken a part, both of them acting identical when installed. Some keys respond by giving absolutely not relevant symbols, beeping noise come with almost every key i pressed…..
Recovering after massive cappuccino spell after surprising hug :(((((
I swear to post photo step by step, if I will achieve this one……….. assemble back to 100% working condition after total reassembling, ultrasonic cleaning and drying………. just keyboard panel.
Give me nightmares :) will be first time I have so much trouble to fix………
I'm wondering about putting it back together. Different wires and small parts etc were glued or adhered in some way to the case or sides or whatever, as it is put together in the beginning. Is that just to make it easier to put it back together? Should I try to stick them back the way they were with something? Can you use tape or glue if it's just a wire? I wouldn't want to use something that would melt...or is this not something to worry apout?
I just used 1/4 polymide tape, and iFixit double sided tape. Works like a champ.
-


To reassemble your device, follow these instructions in reverse order.
To reassemble your device, follow these instructions in reverse order.
65等其他人完成本指南。

Compare the short screws carefully before reinstalling them. The shouldered screws go in the holes on the front edge.
David Kilbridge - 回复
Before I started removing any screws I took a piece of paper and drew the bottom of the laptop and put a piece of double-sided tape in the spot where each screw goes. That way when I took out the screws, I could put them on the tape so I knew exactly which screw went in which spot. I did the same thing for dismantling the inside on another sheet of paper, then a third sheet for the screen after getting the front glass off.
mastover - 回复
I use a similar technique: I print out the iFixit manual for the job, and Scotch-tape down the screws/brackets/cables I remove at each step next to the component descriptions. That way, when I'm reassembling, the bits are taped right next to the photo of where they came from.
adlerpe -
That's exactly what I do for all my repairs! It's the best way to keep track of all of the parts ' original location and to make sure that you don't miss any parts during reassembly.
joyitsjennie -
Great idea and one I use often
Thomas Overstreet -
Excellent idea! Thanks for sharing it here.
Laura Sharkey -
I used a 00 that fit but the screws were very tight so I used a tiny paintbrush with some wd40 on it and put it around the edges of the screws. Worked like a charm
valentinedhdh - 回复
I use a magnetic mat and place the screws in order on that :)
Cary B - 回复