跳转到主内容

当前版本的文档还未经巡查,您可以查看最新的已查核版本

仅作为前提条件
本指南仅用作其他指南的先决条件。不能单独食用。

你所需要的

  1. , 后壳: 步骤 1 中的图像 1,1
    • 移除下列将 MacBook Pro 13" Unibody后壳固定的 10个 螺丝:

    • 7个3 mm Phillips螺丝

    • 3个13.5 mm Phillips 螺丝

  2. : 步骤 2 中的图像 1,1
    • 轻轻提起后壳然后推向电脑的后方来松开卡舌。

  3. , 电池: 步骤 3 中的图像 1,1
    • 为了预防意外发生,我们建议您从逻辑板上断开电池连接器,以避免任何放电。

    • 使用一个平端撬棒将电池连接器分离逻辑板插座。

  4. , 风扇: 步骤 4 中的图像 1,3 , 风扇: 步骤 4 中的图像 2,3 , 风扇: 步骤 4 中的图像 3,3
    • 从逻辑板的插座上使用撬棒来撬起风扇连接头

    • 从风扇电缆线下方扭动撬棒有助于以断开连接插头。

    • 风扇插座和风扇插头可以在第二张和第三张图片中看到。 使用撬棒将风扇插头向上提起并从插座中拔出时,请小心不要将塑料风扇插座从逻辑板上拆下。 第二张图片中显示的逻辑板的布局可能与您的机器略有不同,但是风扇插座是相同的。

  5. : 步骤 5 中的图像 1,1
    • 移除下列3颗螺丝

    • 一颗7mm T6 梅花螺丝。

    • 两颗5.4mm T6 梅花螺丝。

  6. : 步骤 6 中的图像 1,1
    • 从顶壳中取出风扇。

  7. , 逻辑板: 步骤 7 中的图像 1,3 , 逻辑板: 步骤 7 中的图像 2,3 , 逻辑板: 步骤 7 中的图像 3,3
    • 抓住贴在显示数据排线扣上贴的塑料把手,向电脑交流电源插口处拉动。

    • 小心的将显示数据排线由D面转轴在上的右方拉出

    • 请不要将排线向上拉,以免损坏排线座

  8. : 步骤 8 中的图像 1,2 : 步骤 8 中的图像 2,2
    • 移除两颗将显示数据线缆支架与顶壳相固定的螺丝。

    • 一颗8.6mm 十字螺丝。

    • 一颗5.6mm 十字螺丝。

    • 从顶壳中提起显示数据线缆支架。

  9. : 步骤 9 中的图像 1,1
    • 使用撬棒扁平的一端,从逻辑板上撬起低音音箱和右扬声器插头。

  10. : 步骤 10 中的图像 1,1
    • 向光驱方向拉动摄像头线缆插头,来将其与逻辑板断开。

    • 插座是金属的而且很容易被弯折。 在重新连接时请确保插头和插座已经对其。

  11. : 步骤 11 中的图像 1,3 : 步骤 11 中的图像 2,3 : 步骤 11 中的图像 3,3
    • 使用撬棒扁平一端从逻辑板上撬起光驱、硬盘和触摸板线缆插头。

  12. : 步骤 12 中的图像 1,3 : 步骤 12 中的图像 2,3 : 步骤 12 中的图像 3,3
    • 使用你的指甲或者撬棒尖端来解锁键盘线缆插座上的ZIF连接器滑杆。

    • 使用撬棒将键盘线缆从插座中滑出。

  13. : 步骤 13 中的图像 1,1
    • 撕下键盘背光排线插座上的小黑色胶带。

  14. : 步骤 14 中的图像 1,3 : 步骤 14 中的图像 2,3 : 步骤 14 中的图像 3,3
    • 使用撬棒尖端来解锁键盘背光线缆ZIF插座上的小滑杆。

    • 使用 撬棒来将键盘背光排线线缆从插座中滑出。

  15. : 步骤 15 中的图像 1,1
    • 使用撬棒扁平一端从逻辑板撬起电量显示线缆插头。

  16. : 步骤 16 中的图像 1,1
    • 使用撬棒尖端来将麦克风从将其固定到顶壳的胶带中撬出。

  17. : 步骤 17 中的图像 1,1
    • 移除下列螺丝:

    • 交流电源板上的两颗7mm T6 梅花螺丝

    • 五颗3.3mm T6 梅花螺丝。

    • 两颗4 mm T6 梅花螺丝。

  18. : 步骤 18 中的图像 1,2 : 步骤 18 中的图像 2,2
    • 在抬起逻辑板之前移走电池并不是必须要进行的操作,但是折让移走逻辑板工作变得更加简单。 如果不想取下电池,请特别小心,不要将逻辑板靠近电池外壳,靠近它的的条形码位置。

    • 移除下列将电池固定到顶壳的Y字螺丝。

    • 一颗5.5mm Y字螺丝。

    • 一颗13.5mm Y字螺丝。

    • 将电池从顶壳中移走。

  19. : 步骤 19 中的图像 1,2 : 步骤 19 中的图像 2,2
    • 将逻辑板从其左边缘提起,并抬起它,直到端口完全从顶壳中移出。

    • 将逻辑板从顶壳的侧面拉出,将其拆下来,请小心交流电源板可能被卡住。

  20. 这个步骤还没有翻译 帮忙翻译一下

    : 步骤 20 中的图像 1,2 : 步骤 20 中的图像 2,2
    • Remove two Phillips screws securing the hard drive bracket to the upper case.

    • The screws remain captive to the bracket.

    • Lift the the retaining bracket out from the upper case.

  21. 这个步骤还没有翻译 帮忙翻译一下

    : 步骤 21 中的图像 1,1
    • Lift the hard drive from its free edge and pull it out of the chassis, minding the cable attaching it to the computer.

  22. 这个步骤还没有翻译 帮忙翻译一下

    : 步骤 22 中的图像 1,1
    • Disconnect the hard drive by pulling the hard drive cable connector away from the drive.

  23. 这个步骤还没有翻译 帮忙翻译一下

    : 步骤 23 中的图像 1,2 : 步骤 23 中的图像 2,2
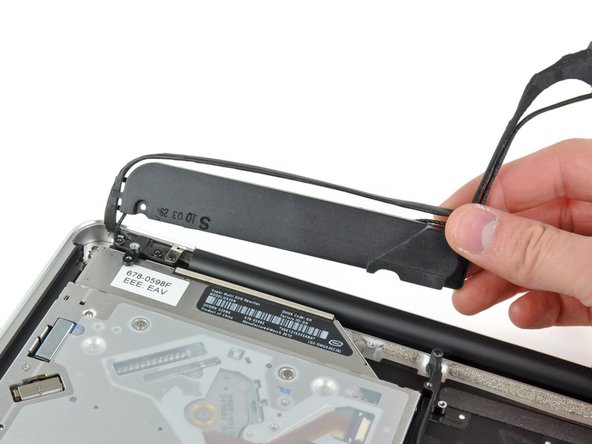
    • Remove the following four screws securing the hard drive and IR sensor cable to the upper case:

    • Two 1.5 mm Phillips screws.

    • Two 4 mm Phillips screws.

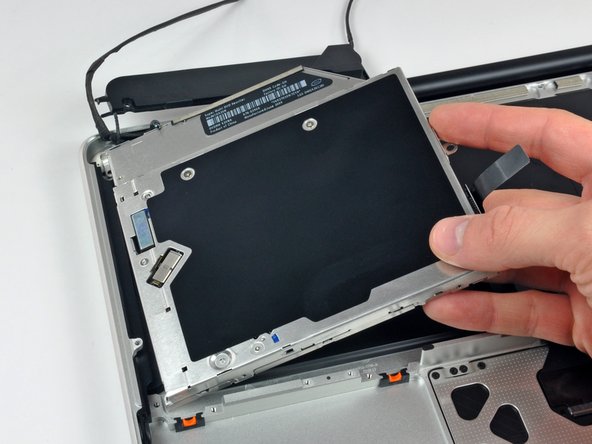
    • Slide the hard drive and IR sensor bracket away from the edge of the upper case.

    • Carefully peel the hard drive and IR sensor cable from the upper case.

  24. 这个步骤还没有翻译 帮忙翻译一下

    : 步骤 24 中的图像 1,2 : 步骤 24 中的图像 2,2
    • Remove the following screws securing the subwoofer to the upper case:

    • One 3.8 mm Phillips screw.

    • One 5 mm Phillips screw

    • The subwoofer is still connected to the right speaker, so don't completely remove it just yet.

    • Lift the subwoofer off the optical drive, and set it above the computer.

  25. 这个步骤还没有翻译 帮忙翻译一下

    : 步骤 25 中的图像 1,2 : 步骤 25 中的图像 2,2
    • Remove the two 10 mm Phillips screws securing the camera cable bracket to the upper case.

    • The leftmost screw may remain captive in the camera cable.

    • Lift the camera cable bracket out of the upper case.

  26. 这个步骤还没有翻译 帮忙翻译一下

    : 步骤 26 中的图像 1,2 : 步骤 26 中的图像 2,2
    • Remove the three 2.5 mm Phillips screws securing the optical drive to the upper case.

    • Lift the optical drive from its right edge and pull it out of the computer.

  27. 这个步骤还没有翻译 帮忙翻译一下

    : 步骤 27 中的图像 1,1
    • Peel back the small piece of black tape covering the right speaker cable.

    • Be careful, as the power button ribbon cable is directly under this piece of tape.

  28. 这个步骤还没有翻译 帮忙翻译一下

    : 步骤 28 中的图像 1,1
    • Use the tip of a spudger to pry the right speaker up off the adhesive securing it to the upper case.

  29. 这个步骤还没有翻译 帮忙翻译一下

    : 步骤 29 中的图像 1,1
    • Lift the subwoofer and right speaker assembly out of the upper case.

  30. 这个步骤还没有翻译 帮忙翻译一下

    : 步骤 30 中的图像 1,2 : 步骤 30 中的图像 2,2
    • Remove the two outer T8 Torx screws securing each side of the display bracket to the upper case (4 screws total).

  31. 这个步骤还没有翻译 帮忙翻译一下

    : 步骤 31 中的图像 1,1
    • Open your MacBook so the display is perpendicular to the upper case.

    • Place your opened MacBook on a table as pictured.

    • While holding the display and upper case together with your left hand, remove the T8 Torx screw from the lower display bracket.

  32. 这个步骤还没有翻译 帮忙翻译一下

    : 步骤 32 中的图像 1,1
    • Be sure to hold the display and upper case together with your left hand. Failure to do so may cause the freed display/upper case to fall, potentially damaging each component.

    • Remove the last remaining T8 Torx screw securing the display to the upper case.

  33. 这个步骤还没有翻译 帮忙翻译一下

    : 步骤 33 中的图像 1,3 : 步骤 33 中的图像 2,3 : 步骤 33 中的图像 3,3
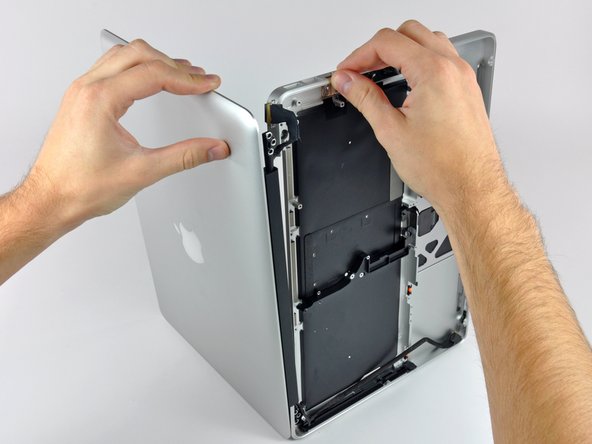
    • Grab the upper case with your right hand and rotate it slightly toward the top of the display so the upper display bracket clears the edge of the upper case.

    • Rotate the display slightly away from the upper case.

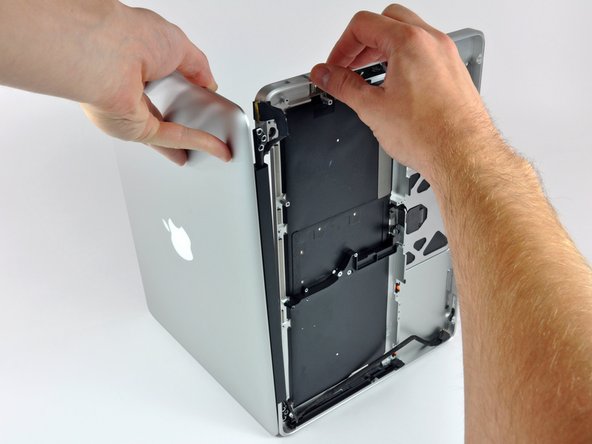
    • Lift the display up and away from the upper case, minding any brackets or cables that may get caught.

终点

9等其他人完成本指南。

0条评论

添加评论

浏览统计数据:

过去 24 小时: 0

过去 7 天: 0

过去 30 天: 2

总计 27,350