跳转到主内容

当前版本的文档还未经巡查,您可以查看最新的已查核版本

你所需要的

  1. , 后壳: 步骤 1 中的图像 1,1
    • 移除下列将 MacBook Pro 13" Unibody后壳固定的 10个 螺丝:

    • 7个3 mm Phillips螺丝

    • 3个13.5 mm Phillips 螺丝

  2. : 步骤 2 中的图像 1,1
    • 轻轻提起后壳然后推向电脑的后方来松开卡舌。

  3. , 电池: 步骤 3 中的图像 1,1
    • 为了预防意外发生,我们建议您从逻辑板上断开电池连接器,以避免任何放电。

    • 使用一个平端撬棒将电池连接器分离逻辑板插座。

  4. , 光驱: 步骤 4 中的图像 1,1
    • 为了预防危险,我们建议您将低音扬声器连接器与逻辑板断开连接,以避免放电。 此步骤是可选的,不强求。

    • 卸下可能在上面的软衬垫,然后将连接器从逻辑板上的插座上轻轻拉出。

  5. : 步骤 5 中的图像 1,1
    • 在断开相机电缆之前,必须将粘贴到逻辑板上的小透明塑料电缆固定器(红色框)滑出。 当您将其从相机电缆连接器上滑开时,请小心不要将板上的任何组件断开。

    • 将相机电缆连接器朝向光驱驱动器拉动,以将其与逻辑板断开连接。

    • 这个插座是金属的,容易弯曲。 在重新连接两者之前,请确保将连接器与逻辑板上的插座对齐。

  6. : 步骤 6 中的图像 1,1
    • 使用撬棒扁平一端来径直从逻辑板上撬起光驱连接头。

  7. : 步骤 7 中的图像 1,1
    • 使用撬棒径直从逻辑板上撬起硬盘连接头。

  8. : 步骤 8 中的图像 1,1
    • 移除将低音扬声器与顶壳固定的螺丝。

    • 一颗3.8mm 十字螺丝。

    • 一颗5mm 十字螺丝。

  9. : 步骤 9 中的图像 1,2 : 步骤 9 中的图像 2,2
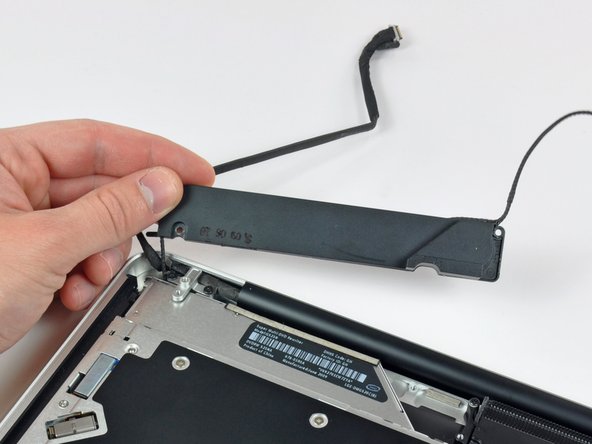
    • 低音扬声器仍然与右扬声器连接,所以请不要完全将其移走。

    • 从光驱上提起低音扬声器,将其放在电脑一边。

  10. : 步骤 10 中的图像 1,2 : 步骤 10 中的图像 2,2
    • 移除两颗将相机线缆支架固定到顶壳的10mm十字螺丝。

    • 最左侧的螺丝可能会一直在支架上呆着。

    • 将相机线缆支架从顶盖中取出。

  11. : 步骤 11 中的图像 1,2 : 步骤 11 中的图像 2,2
    • 移除三颗将光驱与顶壳固定的2.5mm十字螺丝。

    • 从光驱右边提起光驱然后将其从电脑中拉出。

  12. 这个步骤还没有翻译 帮忙翻译一下

    : 步骤 12 中的图像 1,1
    • Remove the optical drive cable by pulling it straight away from the optical drive.

    • This connector is particularly deep, so be sure to pull away from the drive at the center of the connector.

    • If you have a CD or any other object jammed in your optical drive, we have an optical drive repair guide.

  13. 这个步骤还没有翻译 帮忙翻译一下

    : 步骤 13 中的图像 1,1
    • Remove the two black Phillips #0 screws securing the small metal mounting bracket. Transfer this bracket to your new optical drive or hard drive enclosure.

终点

81等其他人完成本指南。

2条评论

I removed my optical drive without disconnecting the hard drive or anything else. I just unplugged the optical drive from the board, unscrewed the speaker, and very slowly removed the drive after taking out the three screws holding it in place. I was discouraged at first to remove my optical drive because it looked a little too tricky for me from the directions, but it was actually quite easy! I'm going to be interested to see if pulling the optical drive results in any noticeable improvement in battery performance on my 13" 2.4GHz MBP! I doubt it haha

T Buckle - 回复

I skipped down to the step with 3 screws holding the optical drive, removed them, gently pried out the optical cable, and slid out the optical drive (at a slight 10 degree angle)!! Thank you!

Ary Safian - 回复

添加评论

浏览统计数据:

过去 24 小时: 8

过去 7 天: 30

过去 30 天: 127

总计 124,435