跳转到主内容

MacBook Pro 13" Unibody Mid 2010 Optical Drive Replacement

仅作为前提条件
本指南仅用作其他指南的先决条件。不能单独食用。

你所需要的

  1. MacBook Pro 13" Unibody Mid 2010 Optical Drive Replacement, Optical Drive: 步骤 1 中的图像 1,1
    • For precautionary purposes, we advise that you disconnect the subwoofer connector from the logic board to avoid any electrical discharge. This step is optional and is not required.

    • Remove the soft padding that may be on top and gently pull the connector up out of its socket on the logic board.

  2. MacBook Pro 13" Unibody Mid 2010 Optical Drive Replacement: 步骤 2 中的图像 1,1
    • It will be necessary to slide the small clear plastic cable retainer (boxed in red) glued to the logic board out of the way before disconnecting the camera cable. Be careful not to break any components off the board as you slide it away from the camera cable connector.

    • Pull the camera cable connector toward the optical drive to disconnect it from the logic board.

    • This socket is metal and easily bent. Be sure to align the connector with its socket on the logic board before mating the two pieces.

  3. MacBook Pro 13" Unibody Mid 2010 Optical Drive Replacement: 步骤 3 中的图像 1,1
    • Use the flat end of a spudger to pry the optical drive connector straight up off the logic board.

  4. MacBook Pro 13" Unibody Mid 2010 Optical Drive Replacement: 步骤 4 中的图像 1,1
    • Use the flat end of a spudger to pry the hard drive connector straight up off the logic board.

  5. MacBook Pro 13" Unibody Mid 2010 Optical Drive Replacement: 步骤 5 中的图像 1,1
    • Remove the following screws securing the subwoofer to the upper case:

    • One 3.8 mm Phillips screw.

    • One 5 mm Phillips screw

  6. MacBook Pro 13" Unibody Mid 2010 Optical Drive Replacement: 步骤 6 中的图像 1,2 MacBook Pro 13" Unibody Mid 2010 Optical Drive Replacement: 步骤 6 中的图像 2,2
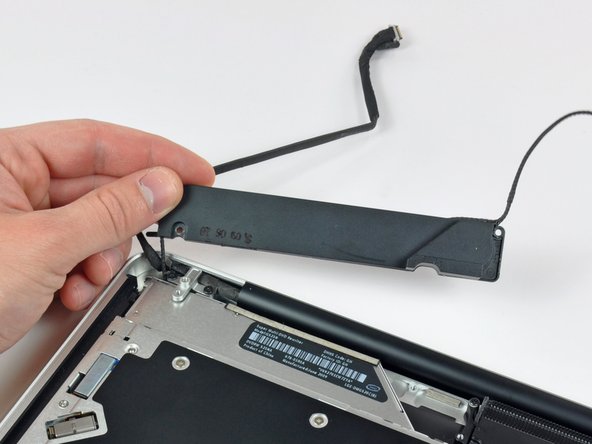
    • The subwoofer is still connected to the right speaker, so don't completely remove it just yet.

    • Lift the subwoofer off the optical drive, and set it above the computer.

  7. MacBook Pro 13" Unibody Mid 2010 Optical Drive Replacement: 步骤 7 中的图像 1,2 MacBook Pro 13" Unibody Mid 2010 Optical Drive Replacement: 步骤 7 中的图像 2,2
    • Remove the two 10 mm Phillips screws securing the camera cable bracket to the upper case.

    • The leftmost screw may remain captive in the camera cable.

    • Lift the camera cable bracket out of the upper case.

  8. MacBook Pro 13" Unibody Mid 2010 Optical Drive Replacement: 步骤 8 中的图像 1,2 MacBook Pro 13" Unibody Mid 2010 Optical Drive Replacement: 步骤 8 中的图像 2,2
    • Remove the three 2.5 mm Phillips screws securing the optical drive to the upper case.

    • Lift the optical drive from its right edge and pull it out of the computer.

结论

To reassemble your device, follow these instructions in reverse order.

另外一个人完成了本指南。

一条评论

Bonsoir. Le tuto est très clair, mais je voudrais savoir s’il est applicable sur la version 15” du MBP 10. Amicalement, Marc.

Marc Blériot - 回复

添加评论

浏览统计数据:

过去 24 小时: 0

过去 7 天: 0

过去 30 天: 0

总计 688