跳转到主内容

当前版本的文档还未经巡查,您可以查看最新的已查核版本

你所需要的

  1. , 后壳: 步骤 1 中的图像 1,1
    • 移除下列将 MacBook Pro 13" Unibody后壳固定的 10个 螺丝:

    • 7个3 mm Phillips螺丝

    • 3个13.5 mm Phillips 螺丝

  2. : 步骤 2 中的图像 1,1
    • 轻轻提起后壳然后推向电脑的后方来松开卡舌。

  3. , 电池: 步骤 3 中的图像 1,1
    • 为了预防意外发生,我们建议您从逻辑板上断开电池连接器,以避免任何放电。

    • 使用一个平端撬棒将电池连接器分离逻辑板插座。

  4. 这个步骤还没有翻译 帮忙翻译一下

    : 步骤 4 中的图像 1,1
    • Using the flat end of a spudger, gently pry the right speaker/subwoofer cable connector straight up off the logic board. Be careful not to lift the socket. Pull the connector toward the optical drive.

    • Pry up from beneath the wires.

  5. 这个步骤还没有翻译 帮忙翻译一下

    : 步骤 5 中的图像 1,1
    • It will be necessary to slide the small clear plastic cable retainer (boxed in red) glued to the logic board out of the way before disconnecting the camera cable. Be careful not to break any components off the board as you slide it away from the camera cable connector.

    • Pull the camera cable connector toward the optical drive to disconnect it from the logic board.

    • This socket is metal and easily bent. Be sure to align the connector with its socket on the logic board before mating the two pieces.

  6. 这个步骤还没有翻译 帮忙翻译一下

    : 步骤 6 中的图像 1,1
    • Use the flat end of a spudger to pry the optical drive connector straight up off the logic board.

  7. 这个步骤还没有翻译 帮忙翻译一下

    : 步骤 7 中的图像 1,1
    • Use the flat end of a spudger to pry the hard drive connector straight up off the logic board.

  8. 这个步骤还没有翻译 帮忙翻译一下

    : 步骤 8 中的图像 1,1
    • Remove the two Phillips screws securing the subwoofer to the upper case. The right one is 5 mm and the left 3.9 mm.

    • The longer of the two screws is on the right.

  9. 这个步骤还没有翻译 帮忙翻译一下

    : 步骤 9 中的图像 1,2 : 步骤 9 中的图像 2,2
    • The subwoofer is still connected to the right speaker, so don't completely remove it just yet.

    • Lift the subwoofer off the optical drive, and set it above the computer.

  10. 这个步骤还没有翻译 帮忙翻译一下

    : 步骤 10 中的图像 1,2 : 步骤 10 中的图像 2,2
    • Remove the two 8.4 mm Phillips screws securing the camera cable bracket to the upper case.

    • The right screw may remain captive in the camera cable.

    • Lift the camera cable bracket out of the upper case.

  11. 这个步骤还没有翻译 帮忙翻译一下

    : 步骤 11 中的图像 1,2 : 步骤 11 中的图像 2,2
    • Remove the three 2.5 mm Phillips screws securing the optical drive to the upper case.

    • Lift the optical drive from its right edge and pull it out of the computer.

  12. 这个步骤还没有翻译 帮忙翻译一下

    : 步骤 12 中的图像 1,1
    • Peel back the small piece of black tape covering the right speaker cable.

    • Be careful, as the power button ribbon cable is directly under this piece of tape.

  13. 这个步骤还没有翻译 帮忙翻译一下

    : 步骤 13 中的图像 1,1
    • Use the tip of a spudger to pry the right speaker up off the adhesive securing it to the upper case.

  14. 这个步骤还没有翻译 帮忙翻译一下

    : 步骤 14 中的图像 1,1
    • Lift the subwoofer and right speaker assembly out of the upper case.

终点

43等其他人完成本指南。

4条评论

Thanks ifixit for the super guide. I followed the steps and now my mac works properly again!

Toni - 回复

Thank you iFixit!

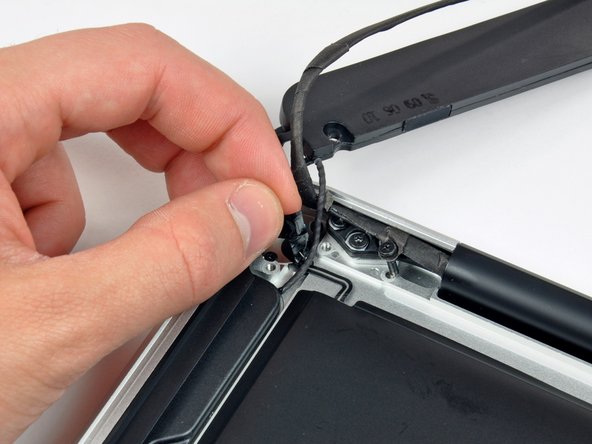
I too snapped the right speaker/subwoofer cable connector right off the mother board, but with patience and a little research, I learned how to solder the thing back on. How about a Warning!!!!! inserted at that step.? I only saw that there were comments AFTER I gingerly tried to pry the connector as instructed. It would help to show how the parts fit together as is done with the fan cable connector. Those instructions (the fan cable connector instructions), helped me better understand what I was prying apart and gave me an idea of how best to do it, and how the speaker/subwoofer cable connector connected to the board, as well as how to position the “pads.”

So, I learned from my mistake, which is a good thing. Nonetheless, I would have preferred to learn BEFORE I snapped off the cable connector, LOL!

Thanks Again for this incredible site.

Leslie L. Gordon - 回复

My connection did not hold. I asked above what the best way is to solder or reattach the right speaker/subwoofer cable connector back onto the board. I saw the soldering guide, but have only soldered once. Any specific guidance on how to reattach this cable would be SO APPRECIATED, especially referencing the soldering guide. Visuals are extremely important to me.

Leslie L. Gordon - 回复

添加评论

浏览统计数据:

过去 24 小时: 5

过去 7 天: 27

过去 30 天: 85

总计 54,970