跳转到主内容

当前版本的文档还未经巡查,您可以查看最新的已查核版本

仅作为前提条件
本指南仅用作其他指南的先决条件。不能单独食用。

你所需要的

  1. , 底盖: 步骤 1 中的图像 1,1
    • 卸下下列十个螺丝

    • 3个 14.4 mm Phillips #00 螺丝

    • 3个 3.5 mm Phillips #00 螺丝

    • 4个 3.5 mm 肩部 Phillips #00 螺丝

    • 装回小螺丝时,将其垂直于外壳的轻微弯曲对齐(不是直着往下对齐的)。

  2. : 步骤 2 中的图像 1,2 : 步骤 2 中的图像 2,2
    • 使用手指从靠近MacBook 风扇处撬开背盖。

    • 移走背盖、

  3. , 电池连接: 步骤 3 中的图像 1,2 , 电池连接: 步骤 3 中的图像 2,2
    • 使用撬棒边缘处来将电池连接器从逻辑板插座上撬起。

    • 使用撬棒撬起连接器的两个“短边”有助于断开连接。 小心对连接器进行操作,连接器很容易断开。

  4. : 步骤 4 中的图像 1,1
    • 稍微弯折连接器,使其远离逻辑板,来确保您进行其他操作时不会意外的重新连接。

  5. , 风扇: 步骤 5 中的图像 1,3 , 风扇: 步骤 5 中的图像 2,3 , 风扇: 步骤 5 中的图像 3,3
    • 使用撬棒的边缘,将风扇插头从逻辑板上的插座中撬出。

    • 在线缆下扭动,可以更加轻松分离连接插头。

    • 风扇的插座和插头可以参考第二三张图片。 确保在您径直撬动插头时不要将塑料插座从逻辑板上弄下来。 第二张逻辑板布局的俯视图有可能和您的机器有些许不同,因为机器的生产时间不同。 但是插座是相同的。

  6. : 步骤 6 中的图像 1,1
    • 移除下列三颗将风扇与逻辑板固定的螺丝。

    • 一颗7.2mm T6梅花螺丝

    • 两颗5.3mm T6梅花螺丝

  7. : 步骤 7 中的图像 1,1
    • 将风扇从逻辑板上的凹槽中提出,注意可能被卡住的电缆。

  8. , 主板: 步骤 8 中的图像 1,2 , 主板: 步骤 8 中的图像 2,2
    • 使用撬棒的尖端把扬声器电线拔出来。

    • 用手把右边扬声器电线往上提,把接口取出主板。

  9. : 步骤 9 中的图像 1,1
    • 从主板断开摄像头电线。

    • 把电线从主板上平行移开。如果仅仅网上拉可能会损坏主板电线。

  10. : 步骤 10 中的图像 1,2 : 步骤 10 中的图像 2,2
    • 断开下面四条电线:

    • AirPort/蓝牙电线

    • 光驱电线

    • 硬盘驱动电线

    • Trackpad 电线

    • 断开电线的时候,使用撬棒平头的一端,把接口从主板撬出来。

  11. : 步骤 11 中的图像 1,3 : 步骤 11 中的图像 2,3 : 步骤 11 中的图像 3,3
    • 使用手指把翻盖从键盘排线 ZIF 支架从抠出来。

    • 确保你是抠在翻盖的边缘,而不是接口本身。

    • 使用撬棒的一端把键盘排线从支架拉出来。

  12. : 步骤 12 中的图像 1,1
    • 如果有小条的黑胶带,把它从键盘的背光电线支架里移除。

  13. : 步骤 13 中的图像 1,3 : 步骤 13 中的图像 2,3 : 步骤 13 中的图像 3,3
    • 使用撬棒或你的指甲把剩下的翻盖从键盘背光电线 ZIF 支架中解救出来。

    • 确保你撬的是翻盖连接处,而不是支架本身。

    • 把键盘背光电线拉出支架。

  14. : 步骤 14 中的图像 1,1
    • 使用撬棒平头的一端把睡眠感应器/电池指示接口从支架中撬出来。

  15. : 步骤 15 中的图像 1,3 : 步骤 15 中的图像 2,3 : 步骤 15 中的图像 3,3
    • 拉出固定显示屏数据线的塑料拉条。

    • 把显示屏数据线从主板支架直接拉出来。

    • 不要向上拉起显示屏数据线,因为支架非常脆弱。像主板平行的方向拉动电线。

  16. : 步骤 16 中的图像 1,1
    • 移除以下九颗螺丝:

    • 五颗 3.6 mm T6 Torx 螺丝

    • 两颗 4.3 mm T6 Torx 螺丝

    • 两颗 7.2 mm T6 Torx 螺丝

  17. : 步骤 17 中的图像 1,2 : 步骤 17 中的图像 2,2
    • 移除以下两颗螺丝:

    • 一颗 8.6 mm 菲利普斯十字螺丝

    • 一颗 5.5 mm 菲利普斯十字螺丝

    • 从上盖移除显示屏数据线。

  18. : 步骤 18 中的图像 1,1
    • 使用撬棒一端从上盖黏胶里轻轻地剥离麦克风。

  19. : 步骤 19 中的图像 1,1
    • 小心边缘众多的接口,把主板从靠近光驱的一边提起来。

    • 把主板小心地从上盖揭出来。

    • 移除主板。

  20. 这个步骤还没有翻译 帮忙翻译一下

    : 步骤 20 中的图像 1,1
    • Remove the following two screws:

    • One 5.6 mm Tri-point screw

    • One 13 mm Tri-point screw

  21. 这个步骤还没有翻译 帮忙翻译一下

    : 步骤 21 中的图像 1,1
    • Carefully peel the battery warning label off the upper case between the battery and the optical drive.

    • Do not remove the label from the battery.

  22. 这个步骤还没有翻译 帮忙翻译一下

    : 步骤 22 中的图像 1,1
    • Use the attached plastic pull tab to help remove the battery from the upper case.

  23. 这个步骤还没有翻译 帮忙翻译一下

    : 步骤 23 中的图像 1,2 : 步骤 23 中的图像 2,2
    • Remove the two Phillips screws securing the hard drive bracket to the upper case.

    • These screws will remain captive to the hard drive bracket.

    • Remove the hard drive bracket.

    • The hard drive bracket may be firmly seated against the upper case.

  24. 这个步骤还没有翻译 帮忙翻译一下

    : 步骤 24 中的图像 1,3 : 步骤 24 中的图像 2,3 : 步骤 24 中的图像 3,3
    • Use the attached pull tab to lift the hard drive out of the upper case.

    • Pull the hard drive cable away from the body of the hard drive.

    • Remove the hard drive.

  25. 这个步骤还没有翻译 帮忙翻译一下

    : 步骤 25 中的图像 1,1
    • Remove the following four screws:

    • Two 3 mm Phillips screws

    • Two 9.7 mm Phillips screws

  26. 这个步骤还没有翻译 帮忙翻译一下

    : 步骤 26 中的图像 1,1
    • Carefully peel up the thin IR sensor/sleep LED ribbon cable from the adhesive securing it to the upper case.

  27. 这个步骤还没有翻译 帮忙翻译一下

    : 步骤 27 中的图像 1,2 : 步骤 27 中的图像 2,2
    • Pull the front hard drive bracket containing the IR sensor/sleep LED away from the front edge of the upper case.

    • Remove the hard drive cable.

  28. 这个步骤还没有翻译 帮忙翻译一下

    : 步骤 28 中的图像 1,1
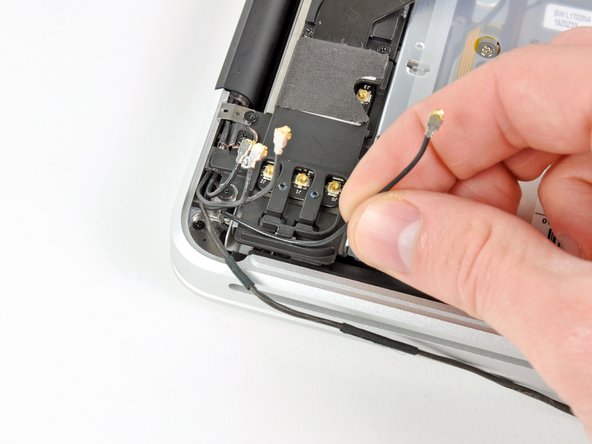
    • Carefully move the AirPort/Bluetooth ribbon cable out of the way as you peel the camera cable off the adhesive securing it to the subwoofer and the AirPort/Bluetooth bracket.

    • De-route the camera cable out from under the retaining finger molded into the AirPort/Bluetooth bracket.

  29. 这个步骤还没有翻译 帮忙翻译一下

    : 步骤 29 中的图像 1,3 : 步骤 29 中的图像 2,3 : 步骤 29 中的图像 3,3
    • Disconnect the four antenna connectors boxed in red in the first picture.

    • To do so, use the tip of a spudger to pry their connectors up from the sockets on the AirPort/Bluetooth board.

    • De-route each of the cables from their channels in the AirPort/Bluetooth bracket.

  30. 这个步骤还没有翻译 帮忙翻译一下

    : 步骤 30 中的图像 1,1
    • Remove the following five screws:

    • Two 10.3 mm Phillips screws

    • Two 3.1 mm Phillips screws

    • One 5 mm Phillips screw

  31. 这个步骤还没有翻译 帮忙翻译一下

    : 步骤 31 中的图像 1,2 : 步骤 31 中的图像 2,2
    • Pull the AirPort/Bluetooth assembly and the Subwoofer upward near the center of the side of the optical drive until they clear each other.

    • Remove the AirPort/Bluetooth board assembly.

  32. 这个步骤还没有翻译 帮忙翻译一下

    : 步骤 32 中的图像 1,1
    • Remove the three 2.7 mm Phillips screws securing the optical drive to the upper case.

  33. 这个步骤还没有翻译 帮忙翻译一下

    : 步骤 33 中的图像 1,1
    • Lift the optical drive from the edge nearest the display and remove it from the upper case.

  34. 这个步骤还没有翻译 帮忙翻译一下

    : 步骤 34 中的图像 1,1
    • Peel the right speaker cable off the upper case.

  35. 这个步骤还没有翻译 帮忙翻译一下

    : 步骤 35 中的图像 1,2 : 步骤 35 中的图像 2,2
    • Use a plastic opening tool or another thin prying object to carefully pry the right speaker up from the adhesive securing it to the upper case.

    • Start prying up from the edge of the right speaker nearest the display. Starting from the other side may damage one of the antennas.

    • Pry up along the edge of the right speaker until it is separated from the upper case.

  36. 这个步骤还没有翻译 帮忙翻译一下

    : 步骤 36 中的图像 1,1
    • Pull the right speaker out from under the optical drive opening.

  37. 这个步骤还没有翻译 帮忙翻译一下

    : 步骤 37 中的图像 1,1
    • Remove two of the three 6 mm T8 Torx screws securing the right side of the display to the upper case.

    • We purposely have you leave one screw attaching the display to the upper case to aid in future steps.

  38. 这个步骤还没有翻译 帮忙翻译一下

    : 步骤 38 中的图像 1,1
    • Remove the small piece of foam tape covering the left display hinge screws.

  39. 这个步骤还没有翻译 帮忙翻译一下

    : 步骤 39 中的图像 1,1
    • Remove two of the three 6 mm T8 Torx screws securing the left side of the display to the upper case.

    • We purposely have you leave one screw attaching the display to the upper case to aid in future steps.

  40. 这个步骤还没有翻译 帮忙翻译一下

    : 步骤 40 中的图像 1,1
    • Open your MacBook Pro so the display is perpendicular to the upper case.

    • Place your opened MacBook Pro on a table as pictured.

    • While holding the display and upper case together with your left hand, remove the remaining T8 Torx screw from the lower display bracket.

  41. 这个步骤还没有翻译 帮忙翻译一下

    : 步骤 41 中的图像 1,1
    • Be sure to hold the display and upper case together with your left hand. Failure to do so may cause the freed display/upper case to fall, potentially damaging each component.

    • Remove the last remaining T8 Torx screw securing the display to the upper case.

  42. 这个步骤还没有翻译 帮忙翻译一下

    : 步骤 42 中的图像 1,3 : 步骤 42 中的图像 2,3 : 步骤 42 中的图像 3,3
    • Grab the upper case with your right hand and rotate it slightly toward the top of the display so the upper display bracket clears the edge of the upper case.

    • Rotate the display slightly away from the upper case.

    • Lift the display up and away from the upper case, minding any brackets or cables that may get caught.

    • Upper case remains.

终点

另外一个人完成了本指南。

0条评论

添加评论

浏览统计数据:

过去 24 小时: 0

过去 7 天: 0

过去 30 天: 0

总计 5,899