跳转到主内容

当前版本的文档还未经巡查,您可以查看最新的已查核版本

你所需要的

  1. , 底盖: 步骤 1 中的图像 1,1
    • 卸下下列十个螺丝

    • 3个 14.4 mm Phillips #00 螺丝

    • 3个 3.5 mm Phillips #00 螺丝

    • 4个 3.5 mm 肩部 Phillips #00 螺丝

    • 装回小螺丝时,将其垂直于外壳的轻微弯曲对齐(不是直着往下对齐的)。

  2. : 步骤 2 中的图像 1,2 : 步骤 2 中的图像 2,2
    • 使用手指从靠近MacBook 风扇处撬开背盖。

    • 移走背盖、

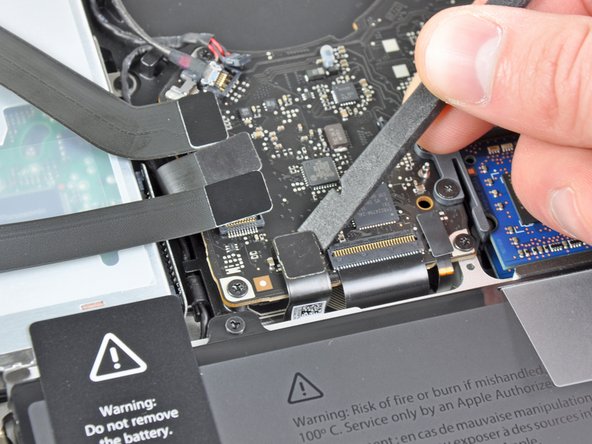
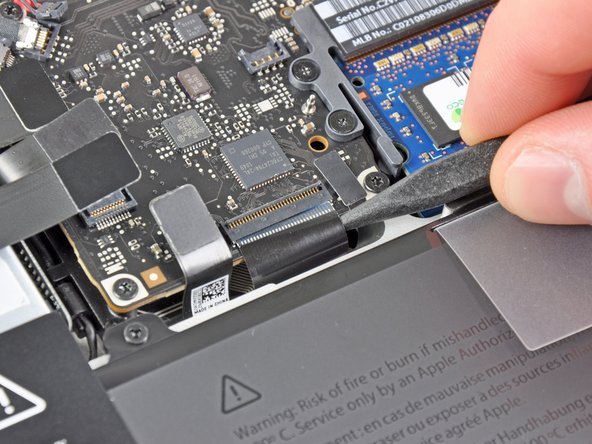
  3. , 电池连接: 步骤 3 中的图像 1,2 , 电池连接: 步骤 3 中的图像 2,2
    • 使用撬棒边缘处来将电池连接器从逻辑板插座上撬起。

    • 使用撬棒撬起连接器的两个“短边”有助于断开连接。 小心对连接器进行操作,连接器很容易断开。

  4. : 步骤 4 中的图像 1,1
    • 稍微弯折连接器,使其远离逻辑板,来确保您进行其他操作时不会意外的重新连接。

  5. , 风扇: 步骤 5 中的图像 1,3 , 风扇: 步骤 5 中的图像 2,3 , 风扇: 步骤 5 中的图像 3,3
    • 使用撬棒的边缘,将风扇插头从逻辑板上的插座中撬出。

    • 在线缆下扭动,可以更加轻松分离连接插头。

    • 风扇的插座和插头可以参考第二三张图片。 确保在您径直撬动插头时不要将塑料插座从逻辑板上弄下来。 第二张逻辑板布局的俯视图有可能和您的机器有些许不同,因为机器的生产时间不同。 但是插座是相同的。

  6. : 步骤 6 中的图像 1,1
    • 移除下列三颗将风扇与逻辑板固定的螺丝。

    • 一颗7.2mm T6梅花螺丝

    • 两颗5.3mm T6梅花螺丝

  7. : 步骤 7 中的图像 1,1
    • 将风扇从逻辑板上的凹槽中提出,注意可能被卡住的电缆。

  8. , 主板: 步骤 8 中的图像 1,2 , 主板: 步骤 8 中的图像 2,2
    • 使用撬棒的尖端把扬声器电线拔出来。

    • 用手把右边扬声器电线往上提,把接口取出主板。

  9. : 步骤 9 中的图像 1,1
    • 从主板断开摄像头电线。

    • 把电线从主板上平行移开。如果仅仅网上拉可能会损坏主板电线。

  10. : 步骤 10 中的图像 1,2 : 步骤 10 中的图像 2,2
    • 断开下面四条电线:

    • AirPort/蓝牙电线

    • 光驱电线

    • 硬盘驱动电线

    • Trackpad 电线

    • 断开电线的时候,使用撬棒平头的一端,把接口从主板撬出来。

  11. : 步骤 11 中的图像 1,3 : 步骤 11 中的图像 2,3 : 步骤 11 中的图像 3,3
    • 使用手指把翻盖从键盘排线 ZIF 支架从抠出来。

    • 确保你是抠在翻盖的边缘,而不是接口本身。

    • 使用撬棒的一端把键盘排线从支架拉出来。

  12. : 步骤 12 中的图像 1,1
    • 如果有小条的黑胶带,把它从键盘的背光电线支架里移除。

  13. : 步骤 13 中的图像 1,3 : 步骤 13 中的图像 2,3 : 步骤 13 中的图像 3,3
    • 使用撬棒或你的指甲把剩下的翻盖从键盘背光电线 ZIF 支架中解救出来。

    • 确保你撬的是翻盖连接处,而不是支架本身。

    • 把键盘背光电线拉出支架。

  14. : 步骤 14 中的图像 1,1
    • 使用撬棒平头的一端把睡眠感应器/电池指示接口从支架中撬出来。

  15. : 步骤 15 中的图像 1,3 : 步骤 15 中的图像 2,3 : 步骤 15 中的图像 3,3
    • 拉出固定显示屏数据线的塑料拉条。

    • 把显示屏数据线从主板支架直接拉出来。

    • 不要向上拉起显示屏数据线,因为支架非常脆弱。像主板平行的方向拉动电线。

  16. : 步骤 16 中的图像 1,1
    • 移除以下九颗螺丝:

    • 五颗 3.6 mm T6 Torx 螺丝

    • 两颗 4.3 mm T6 Torx 螺丝

    • 两颗 7.2 mm T6 Torx 螺丝

  17. : 步骤 17 中的图像 1,2 : 步骤 17 中的图像 2,2
    • 移除以下两颗螺丝:

    • 一颗 8.6 mm 菲利普斯十字螺丝

    • 一颗 5.5 mm 菲利普斯十字螺丝

    • 从上盖移除显示屏数据线。

  18. : 步骤 18 中的图像 1,1
    • 使用撬棒一端从上盖黏胶里轻轻地剥离麦克风。

  19. : 步骤 19 中的图像 1,1
    • 小心边缘众多的接口,把主板从靠近光驱的一边提起来。

    • 把主板小心地从上盖揭出来。

    • 移除主板。

  20. 这个步骤还没有翻译 帮忙翻译一下

    : 步骤 20 中的图像 1,1
    • Pull the MagSafe DC-In board cable toward the heat sink to disconnect it from the logic board.

    • Do not pull upwards. Pulling the connector upwards may break the socket from the logic board.

    • Remove the MagSafe DC-In board.

终点

126等其他人完成本指南。

19条评论

It's worth noting that the two ribbon cables held in place by ZIF connectors are a real pain to put back in - it's very hard to get any force pushing them back into the ZIF connector. It took two small tweezers and a bit of luck on the keyboard cable.

peter - 回复

To get back the keyboard ribbon I put the piece of Anti-Static Kapton Tape to enter it.

Ivan Oliveras -

As stated the keyboard connector is a nightmare to get back in, how I finally did it is, I presented the cable to the socket and using a sticky label pressing down pulled the label towards the centre of the mainboard

The magsafe connector is not under the mainboard and it would be easy for apple to have designed it so that the socket was on the top not the underside of the mainboard

brian whittle - 回复

I was using my Laptop (literally in my lap), with the charger connected when it felt very warm on my pant leg. Felt the bottom of the case by the Mag Safe connector and it was very hot, almost burnt my hand. Surprisingly hot. Wouldn't charge right after that, kept getting hot, intermittent charging. Looked at the contacts with a jewelers loupe; the gold contacts were burnt and blistered, plastic melted so it wouldn't make full contact with the AC charger. Charger contacts OK. Replaced DC in board, works like new, saved a bundle of cash. Laid all the screws out in related groups on table top. e.g. All 10 cover screws in a square. MoBo Screws in MoBo pattern, or, you could use a small metric/millimeter ruler to tell which screw goes where.

ovenwally - 回复

This is a terrific guide. My project, a mid-2009 13" MacBook Pro 5,5, was a little different, and the biggest challenges I experienced were places where my computer's connections were different than the model illustrated. So I'll share how that computer differed for those who might come up against the same challenges. I'll add those notes and illustrations in the sections that apply.

I lucked out with the two keyboard ribbon cables. I simply nudged them into place with two different spudgers—one to pry gently upward from underneath, the other to redirect that force to press the cable directly into its slot. I was anticipating a struggle, but it was a nothing.

Thanks for the great work, Andrew Bookholt, and everyone else!

Larry Horton - 回复

添加评论

浏览统计数据:

过去 24 小时: 12

过去 7 天: 50

过去 30 天: 200

总计 87,485