跳转到主内容

当前版本的文档还未经巡查,您可以查看最新的已查核版本

你所需要的

  1. , 底盖: 步骤 1 中的图像 1,1
    • 卸下下列十个螺丝

    • 3个 14.4 mm Phillips #00 螺丝

    • 3个 3.5 mm Phillips #00 螺丝

    • 4个 3.5 mm 肩部 Phillips #00 螺丝

    • 装回小螺丝时,将其垂直于外壳的轻微弯曲对齐(不是直着往下对齐的)。

  2. : 步骤 2 中的图像 1,2 : 步骤 2 中的图像 2,2
    • 使用手指从靠近MacBook 风扇处撬开背盖。

    • 移走背盖、

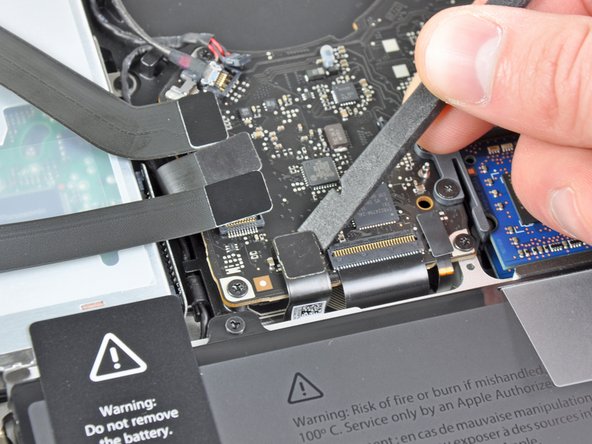
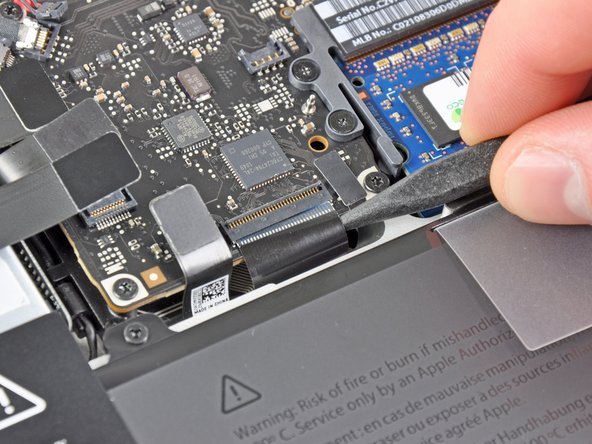
  3. , 电池连接: 步骤 3 中的图像 1,2 , 电池连接: 步骤 3 中的图像 2,2
    • 使用撬棒边缘处来将电池连接器从逻辑板插座上撬起。

    • 使用撬棒撬起连接器的两个“短边”有助于断开连接。 小心对连接器进行操作,连接器很容易断开。

  4. : 步骤 4 中的图像 1,1
    • 稍微弯折连接器,使其远离逻辑板,来确保您进行其他操作时不会意外的重新连接。

  5. , 风扇: 步骤 5 中的图像 1,3 , 风扇: 步骤 5 中的图像 2,3 , 风扇: 步骤 5 中的图像 3,3
    • 使用撬棒的边缘,将风扇插头从逻辑板上的插座中撬出。

    • 在线缆下扭动,可以更加轻松分离连接插头。

    • 风扇的插座和插头可以参考第二三张图片。 确保在您径直撬动插头时不要将塑料插座从逻辑板上弄下来。 第二张逻辑板布局的俯视图有可能和您的机器有些许不同,因为机器的生产时间不同。 但是插座是相同的。

  6. : 步骤 6 中的图像 1,1
    • 移除下列三颗将风扇与逻辑板固定的螺丝。

    • 一颗7.2mm T6梅花螺丝

    • 两颗5.3mm T6梅花螺丝

  7. : 步骤 7 中的图像 1,1
    • 将风扇从逻辑板上的凹槽中提出,注意可能被卡住的电缆。

  8. , 主板: 步骤 8 中的图像 1,2 , 主板: 步骤 8 中的图像 2,2
    • 使用撬棒的尖端把扬声器电线拔出来。

    • 用手把右边扬声器电线往上提,把接口取出主板。

  9. : 步骤 9 中的图像 1,1
    • 从主板断开摄像头电线。

    • 把电线从主板上平行移开。如果仅仅网上拉可能会损坏主板电线。

  10. : 步骤 10 中的图像 1,2 : 步骤 10 中的图像 2,2
    • 断开下面四条电线:

    • AirPort/蓝牙电线

    • 光驱电线

    • 硬盘驱动电线

    • Trackpad 电线

    • 断开电线的时候,使用撬棒平头的一端,把接口从主板撬出来。

  11. : 步骤 11 中的图像 1,3 : 步骤 11 中的图像 2,3 : 步骤 11 中的图像 3,3
    • 使用手指把翻盖从键盘排线 ZIF 支架从抠出来。

    • 确保你是抠在翻盖的边缘,而不是接口本身。

    • 使用撬棒的一端把键盘排线从支架拉出来。

  12. : 步骤 12 中的图像 1,1
    • 如果有小条的黑胶带,把它从键盘的背光电线支架里移除。

  13. : 步骤 13 中的图像 1,3 : 步骤 13 中的图像 2,3 : 步骤 13 中的图像 3,3
    • 使用撬棒或你的指甲把剩下的翻盖从键盘背光电线 ZIF 支架中解救出来。

    • 确保你撬的是翻盖连接处,而不是支架本身。

    • 把键盘背光电线拉出支架。

  14. : 步骤 14 中的图像 1,1
    • 使用撬棒平头的一端把睡眠感应器/电池指示接口从支架中撬出来。

  15. : 步骤 15 中的图像 1,3 : 步骤 15 中的图像 2,3 : 步骤 15 中的图像 3,3
    • 拉出固定显示屏数据线的塑料拉条。

    • 把显示屏数据线从主板支架直接拉出来。

    • 不要向上拉起显示屏数据线,因为支架非常脆弱。像主板平行的方向拉动电线。

  16. : 步骤 16 中的图像 1,1
    • 移除以下九颗螺丝:

    • 五颗 3.6 mm T6 Torx 螺丝

    • 两颗 4.3 mm T6 Torx 螺丝

    • 两颗 7.2 mm T6 Torx 螺丝

  17. : 步骤 17 中的图像 1,2 : 步骤 17 中的图像 2,2
    • 移除以下两颗螺丝:

    • 一颗 8.6 mm 菲利普斯十字螺丝

    • 一颗 5.5 mm 菲利普斯十字螺丝

    • 从上盖移除显示屏数据线。

  18. : 步骤 18 中的图像 1,1
    • 使用撬棒一端从上盖黏胶里轻轻地剥离麦克风。

  19. : 步骤 19 中的图像 1,1
    • 小心边缘众多的接口,把主板从靠近光驱的一边提起来。

    • 把主板小心地从上盖揭出来。

    • 移除主板。

  20. , 左扬声器: 步骤 20 中的图像 1,1
    • 把麦克风线给先拆下来。

  21. : 步骤 21 中的图像 1,1
    • 移除盖住左边扬声器接口的小块黑胶布。

  22. : 步骤 22 中的图像 1,1
    • 使用撬棒平头的一端撬动左边扬声器接口,把它从主板支架里撬出来。

    • 从线的底下开始向上撬。

  23. : 步骤 23 中的图像 1,1
    • 仔细地把左边扬声器从固定的泡沫胶里撬出来。

    • 移除左边扬声器。

  24. 这个步骤还没有翻译 帮忙翻译一下

    : 步骤 24 中的图像 1,1
    • Remove the piece of black tape covering the microphone connector.

  25. 这个步骤还没有翻译 帮忙翻译一下

    : 步骤 25 中的图像 1,1
    • Pull the microphone cable upward to lift its connector out of the socket on the logic board.

    • Remove the microphone.

  26. 这个步骤还没有翻译 帮忙翻译一下

    : 步骤 26 中的图像 1,1
    • Pull the MagSafe DC-In board cable toward the heat sink to disconnect it from the logic board.

    • Remove the DC-In board.

  27. 这个步骤还没有翻译 帮忙翻译一下

    : 步骤 27 中的图像 1,2 : 步骤 27 中的图像 2,2
    • Remove the three 8.4 mm #1 Phillips screws securing the heat sink to the logic board.

    • Don't lose the springs held under each of the screws.

    • Carefully remove the heat sink from the processor.

    • If the heat sink seems to be stuck, it may be helpful to gently pry it off the processor with a plastic spudger. Be careful not to break any surface mount components on the processor while prying.

    • Be sure to clean off the old thermal paste and apply a new layer before you reinstall the heat sink. We have a guide that makes it easy.

  28. 这个步骤还没有翻译 帮忙翻译一下

    : 步骤 28 中的图像 1,2 : 步骤 28 中的图像 2,2
    • Pull the two RAM retaining arms away from the center of the RAM chip.

    • The RAM chip should "pop" up slightly from its socket.

    • Pull the RAM stick out of its socket.

    • Repeat this process to remove the second RAM chip.

    • Logic board remains.

终点

129等其他人完成本指南。

6条评论

My son spilled soda into 13"MB early 2011, I did not get to repair for 6 weeks. Machine took over twice typical time to start-up and once running, cursor showed stuttered movement and launching applications was very slow.

I used guide (only steps 1-19) to remove logic board and delicately cleaned with very slightly damp Q-Tip (using Windex electronics cleaner) & dried, every place I cleaned, using compressed air. I did not remove the heatsink, as I assumed the paste protected the processor underneath.

Once cleaned, I reversed all steps and it booted quickly and all other issues disappeared. THANK YOU!!!

mitchkirk - 回复

what is logic board part number if I want to order new one

QASEM ALHADIDI - 回复

For the Early 2011 MBP A1278 with the Core i5 2.3 GHz processor, the part numbers are 661-5869 and 661-6078

Susanna -

Do you send to Brazil the same Logic board above Its the Early 2011 MBP A1278 with the Core i5 2.3 GHz processo. It had many issues with it’s Logic boar and I think it’s a manufacture defect. I’m so desaposentes with apple planned Obsolescence, ando no repair. It’s not the same apple. My computer was boutique inAustralia , so I’m protected by their consumer act(2010) I just have to prove it was a hidden problem.

Maria carolina - 回复

My track pad was difficult to "click". I've replaced batteries before, so I knew that it was definitely a swollen battery. However, when removing the damaged, swollen battery, I used the end of a flat head screw driver to pry up the battery connection... DON'T DO THAT! I saw the tiniest of sparks around pins 4-5-6 on the 9 pin battery connector. New battery installed, but the OS didn't recognize the new battery -- black "X" over the battery indicator. Further, the wall charger would not recharge the new battery. Instead, the computer ran off the 30% charge that new batteries are shipped with. I ordered another new battery, and after draining a second battery without being able to charge, I figured that spark was the sign that I fried something in the logic board. Indeed that was exactly the case, and logic board replacement did fix the issue. I found these instructions INVALUABLE in replacing my old logic board.

$260 lesson: Always use a plastic spudger when dislodging connectors in computers!

Thanks!

Jake Ketchum - 回复

添加评论

浏览统计数据:

过去 24 小时: 9

过去 7 天: 74

过去 30 天: 420

总计 209,520