简介
使用本指南更换破损的显示屏组件。
你所需要的
-
-
使用撬棒边缘处来将电池连接器从逻辑板插座上撬起。
Prying the battery connector off does not take much force. I did exactly what the guide suggested (walked it off back and forth) with the spudger without any problems. Just be very gentle, much like with anything inside laptops, they are very fragile and need to be worked with carefully. A+ instructions, battery replacement was a success.
Be patient on disconnecting this one. It worked for me step by step, little by little.
I used the nails of thumb and pointer finger simultaneously - worked pretty fine
I whittled down ends of two wooden strips to use, along with my fingernails to start with. I used halves of a wooden clothespin, but popsicle sticks should work too.
Mike Baker - 回复
-
-
-
稍微弯折连接器,使其远离逻辑板,来确保您进行其他操作时不会意外的重新连接。
I put some tape between the connector and socket while working on the drive.
That's a good tip
Anrothan -
Great tip, I did that too
One other note: The screw heads fit flush with the curvature of the case -- which means that they aren't exactly horizontal. In other words, they aren't perpendicular to the table that the computer is resting on. Don't try to force them straight in vertically, because you'll risk cross-threading them. (nearly ruined one screw hole myself!)
On my MacBook Pro, the connector seems to be an integral part of the battery.
I suspect it’s just like the special screwdriver required for seatbelts on cars – to discourage regular consumers from attempting repairs. Of course, this only encourages consumers to use the wrong tool to attempt to repairs
Dissambling my MacBookPro Premium Mid 2012 (i5-3210M 2.5Ghz) was easily, Careful with the screws, use screwdriver fitting exactly with the screws, you damage them very fast. Work very exactly, relaxed with time, consentration, good Tools and with feelings in your hands. Disconnect the Akku was easy if you take care, remove it to be safe, Two screws more, more space to work & haven`t to think about damaging someting. Apple use diffrent screws, you should have many difffrent scewdrivers. It is also good to clean everything inside, With time everything gets very dusty & dirty, don`t forget the sides and little fittings at the case. Use a pinsel, alcohol, soft peace stuff, it will look like new. If you have knowledge & experience, you can paint it in any colour or airbrushing for individualizing. You can also just polish it with a soft Politure (Sonax car Polish No1, NOT with wax or take an other light Politure you familiar & can do the job, A Laptop should serviced once a year, keeping it good working over years
First thing i do is open & cleanig everything inside,specially the cooling & fan, renew the thermal paste with an high quality product. Install the Nain System, clean up Bloatware and other unnecessary things, install standard software for daily use, additional change system components against better one (Edge to Firefox, Windows Media Player to VLC , an Office Suite and configuring everything for Data Protection, Privacy- & Indentety Protection, install Drivers from the component Manufactur (incedible effect, disable limitations, more functions, work better & faster, increasing performance, additional change the WiFi & Bluetooth Card to a better one a UMTS WWAN to an LTE Card, increase RAM with two Dual-Channel working SODIMMs, Use M2 or 2,5" SSD if no M2 Slot aviable) as System- and Software iDrive, a FAT32 formatted 32GB Partition to be safe of metaviruses comes with harmless downloads, and a big 2,5 HDD to store the user data. What does you guys think about this? Old Computer become a new life,
I livein Austria, near Vienna, if someone needs help or anything else, i would be glad to help. I always searching old or broken devices to bring them to new live. I also searching for spare parts, specilly a Bottom & Side Case and a 256GB or higher NGFF Storage Card for a Sony Vaio Tab 11 SVT1144HE (2014), some 14,1" Displays for a HP Probook 440G5 (2016), Elitebook MT 43 Mobile Thin Client, (2011), Dell Vostro 3460 (2012) Lenovo Thinkpad T440s (2014), and a Logic Board for an Lenovo Ideapad 330-15ARR (2017, damaged by Water i think) and a Logic Bord for an Alienware 17R4 with i7-6870HX & Nvidia 1080 (2018, CPU dead, maybe there is a repair Guide or workaround to bring it back to Life). I need always 8GB or 16GB DDR3 and DDR4 RAM Storage (perfectly two ident one for Dual-Channel use for Laptops, M2 SATA 6GB/s and NVMe PCIe SSDs 500GB or more and 2,5"SSD or HDD with 1TB or more and 3,5" HDD with 4GB or above. If you have some of this or other useful parts and doesn`t need them, please make me an offer, maybe
2
an change something you need. This is not a Business what i do, it`s more a Hobby with challenging new Excercices.. Thats the best Point. Plase forgive me as a Newbie this very long Post in the wrong Section, but if you are start writing you cannot stop.... But now i have to come to an end and would be happy if someone wants to get in contact. My E-Mail is: udontknowme@gmx.at (the adress name is just a notice against Big Data and for Privacy Protection!
-
-
-
使用撬棒扁平一端来从逻辑板上的插座中撬起AirPort/蓝牙 连接插头。
N.B! Thank you very much all you here on iFixit! Some IMPORTANT notes. Be very careful BEFORE prying the connectors up and down. They are very fragile and the picture could actually be seen as showing a bending loading in their weakest direction, AROUND its slender axis. The connector is slender and inserted on the logic board, so the gentle "walking" up and down should be done ALONG their slender direction and WITHOUT touching the adjacent connectors. If bending is done around its axis the soldering comes apart and the cable is done and gone. Just happened. These flat cables are one of the weakest design spots in my experience. They are a major time, money and geist consuming reason for malfunction like Wi-Fi connection problems, HDD, SSD not found internally but externally from USB issues et al being found on different forums. Thanks again and again.
-
-
-
小心的从逻辑板上的插座中拉起相机线缆。
My cable is broken, have the part number or code to buy?
I found there was plenty of length in the camera cable (as it goes around two sides of the optical drive) so does not need to be disconnected - just ease it out of the slot alongside the drive and lay it diagonally across.
-
-
-
-
使用上一步中描述的方法,断开剩余的三个天线连接器。
-
将电缆从AirPort /蓝牙支架上的插槽中拔出。
I found re-attaching these antennae connectors the trickiest bit by far as they appear very delicate and seating them correctly was fiddly. In the end lighting them from the side with a small torch helped to check their position before gently pushing them down. The first one made a clicking sound as it connected, the other two went on silently. MBP wifi working perfectly now. I’m fairly sure that was at least £100 of labour had I taken it in for repair so thanks ifixit for saving me money and for the warm glow of accomplishment!
Actually, on my repair attempt, one antenna cable broke (on the image the bottom right one in the red square), I’m not sure whether it broke already before or was morbid somehow. Fact is. suddenly I had this cable in my fingers, and was sure I completely broke the macbook and need to find a new display now.
But as it turned out: the Mac is still fully working, including WIFI, BT, Camera etc. So apart from my huge relief, I want to address that these cables may break easily at their connection with the display. And that one antenna might be not mandatory for WIFI to work.
How do I know which of these cables goes in which slot when attaching the new display?
BellaVulpa - 回复
-
-
-
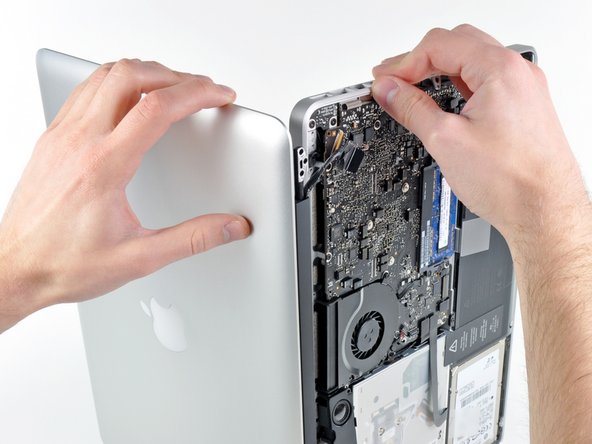
抓住固定在显示电路上的塑料拉片,并将其朝电脑侧旋转。
-
将显示电路直接从主板上的插座拉出。
This was the hardest part for me. It took me a bit to figure out what parts were the socket and which was the cable and where were they going to separate. What I did was gently twist the pull tab on the cable in a clockwise direction. This allowed me to see a small separation between the socket and cable. At that point I knew what side of the pull tab I had to use a little pressure on, to continue to wiggle the cable free.
Eric Olson - 回复
-
-
-
拆下以下两颗螺丝:
-
一颗8.6毫米十字螺丝
-
一颗5.5毫米十字螺丝
-
从显示屏上取下显示屏电路固定器。
When putting the display case back together, I found it MUCH easier to reinsert the display cable before screwing back in the data cable retainer. It did require me angling my screwdriver to get the rightmost screw in, but it was not too difficult. It certainly made it much easier to reinsert the display cable since I had more freedom to maneuver it back into position. Hope this help others. God Bless!
-
-
-
打开MacBook Pro,使显示屏垂直于上壳。
-
将打开的MacBook Pro放在桌子上,如图所示。
-
同时用左手握住显示屏和上盖,从下方的显示支架中取下剩余的T8 梅花螺丝。
I have found that keeping the MacBook more open than you’d think is the key to getting this step right. Initially I opened the lid only about 50º or so, but couldn’t free the hinges from the case even after removing the final two screws. Opening the lid to about 90º has made this much easier, and means the hinges come free without catching on the rest of the body of the Mac.
-
-
-
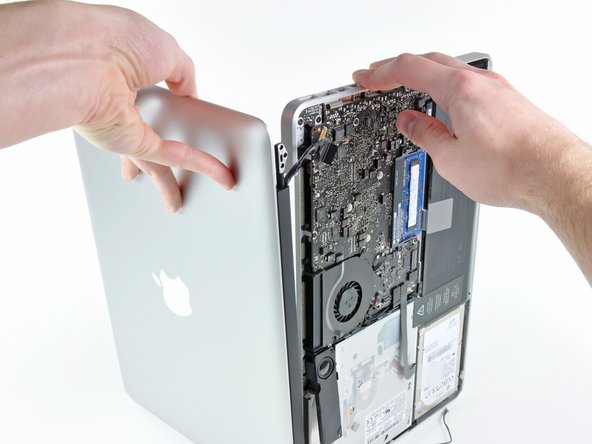
用右手抓住上壳,稍微向显示屏顶部旋转,以便上显示支架移出上壳的边缘。
-
将显示屏稍微远离上盖。
-
将显示器向上提起并远离上盖,夹住可能被抓住的任何支架或电路。
I used this guide to tighten the hinges; screen was all wobbly because the four screws that hold the screen in place had worked themselves loose. Surprised that getting at the screws required the full removal of the display. One thing that's helpful in putting it all together is in regard to adjusting the position of the hinges; with the screws loose, there is a lot of play in the hinges, and if you just torque them down, the lid won't fit right. I snugged up the screws then put the display back in place on the body & inserted one screw into each side, then loosened the hinge screws to align the screen. That has to happen before replacing the black plastic cover over the bottom edge of the display.
My Macbook Pro developed a severe wobble in the display so I took it in to the Genius bar to see what could be done. They told me that fixing it would involve replacing the whole display because the problem is due to a piece of plastic inside breaking off. I suspected it just needed to have the hinge screws tightened so I brought my laptop home and gave it a go using this guide. Well, it turns out I was right! The Torx screws joining the hinges to the the display had come loose at both sides. To fix this, I got the hinges lined up straight on the display and tightened them down. To attatch the hinges to the body, I tightened one screw on each side half way and closed the display to line it up with the body. I then proceeded then to tighten all of the Torx screws on the body. Thank you for the great guide, Philip! I love this site!
gilded yak - 回复
Might be a dumb question but can I swap screens from a broken MacBook Pro to the my working one (both same model)
Yes, you can
When separating the display, be crazy careful with those tiny WiFi antenna wires you undid in step 9. One of mine came apart with almost no force whatsoever. If you do break one, reroute them when reassembling so that ports J0 and J2 on the Airport card have good connections. That’ll retain your laptop’s ability to connect to 5GHz WiFi if you’re unable to replace the entire antenna assembly.
I’ve made the replacement following each step, everything went well except when I turn on the Mac, I can see light in the screen it actually starts all clear in white light, but then it gets dark. The computer is working well I use a external monitor connected with a HDMI adaptor, but the Macbook monitor just doesn’t work, I checked the Flex cable, it is working good, camera, sound, wifi, everything.
I don’t know what else to try. Could it be possible I just broke the mother board connection with the LCD?? Please help!
Don't know, you'll have to take it into a repair technician. Get them to have a look
Deca321 -
-


要重新组装您的设备,请按照该指南并按照相反的顺序重新组装。
要重新组装您的设备,请按照该指南并按照相反的顺序重新组装。
146等其他人完成本指南。


15条评论
Although this guide a difficulty rating I wasn't sure how long it would take a fairly adept novice to complete the R&R of the display. I took my time and did the tear down in 1 hour. I separated the fasteners by placing each section on a loop of tape above the work. The replacement of the new display took me about 2 hours. As the guide says it was just the tear down in reverse. Things that added to the replacement were getting the first 2 screws aligned and in place; re-routing the antenna and camera cables and making sure the camera cable socket connector was in correctly. The good news is it worked on the first power-up. Great guide.
Unfortunately no, they are not interchangeable.
Does the display come with the back cover included. I don't know the correct name for the part. I just mean the silver cover with the apple thingy in it.
No but you can buy that piece from PowerBook medic it is called the display housing
The same question here. I didn't show either got back shell or not
Great guide. Snagged an A- used from eBay for $150, December 2016 and installed in about 45 minutes. Thanks.
I used this guide to fix my Early 2011 MacBook Pro's wobbly screen. I took it into the Apple store, where a Genius took a look under the hood and told me the "Clutch is snapped," and that not only would it cost ~$500 to fix, but because the laptop is so old Apple won't do repairs anymore for it. When I took it apart, I could see that just a tiny part of the black plastic mechanism underneath the clutch cover was broken which did contribute to the wobble. I tightened the hinge screws and used Threadlocker Blue on them, and then used an automotive adhesive from Ace Hardware on the broken plastic piece. The wobble is gone and my MacBook is now fully functional once again!
I used this guide to tighten a loose display, and it worked great. The guide is very thorough, so if you follow it step by step you should have no problem. The hardest part was disconnecting the display cable from the socket on the board. Other than that go slow, take your time, and you should be fine.
Eric Olson - 回复
Can use it to replace Mid 2014 MacBook Pro?
It is possible to replace just the glass? How do I do it?
Thanks
Hello guys, can I install screen of MacBook aluminium late 2009 A1278 on MacBook pro 2011 ? If I can't use webcam it's note a problem for me !
How much weight can I save by removing the optical drive?
gunes314 - 回复
You can save a lot of weight if lets say your installing a solid state drive or putting in a second hard drive but if you know that you use the CD/DVD disc drive a lot then you might just want to leave the drive alone.
Marshall WahlstromHelgren -
Tip: Use one of those weekday pill holders to have a cheep way to store screws you remove and each day of the week can be for different sizes or parts. It has been handy to have (much less expensive than the magnetic mat.
Robert Wacker - 回复
Hello, where can I buy the screws I need in case I lose one of them?
taylornya - 回复
iFixit sells a kit: MacBook Pro Unibody Lower Case Screw Set
Darrell Johnson -
I have one stripped screw... How opening without drill it?! Any suggestions please?
rodrigosady - 回复
I also stripped a couple screws. I wasn’t able to open it up without drilling. After drilling the heads and removing the cover it was easy to hacksaw the tip and unscrew with a standard driver.
Michael Wilkens -
We have a guide for that!
如何卸下滑丝的螺丝
Sam Omiotek -
My top tip - make sure you buy good quality Phillips screwdrivers and a magnetic holder. Cheap screwdrivers won’t get the screws undone safely. Without a magnetic holder you have no chance of getting the tiny crews in and out safely.
jeremyyoung - 回复
A good Phillips 00 is your friend here. Also, when reinserting the screws, gently start anticlockwise and you wil feel a click at the start of the thread. This tells you you’re in the right place and less likely to cross-thread through force in the wrong place.
Iain Boyd - 回复
I feel like these are 000 screws. Amazon sales describe them as such and my 000 screwdriver fits better
cam2000deluxe -
Before ordering a new Trackpad remove the existing battery and try clicking the Trackpad. If it clicks OK with the battery out the source of problem is likely a swollen battery, which should to be replaced even if it still works to some degree. From the side of the battery you will likely see the soft part of the battery bulging beyond the hard case.
Patrick Langvardt - 回复
That’s absolutely correct as I can testify. With the battery removed I also adjusted the T6 set screw that adjusts the sensitivity of the trackpad click, evidently someone had cranked mine down tighter than the factory setting.
Gary Register -
Le quatrième paragraphe dans les instructions en français n’est pas correct : ce ne sont pas les 2 petites vis, mais les 7 petites vis qui sont inclinées. Et les 3 grandes sont bien verticales.
Degeorges - 回复
Bonjour ! Merci de votre observation. J’ai corrigé la traduction. iFixit étant un wiki, n’hésitez pas à modifiez si vous remarquez une erreur :) Encore merci de votre attention et à bientôt !
Claire Miesch -
Tip: if you have a magnetic screw mat or similar, lay the macbook over the mat to make sure it catches any screws that may decide to fall of and hide under your table
Moritz - 回复
Funny, it's not her hands that are doing the close ups. :)
Cinemated Man - 回复
What's the difference between the shouldered and non shouldered screws? They look exactly the same to me.
MLNLRD - 回复