跳转到主内容

当前版本的文档还未经巡查,您可以查看最新的已查核版本

你所需要的

  1. , Macbook 背盖: 步骤 1 中的图像 1,1
    在这个步骤中使用的工具:
    Magnetic Project Mat
    $19.95
    购买
    • 将固定在顶盖和背盖的螺丝卸除:

    • 两个 2.3mm的P5五角螺丝

    • 八个3.0mm的P5五角螺丝

    • 在整个维修过程中,这款磁性工作垫可以让每颗螺丝都能被磁力吸附,以帮助你将这些螺丝正确地安装回去,以免损坏设备。

  2. : 步骤 2 中的图像 1,1
    • 将手指伸入顶盖和背盖之间。

    • 轻轻地将背盖与顶盖拉开。

    • 将取下的背盖放置在一旁。

  3. : 步骤 3 中的图像 1,3 : 步骤 3 中的图像 2,3 : 步骤 3 中的图像 3,3
    • 背盖和顶盖通过中心的两个塑料夹扣相连。

    • 重新组装的过程中,轻按两个塑料夹扣重新连接。

  4. 这个步骤还没有翻译 帮忙翻译一下

    : 步骤 4 中的图像 1,1
    • Remove the plastic cover adhered to the battery contact board.

  5. 这个步骤还没有翻译 帮忙翻译一下

    : 步骤 5 中的图像 1,1
    • Remove the following screws securing the battery connector board to the logic board:

    • Two 2.8 mm T6 Torx screws

    • One 7.0 mm T6 Torx shouldered screw

  6. 这个步骤还没有翻译 帮忙翻译一下

    : 步骤 6 中的图像 1,2 : 步骤 6 中的图像 2,2
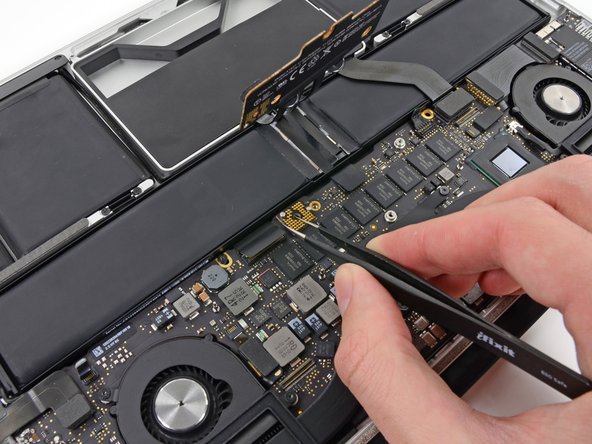
    • Use tweezers to remove the small plastic cover located near the bottom right of the battery connector board.

  7. 这个步骤还没有翻译 帮忙翻译一下

    : 步骤 7 中的图像 1,1
    • Remove the wide head 6.4 mm T6 Torx screw securing the battery connector to the logic board assembly.

  8. 这个步骤还没有翻译 帮忙翻译一下

    : 步骤 8 中的图像 1,2 : 步骤 8 中的图像 2,2
    • Carefully lift the battery connector board up off the logic board.

    • It is recommended to bend the battery cables just slightly, to keep the board suspended up above the logic board and out of the way.

    • Do not fold the board completely over, or crease the cables, as this may damage the battery.

  9. 这个步骤还没有翻译 帮忙翻译一下

    : 步骤 9 中的图像 1,2 : 步骤 9 中的图像 2,2
    • Grasp the Interposer with tweezers.

    • An interposer is the name for an interface that links one electrical connection to another. In this repair, it is the board connecting the battery to logic board.

    • Lift the Interposer off the logic board and remove it.

    • Removing this board will ensure that the battery remains disconnected throughout your repair, preventing your computer from accidentally powering on. It's also a good idea to take it out so it doesn't fall out unexpectedly.

  10. 这个步骤还没有翻译 帮忙翻译一下

    : 步骤 10 中的图像 1,3 : 步骤 10 中的图像 2,3 : 步骤 10 中的图像 3,3
    • Use the flat end of a spudger to pry the headphone jack cable connector straight up off its socket on the logic board.

    • Gently bend the headphone jack cable to 90° up from the logic board.

    • Bending the headphone jack cable will allow you to disconnect the left speaker cable connector without having the headphone jack cable in the way.

  11. 这个步骤还没有翻译 帮忙翻译一下

    : 步骤 11 中的图像 1,2 : 步骤 11 中的图像 2,2
    • Wedge the tip of a spudger beneath the left speaker cable connector.

    • Gently pry the left speaker cable connector up off from its socket on the logic board.

    • Be sure you are prying up on the connector, not the socket itself.

  12. 这个步骤还没有翻译 帮忙翻译一下

    : 步骤 12 中的图像 1,1
    • Use a T5 Torx driver to remove the following screws securing the left speaker to the upper case:

    • One black 6.8 mm screw

    • One silver 6.3 mm screw

    • One black 4.9 mm screw

    • The silver screw (in the corner) may be covered with a foam pad. If so, use your tweezers to peel it up and remove it.

  13. 这个步骤还没有翻译 帮忙翻译一下

    : 步骤 13 中的图像 1,2 : 步骤 13 中的图像 2,2
    • Lift and remove the left speaker out of the upper case.

终点

22等其他人完成本指南。

5条评论

Rats:

"Wedge the tip of a spudger beneath the left speaker cable connector.

Gently pry the left speaker cable connector up off from its socket on the logic board.

Be sure you are prying up on the connector, not the socket itself."

I accidentally pried up on the socket, which looks like it was soldered to the board. Left speaker doesn't work, of course. I assume there is no fix for this, other than replacing the board??

Don Sandifer - 回复

Thank you very much for the walkthrough. No problems to follow at all. Everything worked as a charm. Changed both speakers as per your other guide.

timofej.se - 回复

I was able to follow the steps exactly as described without damaging anything. Patience is the key.

Max Max - 回复

This was great! I fixed the computer easily.

Kyle Meyers - 回复

Très bon tuto. Clair et précis. Changement des 2 HP en moins d'1 heure.

Bravo à l'équipe.

Dominique BONNEL - 回复

添加评论

浏览统计数据:

过去 24 小时: 6

过去 7 天: 28

过去 30 天: 107

总计 16,579