跳转到主内容

当前版本的文档还未经巡查,您可以查看最新的已查核版本

已存档的指南
本指南只作为历史记录保留。请使用指南的最新版本来进行维修。

你所需要的

  1. , Macbook 背盖: 步骤 1 中的图像 1,1
    在这个步骤中使用的工具:
    Magnetic Project Mat
    $19.95
    购买
    • 将固定在顶盖和背盖的螺丝卸除:

    • 两个 2.3mm的P5五角螺丝

    • 八个3.0mm的P5五角螺丝

    • 在整个维修过程中,这款磁性工作垫可以让每颗螺丝都能被磁力吸附,以帮助你将这些螺丝正确地安装回去,以免损坏设备。

  2. : 步骤 2 中的图像 1,1
    • 将手指伸入顶盖和背盖之间。

    • 轻轻地将背盖与顶盖拉开。

    • 将取下的背盖放置在一旁。

  3. : 步骤 3 中的图像 1,3 : 步骤 3 中的图像 2,3 : 步骤 3 中的图像 3,3
    • 背盖和顶盖通过中心的两个塑料夹扣相连。

    • 重新组装的过程中,轻按两个塑料夹扣重新连接。

  4. 这个步骤还没有翻译 帮忙翻译一下

    : 步骤 4 中的图像 1,1
    • Remove the plastic cover adhered to the battery contact board.

  5. 这个步骤还没有翻译 帮忙翻译一下

    : 步骤 5 中的图像 1,1
    • Remove the following screws securing the battery connector board to the logic board:

    • Two 2.8 mm T6 Torx screws

    • One 7.0 mm T6 Torx shouldered screw

  6. 这个步骤还没有翻译 帮忙翻译一下

    : 步骤 6 中的图像 1,2 : 步骤 6 中的图像 2,2
    在这个步骤中使用的工具:
    Tweezers
    $4.99
    购买
    • Use tweezers to remove the small plastic cover located near the bottom right of the battery connector board.

  7. 这个步骤还没有翻译 帮忙翻译一下

    : 步骤 7 中的图像 1,1
    • Remove the wide head 6.4 mm T6 Torx screw securing the battery connector to the logic board assembly.

  8. 这个步骤还没有翻译 帮忙翻译一下

    : 步骤 8 中的图像 1,2 : 步骤 8 中的图像 2,2
    • Carefully lift the battery connector board up off the logic board.

    • It is recommended to bend the battery cables just slightly, to keep the board suspended up above the logic board and out of the way.

    • Do not fold the board completely over, or crease the cables, as this may damage the battery.

  9. 这个步骤还没有翻译 帮忙翻译一下

    : 步骤 9 中的图像 1,2 : 步骤 9 中的图像 2,2
    在这个步骤中使用的工具:
    Tweezers
    $4.99
    购买
    • Grasp the Interposer with tweezers.

    • An interposer is the name for an interface that links one electrical connection to another. In this repair, it is the board connecting the battery to logic board.

    • Lift the Interposer off the logic board and remove it.

    • Removing this board will ensure that the battery remains disconnected throughout your repair, preventing your computer from accidentally powering on. It's also a good idea to take it out so it doesn't fall out unexpectedly.

  10. 这个步骤还没有翻译 帮忙翻译一下

    : 步骤 10 中的图像 1,2 : 步骤 10 中的图像 2,2
    • Use the flat end of a spudger to pry the right side of the I/O board data cable connector up off its socket on the I/O board.

    • When prying the I/O board data cable connector from its socket, make sure to pry the connector itself and not the socket. Prying the socket may cause irreversible damage to the I/O board.

  11. 这个步骤还没有翻译 帮忙翻译一下

    : 步骤 11 中的图像 1,2 : 步骤 11 中的图像 2,2
    • Wedge the flat end of a spudger beneath the left side of the I/O board data cable connector.

    • Gently twist the spudger to disconnect the I/O board data cable connector from its socket on the logic board.

  12. 这个步骤还没有翻译 帮忙翻译一下

    : 步骤 12 中的图像 1,1
    • Lift and remove the I/O board data cable from the MacBook Pro.

  13. 这个步骤还没有翻译 帮忙翻译一下

    : 步骤 13 中的图像 1,3 : 步骤 13 中的图像 2,3 : 步骤 13 中的图像 3,3
    • Use the flat end of a spudger to pry the SSD cable connector up from its socket on the logic board.

    • Move the SSD cable connector out of the way.

  14. 这个步骤还没有翻译 帮忙翻译一下

    : 步骤 14 中的图像 1,2 : 步骤 14 中的图像 2,2
    • Wedge the pointed end of a spudger beneath the right speaker cable connector.

    • Gently pry the right speaker cable connector up off from its socket on the logic board.

    • Be sure you are prying up on the connector, not the socket itself.

  15. 这个步骤还没有翻译 帮忙翻译一下

    : 步骤 15 中的图像 1,2 : 步骤 15 中的图像 2,2
    在这个步骤中使用的工具:
    Tweezers
    $4.99
    购买
    • Use a T5 Torx driver to remove the following screws securing the right speaker to the upper case:

    • One black 6.8 mm screw

    • One silver 6.3 mm screw

    • One black 4.9 mm screw

    • The silver screw (in the corner) may be covered with a foam pad. If so, use your tweezers to peel it up and remove it.

  16. 这个步骤还没有翻译 帮忙翻译一下

    : 步骤 16 中的图像 1,2 : 步骤 16 中的图像 2,2
    • Lift and remove the right speaker out of the upper case.

    • If necessary, de-route the right speaker cable from its channel in the upper case.

  17. 这个步骤还没有翻译 帮忙翻译一下

    : 步骤 17 中的图像 1,3 : 步骤 17 中的图像 2,3 : 步骤 17 中的图像 3,3
    • Use the flat end of a spudger to pry the headphone jack cable connector straight up off its socket on the logic board.

    • Gently bend the headphone jack cable to 90° up from the logic board.

    • Bending the headphone jack cable will allow you to disconnect the left speaker cable connector without having the headphone jack cable in the way.

  18. 这个步骤还没有翻译 帮忙翻译一下

    : 步骤 18 中的图像 1,2 : 步骤 18 中的图像 2,2
    • Wedge the tip of a spudger beneath the left speaker cable connector.

    • Gently pry the left speaker cable connector up off from its socket on the logic board.

    • Be sure you are prying up on the connector, not the socket itself.

  19. 这个步骤还没有翻译 帮忙翻译一下

    : 步骤 19 中的图像 1,1
    在这个步骤中使用的工具:
    Tweezers
    $4.99
    购买
    • Use a T5 Torx driver to remove the following screws securing the left speaker to the upper case:

    • One black 6.8 mm screw

    • One silver 6.3 mm screw

    • One black 4.9 mm screw

    • The silver screw (in the corner) may be covered with a foam pad. If so, use your tweezers to peel it up and remove it.

  20. 这个步骤还没有翻译 帮忙翻译一下

    : 步骤 20 中的图像 1,2 : 步骤 20 中的图像 2,2
    • Lift and remove the left speaker out of the upper case.

  21. 这个步骤还没有翻译 帮忙翻译一下

    : 步骤 21 中的图像 1,3 : 步骤 21 中的图像 2,3 : 步骤 21 中的图像 3,3
    • Use your thumb or finger to bend the plastic spring bar on the SSD tray, freeing the two clips at the front side of the device.

    • While holding the spring bar depressed, tilt the SSD assembly up out of its cavity.

  22. 这个步骤还没有翻译 帮忙翻译一下

    : 步骤 22 中的图像 1,1
    • Remove the SSD assembly from the upper case.

  23. 这个步骤还没有翻译 帮忙翻译一下

    : 步骤 23 中的图像 1,2 : 步骤 23 中的图像 2,2
    • Remove three 2.2 mm T5 Torx screws from each side of the battery (six screws total).

  24. 这个步骤还没有翻译 帮忙翻译一下

    : 步骤 24 中的图像 1,1
    • The liquid adhesive remover provided in your kit can affect the antireflective coating on your MacBook Pro's display.

    • To protect your display, place a sheet of aluminum foil between the display and keyboard and leave it there while you work.

  25. 这个步骤还没有翻译 帮忙翻译一下

    : 步骤 25 中的图像 1,2 : 步骤 25 中的图像 2,2
    • Now that your MacBook Pro is fully prepped, it's time to prep yourself.

    • iFixit adhesive remover contains acetone, a mild skin and eye irritant.

    • Wear eye protection when handling and applying the adhesive remover. (Eye protection is included in your kit.)

    • Do not wear contact lenses without eye protection.

    • Protective gloves are also included in your kit. If you are concerned about skin irritation, put your gloves on now.

  26. 这个步骤还没有翻译 帮忙翻译一下

    : 步骤 26 中的图像 1,2 : 步骤 26 中的图像 2,2
    • Open your container of adhesive remover.

    • Fill the syringe included in your kit with a small amount (approximately 1-2 milliliters) of adhesive remover.

    • It's best to fill the syringe with no more than about 1-2 milliliters of adhesive remover at a time, so as to avoid accidentally applying too much.

    • Refill your syringe as needed throughout the rest of this procedure.

  27. 这个步骤还没有翻译 帮忙翻译一下

    : 步骤 27 中的图像 1,1
    • Apply a small amount of adhesive remover (approximately 1 ml) evenly under the edge of the leftmost battery cell.

    • Wait 2-3 minutes for the liquid adhesive remover to penetrate underneath the battery cell before you proceed to the next step.

  28. 这个步骤还没有翻译 帮忙翻译一下

    : 步骤 28 中的图像 1,3 : 步骤 28 中的图像 2,3 : 步骤 28 中的图像 3,3
    在这个步骤中使用的工具:
    Plastic Cards
    $2.99
    购买
    • Insert the flat edge of a spudger or plastic card underneath the leftmost battery cell.

    • Run your tool along the bottom perimeter of the battery cell and lift to begin separating the adhesive.

  29. 这个步骤还没有翻译 帮忙翻译一下

    : 步骤 29 中的图像 1,3 : 步骤 29 中的图像 2,3 : 步骤 29 中的图像 3,3
    • Insert the spudger along the left-hand side of the leftmost battery cell.

    • Run the spudger up along the left side of the leftmost battery cell.

    • Slightly pry the leftmost battery cell to release it from the adhesive.

  30. 这个步骤还没有翻译 帮忙翻译一下

    : 步骤 30 中的图像 1,3 : 步骤 30 中的图像 2,3 : 步骤 30 中的图像 3,3
    • Repeat the above steps to separate the adjacent battery cell from its adhesive:

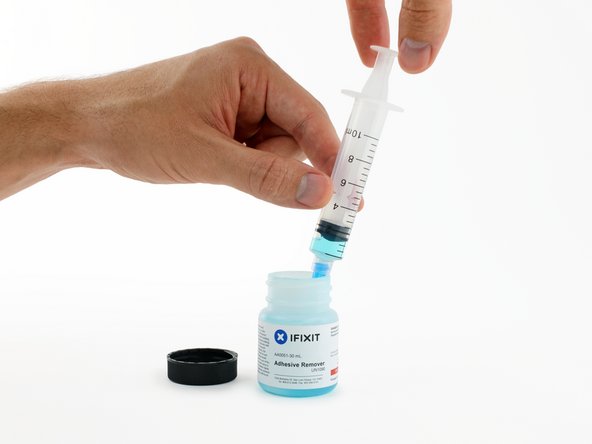
    • Apply a small amount (about 1 ml) of liquid adhesive remover under the battery cell.

    • Wait 2-3 minutes for the adhesive remover to penetrate and soften the adhesive.

    • Carefully wedge a spudger or plastic card inwards, being careful to not damage the battery, and separate the battery cell from the adhesive securing it to your MacBook Pro.

  31. 这个步骤还没有翻译 帮忙翻译一下

    : 步骤 31 中的图像 1,3 : 步骤 31 中的图像 2,3 : 步骤 31 中的图像 3,3
    • Insert the flat end of a spudger underneath the larger leftmost battery cell.

    • Carefully wedge the spudger inwards, being careful to not damage the battery cells.

    • Pry the larger leftmost battery cell up off the upper case.

  32. 这个步骤还没有翻译 帮忙翻译一下

    : 步骤 32 中的图像 1,3 : 步骤 32 中的图像 2,3 : 步骤 32 中的图像 3,3
    • Grasp the battery cells and gently move (but do not remove) them from their recess in the upper case.

    • Leave the battery cells resting on top of the upper case as shown in the third picture.

  33. 这个步骤还没有翻译 帮忙翻译一下

    : 步骤 33 中的图像 1,3 : 步骤 33 中的图像 2,3 : 步骤 33 中的图像 3,3
    • Switch sides and repeat the above procedure for the two battery cells on the right-hand side of the MacBook Pro.

    • Remember to add about 1 ml of liquid adhesive remover under each battery cell, and wait 2-3 minutes for it to penetrate before prying up the cell.

    • Be careful not to puncture or otherwise damage the battery cells.

  34. 这个步骤还没有翻译 帮忙翻译一下

    : 步骤 34 中的图像 1,3 : 步骤 34 中的图像 2,3 : 步骤 34 中的图像 3,3
    • Lift the battery as a whole up out of the upper case, and remove the battery.

    • Before installing a new battery, remove all the old adhesive from the MacBook Pro's case.

    • With a little luck, you can slowly pull out each strip of adhesive with your fingers.

    • Otherwise, soak each section of adhesive with a bit of adhesive remover for 2-3 minutes, and then scrape it out with an opening pick or one of the other tools in your kit. This can take quite a bit of work, so be patient.

    • Mop up any remaining adhesive remover and give your MacBook Pro a few minutes to air dry.

    • The replacement battery included in your iFixit kit comes with adhesive pre-installed. Test the battery's fit and alignment carefully before peeling off the film covering the adhesive, and then press each cell firmly into place. If any additional films/liners are present that weren't on your original battery, remove them now.

    • Calibrate your new battery before using it: allow it to drain overnight, then charge it to 100% and drain it again until your MacBook Pro shuts down automatically. Charge it again and use it normally.

    • If you notice any unusual behavior or problems after installing your new battery, you may need to reset your MacBook Pro's SMC.

终点

另外一个人完成了本指南。

0条评论

添加评论

浏览统计数据:

过去 24 小时: 0

过去 7 天: 0

过去 30 天: 14

总计 419