简介
用这条指南来安全地用iFixit更换电池工具从你那MacBook Pro上拆除满是胶的电池。你的iFixit工具中的除胶剂可以溶化固定电池的胶,让你轻而易举地拆除电池。
“iFixit除胶剂非常易燃。”请在通风良好的地区做这件工作。在此过程中不要吸烟或是靠近明火。
注意:用来溶解胶的溶剂会损伤某些塑料。遵照所有这些指导并在涂溶剂的时候多加小心。
你所需要的
-
-
在MacBook Pro底壳的前部中心位置嘬一个带把手的吸盘。
-
抬起吸盘,在底壳和机身之间制造一道缝隙。
To replace the bottom just line it up just like it came from the factory. Make sure it clears the display connectors. And press firmly down until the clips connect to the bottom again.
-
-
-
再把你的撬片插进底壳的前部边缘,靠近最中间的两个螺丝口其中之一的地方。
-
用力扭动撬片,来打开固定底壳的第三个卡扣。
-
在另一个最中间的螺丝口处重复上述步骤,打开第四个卡扣。
My 3rd and 4th clips released simultaneously with clip 1 and 2.
Therefore I was looking to do something which had already been accomplished.
yeah be sure not to bend those clips by the display bottom. You pull towards yourself to get it off
-
-
-
用力将底壳向MacBook的前端方向(与合叶相反的方向)拉,以此来分离最后的固定底壳的卡扣。
-
这可能需要用点儿力。
Difficult to explain clearly, but worked easily for me by gripping the adjacent bottom and top corners then pulling in opposite directions, rather than trying to grip the hinge corner which is too narrow to afford a strong grip.
This helped me. It needed more force than what I expected. Basically grab the corner with 6.2mm screw with one hand and the cover of that same corner with the other. Then pull the cover and push the laptop. Careful, it pops off with force!
I initially tried shifting the whole panel off the front after using the separating tool to make some space at the back where the hinges are. I only had luck when I pushed the panel back to it’s normal state and using the separating tool again to open the front, then getting my fingers underneath the slide it off the front was easy. I guess the lesson is to not use the separating tool to “push from the back“.
Josh Brown - 回复
This step really through me through a loop. My last two MBP were a 2011 and 2013 and on those the bottom just lifted off when you removed the screws. The clips and this sliding lock design added in the 2017 model was frustrating the first time. I was following a youtube video first and he did not explain the sliding part at all. I should have come here first, this guide explains it pretty well. The second time I opened my 2017, I kept an “opening pick” between the bottom panel and the body on each side, and used my two smallest screwdrivers as levers in both “front” corner screw holes. Used the same method without the picks to put it back together at the end. Wayyy easier that trying to grip the panel or laptop body. Just make sure the screwdrivers/pins that you’re using as levers are small enough to be loose in the screw holes and have room to move
I used a pick underneath one of the back corners and nudge it (push down and towards the front - to get it off the hinge). This will make it easier to do the same for the other corner. The lower case will move off the middle plastic L-clips (which you will see after you inspect it.) Cheers! =)
I have found that your iFixit blue pry tool is excellent at giving me leverage to slide the bottom case forward to release it from the internal clips.
-
-
-
摘除底壳。
I used the green prying tool in the air gap at the rear to nudge the bottom forward.
That is far easier and more reliable.
David. I agree. I've found the blue iFixit prying tool most helpful. I place it with the curve of the tool around the hinge and move the bottom case towards the front to release it from the slide-in clips. I consider myself to have pretty good grip strength but I have had some bottom cases that just wouldn't budge until I used this method. Scott The Mac Doctor
Like Dave and "themacdoctor" said, this job is MUCH easier if you use a spudger or similar tool to gently push the cover away from the air gap, at the rear of the laptop. Once you do this, you've loosened clips that are on the inside of the bottom case. This is much easier than tugging on the case itself.
ECJohansen - 回复
-
-
-
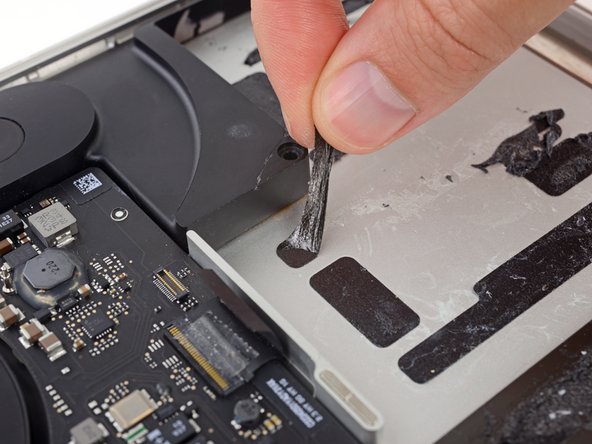
小心地剥开这一大片盖住电池接头的胶带,它在主板最靠近电池的边缘。
-
拿走这胶带。
once the tape's back in place, it doesn't look tightly attached. not sure, did I do something wrong here or it should be so.
The tape will likely not adhere as well as when it came out of the factory. This isnt an issue! As long as the tape is in place when the lower cover is put back on the device you should be good to go.
The underside of the tape is not uniform. Therefore, pay attention to which direction it is placed by looking at the underside when you remove it. Possibly mark one edge so that you can replace in the same direction during reassembly.
Rick Jaffe - 回复
Mark one of the tape’s edges and, upon removal, stick it down with the same orientation. The first time I was inside the MacBook Pro (to upgrade the SSD) I failed to do this, and spent almost 30 minutes trying to get it back like it had been. Making a photo also helps.
anasazi4st - 回复
-
-
-
轻轻地剥开这个盖住电池排线接口的小片胶带。
-
-
-
用撬棒的尖头挑起这个固定排线的黑色小卡扣。
-
-
-
把电池数据排线滑出它的插槽来断开连接。
-
滑的时候要在排线方向平行于主板滑动。
The little tab that you pull back on, at least in my cable, was simple glued onto the rest of the cable. I tried to carefully remove the cable, and the tab came off. I did not have flat tweezers in the ifixit replacement kit and did not want to pinch the cable with sharp instruments. Therefore, be extremely careful when removing the tab as it is difficult to reattach the cable without it.
Rick Jaffe - 回复
-
-
-
把电池数据排线弯到后面去让它不要挡路。
-
如果你要更换电池,则可能需要完全移除此电缆并将其转移到新电池上。断开两端并小心地取下电缆。在安装过程中,注意不要倒置或反向安装——注意照片中的方向。
The new battery I received did not come with the battery board data cable, so I had to remove the existing one and transfer it. The lock at the smaller end is the same mechanism as the one at the end shown in steps 11 and 12, but smaller (and harder to see. It helps to gently straighten the left end of the cable before trying to insert it in the end of the replacement circuit board.
I can corroborate MikeG1’s comment. My battery came without the long data cable as well. I had to remove it from the fried battery. Plastic lock tab mechanism on the ZIF connector is smaller. My inspection microscope helped to transfer the cable to the new battery board. Thanks Mike!
Likewise - the new battery came without a data cable. The cable was successfully removed from the old battery assembly and installed on the new battery, but it was tricky and nerve-racking (the cable is delicate and the connectors are very small) without instruction provided! The instructions should be updated to highlight the missing cable possibility, and provide information/illustration on transferring the cable.
In step 13, notice the amount of the data cable that sticks out of the connector. When moving this cable to the new battery, it is difficult to tell how far to push the cable into the connector or when it is fully inserted because the cable is so bendable.
Rick Jaffe - 回复
AMEN!! This was the hardest part of the ENTIRE process! Hard to know when the small end of the cable was “fully” inserted. Cable is SOOOOO delicate!
my old battery was working but could not hold a charge very long so I replaced the battery and now my mac does not recognize the new battery. Thought it was a bad battery at first but I purchased a new batter and still the same problem, My mac will work off power outlet but does not register it has a battery at all now. I tried putting my old battery back on but i damaged the very small clip when i slid out the flex cable so its gone now. Could this cable be at fault? I don/t know what else it could be, i only messed with the battery.
I have this same problem! Did you figure out what the issue was? Do I need a new flex cable?
I am having the same issue as Leo. After install. Is there a way to identify the fault?
Although the rest of fixit manual on this is excellent, this step is woefully lacking and the fact that the replace “kit” doesn’t have the Battery Board Data cable included makes the replacement kit significantly lacking (especially compared to other kits and instructions I’ve used before from them)
-
-
-
用一把T5 内梅花头改锥拆掉这个固定电池接头的3.7mm“薄煎饼”螺丝。
When the battery management “BMS” circuit board is re-installed, loosely install the two 3.7 mm screws, put a spudger on the left side of the BMS board to wedge theBMS board to the right then tighten the two 3.7 mm screws. The reason for doing this is that the two power traces on the board may not make physical contact with the battery connector (connector at where the spudger is on step 15). One clue that you didn’t have physical contact is if you reinstalled everything but there is no power unless the AC supply is plugged in (with battery meter on the top at 0%). This was what happened to me. The reason is that when you bend the battery connector in step 15, it’s no longer in alignment with the traces on the BMS board and hence, you have to shift the BMS board to the right to compensate. Once I did this, voila 64% power.
-
-
-
-
用撬棒轻轻地抬起电池接头,断开电池。
-
将接头抬起足够高使得它从插槽中分离。如果在修理过程中它意外碰到插槽,你的MacBook Pro有可能会受损。
On disassembly note the position of the connector before you lift. It has two gold-plated connections on the underside. On reassembly these need to make contact with the matching battery board connectors. Bending the connector out of the way deformed it a bit, and on reassembly I could see that the connectors didn't align well with the board's connectors. I needed to adjust the battery board position to the left a bit by loosening the 3.1 mm screws in step 23. Possibly this could be the reason why some people report that new battery is not detected.
-
-
-
准备一个iOpener,把它放在触摸板排线上持续大概一分钟,来软化把触控板排线黏在电池上的双面胶。
-
如果你没有iOpener,可以用一台吹风机来加热排线。排线应该是热的,但不能热到没法碰。千万小心不要使电池过热。
-
-
-
把撬棒的平头插到电池板下最靠近主板的一头。
-
抬起电池板大约45度。如果有必要,抬起电池插头来给电池板更多的空间。
A ce moment là, il faudrait déconnecter la nappe de données de la carte de la batterie et la mettre de côté
At this point I Jump to step 30 . I do not use the liquid adhesive remover method. I use a silicone rubber kitchen food scooper. The scoop end is a soft, silicone rubber material with a beveled edge. The handle is a hard plastic. This tool I’ve used in about 50 retina battery swaps. No floss, credit cards or metal spatulas for me.. The angle of the ends and the rubber pliability combined with the hard plastic handle is ideal. After a few repairs you will get better at it. Be careful when applying pressure or leveraging to get between battery and base. You don’t want to slip & “overshoot” the scoop end into the logic board. EASY DOES IT…Save yourself the mess of applying the liquid. I can remove a battery in 10 minutes. Here’s the link to this tool that I found in my GF’s kitchen:
This and the dental floss are great ides that I wish I'd seen before following the method in this guide even though it worked, I think there are better ways.
Amazon says these are no longer available, no idea if or when they will be again.
anasazi4st - 回复
You can order a single scooper from amazon.
google: Tovolo Mini Scoop and Spread Tool
etcremer -
-
-
-
为保护你的显示器,应在显示器和键盘之间铺一张铝箔,在你工作的时候应该一直把它放在那儿。
-
此外,放一张吸收性好的毛巾在触摸板区域之下,用来吸收过量的除胶剂。
-
-
-
现在你的MacBook Pro已经完全准备好了。下面该准备你自己了。
-
在涂除胶剂的时候戴一个护目镜。(护目镜包含在你的工具包里。)
-
没戴护目镜就不要戴隐形眼镜。
-
防水手套也包含在你的工具包里。如果你担心除胶剂可能刺激你的皮肤,马上戴好手套。
Wenn das Trackpad ausgebaut ist, kann man den alten Akku auch ohne Klebstoffentferner relativ gut auslösen.
-
-
-
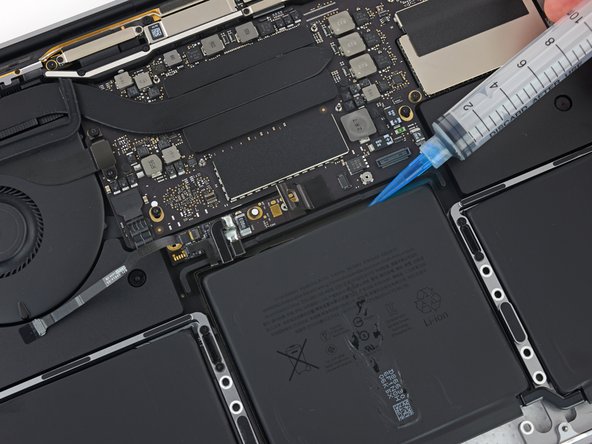
打开你的除胶剂瓶盖。
-
向你工具包里的注射器里灌少量(大约2毫升)的除胶剂。
-
在剩余的过程中,如果需要就重新在注射器里充好除胶剂。
Au moment de ma commande le kit complet avec le dissolvant ifixit n’était pas disponible, mais seulement la batterie sans accéssoires, j’ai utilisé quelques gouttes d’acétone à la place. la battéerie originale s’est décollée sans difficulté à l’aide d’une carte de credit
Can I use isopropyl or ethanol instead?
Petite astuce après une réparation fructueuse : pour simplifier cette étape, munissez vous d’un dissolvant fourni ou non, prenez les élastiques de masques chirurgicaux et imbibez le avec le dissolvant. À l’aide de cures-dents, l’insérer entre le châssis et la batterie puis faire un mouvement d’aller et retour tout en avançant au fur et à mesure que la batterie se décolle. Cette astuce m’a fait gagné beaucoup de temps et elle permet de ne pas endommager la batterie lorsque de son extraction. Plus sur, plus rapide et plus facile !
A little tip after a successful repair: to simplify this step, take the surgical mask elastic bands and soak them with solvent. Using toothpicks, insert it between the frame and the battery then move back and forth while moving forward as the battery comes off. This trick saved me a lot of time and avoids damaging the battery when removing it. Safer, quicker and easier.
The glue remover is a mix of Acetone and Isopropyl alcohol I believe.
Luke Lanza - 回复
The adhesive remover they are currently selling does not need to be cut open, it is black and already has a small hole. Check yours before you cut off something you don't need to.
A little warning for those of us who don't know a lot about acetone. DO NOT spill any on any finished wood. It will take the finish off of a wood surface faster than you can wipe it off. It won't harm clothes surprisingly, but your hardwood floor or wood table are not going to look great if you spill this on them.
I ordered just the battery, and successfully used "Goo Gone" to loosen the adhesive. I found it useful to place the plastic card along the edge of the battery, then dribble the Goo Gone on the card (when runs down the card to the edge of the battery). In my computer the adhesive is in three strips running across the length of the cell, each strip is about 1/4" wide
Phil Evans - 回复
-
-
-
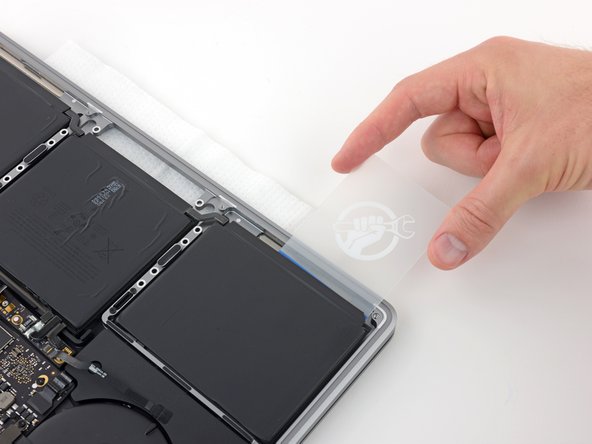
2、3分钟过后,在你一开始涂除胶剂的那个电池组边缘插一张塑料卡片进去。
Agreed, hardest step. “Several drop” was not enough, I had to add more twice, so take your time.
Just like on the picture, the corner close to the track pad seem to be a weak point, strat pushing the corner of the plastic card there.
There is a metal lip that blocks you from pushing it in. I recommend you start from the corner with the lifted metal part. (top left corner of battery in picture)
the adhesive is in three 'bands' running parallel to the front of the computer. my method was to insert the card part way, then drip the adhesive onto the card and let it slide down to where the card met the adhesive. this seemed to work best. it seems unlikely that the adhesive will run all the way to the rear adhesive when you apply it from the front.
-
-
-
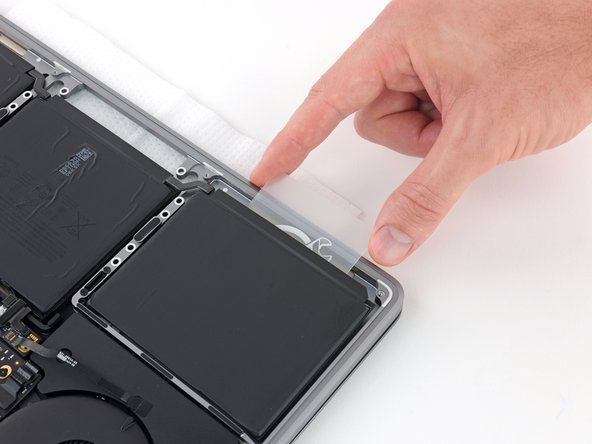
轻轻地让卡片深入到电池组之下,将固定用的胶扯开。
They are RIGHT, let the acetone do the work. It did need more than a few drops, but not much more. Wait 3 min, apply again. Wait 3 min again. Then take the card and aim the point of the card toward the middle of the adhesive. Wiggle wiggle wiggle moderate pressure. It will penetrate the first strip and then work it left and right. Repeat for the next two strips.
-
-
-
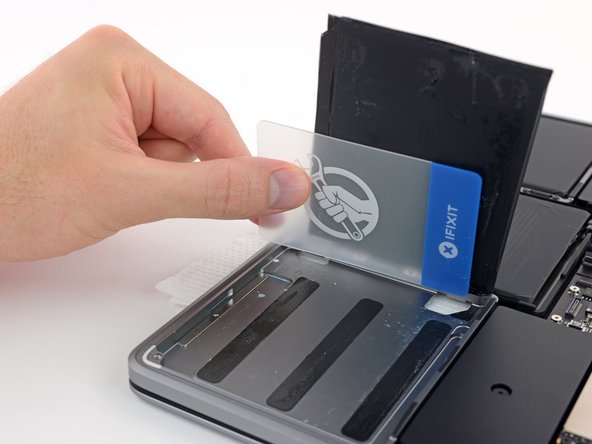
在中部电池组的一个边缘插一张塑料卡片。
-
将你的卡片轻轻扭动也许会有助于在电池组和MacBook Pro机身之间打开一道缝隙。
I don't see how starting from the side is even possible, it's too steep and the card is not flexible enough.
I started from the top. To do so, I had to lift the battery control card (step 24) enough to be able to put the power connector (step 15) back below it. That way I could slide the card all the way.
Because of the way the tutorial describe it, I was conservative on the quantity of remover. That may be why this step was not easy.
-
-
-
举起并拿走电池。
-
如果你有些小幸运,你没准儿能用你的手指将那些胶慢慢撕掉。
-
不然,你就得用除胶剂浸泡每一块胶2、3分钟,然后再用塑料工具将他们刮掉。这会占用你相当长的一段工服,耐心点儿。
-
擦掉任何残留的除胶剂,再给你的MacBook Pro一点时间晾干它。
-
在你使用的电池之前先检测它:先给放一夜的电,再把它充到100%,然后再放电直到你的MacBook Pro自动关机。再充满电就可以正常使用。
Hi Jeff,
Thank you for the great instructions! With a piece of dental floss it goes even better. Also it’s good to explain to shift the back cover out after removing the bolts. At the moment to put in the new batteries it’s the best to tighten the batteryprint first and at last to fix the batteries. Put three pieces of plastic under the batteries to prevent fixing too early to the bottom.
Frans.
Thanks for your comment! It was really essential since dropping the battery in the case without its control card being attached could have resulted in the impossibility to connect it.
I had a non-ifixit battery replacement fail due to battery wiring (flat coated copper) touching the sharp edge of the case aluminum. Eventually vibration caused the insulation to wear off and short the middle cell to the case. Failure after a couple weeks.
Tuto au top.
J’ai remplacé la batterie de mon MacBook Pro en suivant à la lettre ce Tuto.
Un grand merci.
Overall good guide. The battery removal was by far the most difficult and time consuming.
It's important to understand stand that the battery is separate from the mother board so you can get somewhat aggressive when removing the old battery without worrying about damaging it.
As a general rule do not be rough with a lithium battery unless you like out of control lithium fires. It is best to use plenty of solvent and be as careful as possible while removing the old cells.
Also a good idea to discharge the battery fully before working on it.
I'm also one of those that just can't stand the idea of using solvent to do the job. FYI, I used a bent and 'sharpened' plastic card, much like a credit card, to carefully separate the battery from its adhesive. I was even able to get the center section out by working the card in from the sides (mostly from the right side, as I'm right-handed), so I didn't have to remove the trackpad assembly. I figured there are huge risks in however we do these complicated jobs, so I'm more comfortable with the risks associated with my technique than the ones associated with the solvent technique. And the bonus is that I finished in less than an hour!
I've done enough of these battery replacements now that I'm confident about dealing with the fussy little ribbon cables and their connectors, which is an added bonus when tackling a newer model like this.
Good luck to all who are taking this on for the first time! Take your time, read all the way through before starting, and be sure to read all the comments throughout!
Can someone clarify the statement "Wait at least 5 hours, then charge your laptop uninterrupted to 100%." in this last step"? It does not state this in the directions I received on a small card with the battery replacement, nor does it in the Conclusion below.
I followed this guide to replace the battery in a Mid 2017 MBP. The original was stuck at 0% even after 3 hours on charge even though the cycle count was 2 digits only.
I dry tested the replacement battery first. It had 38% charge. I left it plugged in and it reached 100% fine. The next day, I stuck the new battery down and low and behold now the machine won't power up.
I reconnected the old battery and the machine powers up ok. I tried reseating the connections 3 times with the new battery and it still won't power up. I've tried an SMC reset too. So I'm guessing it's a faulty new battery. Either that, or the rumours that Apple are deliberately locking out non-genuine Apple parts is true.
Trouble is, this seems to be quite a common scenario with this model.
I just did a battery replacement and after 3-4, SMC resets, checking all connections inside, etc. I cannot get my laptop to show a battery is even installed. I doubt it is a bad battery but as Cool_Breeze suggests, can anyone confirm this may be an Apple "block"? So frustrating!
Bonjour, ils indiquent que je n’ai pas de batterie, quoi faire ?
Merci
Referring to the messages from Cool_Breeze and Karen.
Does this battery replacement technique still work or have Apple somehow 'blocked' it?
Thanks
I don't recommend to calibrate the battery at the end and even Apple do not recommend to calibrate since a decade. It seems the battery is already calibrated with 2 cycles already. I followed your calibration tutorial and my new battery lost 6% health statut... Probably because of letting cels at 0% during 5 hours.... It's totally a non sense!!!
-


要重新组装你的设备,请按逆序操作。
要重新组装你的设备,请按逆序操作。
79等其他人完成本指南。


29条评论
Does the replacement battery comes with the same strong adhesive as the original battery?
I ordered my battery for the 2017 version of the Macbook Pro with function keys from ebay and it didn’t came with a adhesive strip. I am sure you can use your own adhesive strips or double sided tape, as long as you mind the gabs on the aluminum frame,
Serj Nko -
Hi Jeff,
Thank you for this great work to beat Apple greediness. I followed the exact steps and everything went well, but my battery is not charging nor the status is shown on the bar! I tried restarting and resetting and even restoring and it did not work would that be something you can help me with?
If the old battery still works, try putting it back in, and see if that clears up the problem. If it does, the new battery is defective.
i did this one today with just 1 bankcard in 30min time no adhesive loosener needed no head needed…. you don’t even have to remove the mousepad…
i might have to start making my own repair guide….
Glad yours was easy! The strength of the adhesive can vary a lot depending on age, heat cycles, how much was applied at the factory, etc. I’ve seen a few that were easy and quite a few that were absolute monsters to remove. Most fall somewhere in between. This guide should have you covered in all cases, but it probably doesn’t hurt to poke and pry a little before you start, in case you lucked out and got an easy one. Just be very careful not to puncture the battery. Thanks for your comment!
Thank you! This excellent guide gave me a lot of confidence in the replacement of the battery. All went precisely according to plan.
I just completed the swap… awesome guide and really easy.
The only Problem i had was the missing data cable from the battery board to the logic board which was not included with the new battery. Thanks to some comments from other users I used the cable from the old battery.
Everything Else worked as described.
Vielen Dank für die gute Anleitung. Der Akkutausch hat ohne Probleme sehr einfach in ca. einer Stunde geklappt.
Thank you for the great guide! I did not want to ship my Mac to official Apple service centre - as I was advised I would need to wait one week for battery replacement and I needed laptop for my daily work. Decided to replace battery on my own. Thanks to this comprehensive guide I made it in 2 hours. I do appreciate clear and comprehensive way author has explained the procedure. Again big thank you! Also useful comments of users are appreciated. Thanks. Andrew
Petite astuce après une réparation fructueuse : pour simplifier cette étape, munissez vous d’un dissolvant fourni ou non, prenez les élastiques de masques chirurgicaux et imbibez le avec le dissolvant. À l’aide de cures-dents, l’insérer entre le châssis et la batterie puis faire un mouvement d’aller et retour tout en avançant au fur et à mesure que la batterie se décolle. Cette astuce m’a fait gagné beaucoup de temps et elle permet de ne pas endommager la batterie lorsque de son extraction. Plus sur, plus rapide et plus facile !
A little tip after a successful repair: to simplify this step, take the surgical mask elastic bands and soak them with solvent. Using toothpicks, insert it between the frame and the battery then move back and forth while moving forward as the battery comes off. This trick saved me a lot of time and avoids damaging the battery when removing it. Safer, quicker and easier.
good guide, but that adhesive did not come off easy. Used a Bank card and adhesive remover. everything else was smooth ad though ;)
I suggest examining the two connection points of the skinny battery data cable. Possibly you failed to either, fully insert the cable or forgot to press the clamp down. Also, I believe Fixit fails to tell you to lift the clamp before removal and it is impossible to insert without lifting the clamp. You might need extra strong reading glasses to see it properly. Good luck.
I need to buy one, but you guys don't ship to India, is there any way you guys can help ? i needed urgently/
Great guide,
got the spare battery from your store and followed the guide. But now I have the issue that my macBook sometimes needs to be plugged in to wake/start even tough the battery got enough charge. could this be a battery related issue?
Terrific guide, thank you very much!
Got a replacement battery from eBay (UK supplier) and didn't need any battery calibration or the like afterwards.
This was only my second replacement, and it's actually not that complicated. But the tiny screws and clamps and the sh%$&§y glue...
Speaking of glue: I can handle solvent (isopropanol etc.) but I wanted to minimize damage to the screen. So I took the butcher/surgeon approach and cut the battery out with the "plastic cards". Took a while but worked. Total time for first replacement 2 hours, second one 1 hour.
The adhesive strips of the replacement battery were not as strong as those of the original battery, but that may actually reflect aging and effect or repeated heating of the glue. In any case, the replacement battery sits tightly enough to not require any correction.
Cheers
I just did this and it worked a treat. Bought a replacement item from Amazon that had plenty of positive feedback and went to work. I used a plastic scraper and some solvent to get the batteries out and it was definitely the hardest part of the job - took at least an hour - that plus cleaning and prepping the surfaces for the new battery.
But it was really therapeutic and when the computer booted up and Coconut showed me a healthy 100% functional battery the feeling was GREAT!
I made the mistake of removing the trackpad and had to realign it a couple of times but with this operation, I don't think it is necessary to remove it. I'd definitely be able to do it in half the time if I ever needed to again. :D
Hi, I have just done this and all seemed to go well, but just plugged my mac into the mains and it is not charging or switching on at all. Unsure if it could be that the battery data cable isn't connected in well enough as it was quite fiddly to put back in?
I support wholeheartedly the goals of iFixit -- sustainability, support for true ownership of the products we purchase, and elimination of the domination of corporate entities. The guide provided here for replacing the battery in a Macbook Pro was spot-on and even a fraidy-cat like myself had no problems in accomplishing the task. Hooray! Unfortunately, I have found the battery itself to be of low quality, i.e., just six months later a fully-charged battery is completely spent within two hours, even with the screen dimmed to 50% and when doing nothing more demanding than word processing. It is unfortunate that the good intentions of iFixit are not supported by quality products.
Hi there, thanks for this very detailed manual. I followed every step. Everything looks like it work except for one thing : since then my spacebar is not working anymore :/ I'm not sure what happened. If you have any clue to help me I'd be very grateful. A computer without a spacebar is worst than without a battery I'm afraid.. :(
While I do not intend to criticize the writer of this guide, I believe that the directions provided are incomplete without being reversed step-by-step. As a first-time hardware worker, I found several steps to be more complicated than the instruction "follow the above steps in reverse order" suggested. Specifically, installing the new battery required precise alignment of the battery board, which I only discovered after I had already placed the new battery. I had to lift it back out, which was difficult as it was already adhered, to adjust the location properly. Furthermore, connecting the battery board data cable connector to the new battery was challenging, and I was unsure of how much force to apply or how far it needed to go in. After completing the installation, I was concerned that I had made a mistake and potentially damaged the device. If that had been the case, I would have been disappointed that I had spent $119 on a replacement kit.
I followed this guide to replace a battery because my partner's mother's MacBook was only functioning when plugged into the wall. After successful install, I tried booting the computer, but it would not boot unless it was plugged into the wall. It came to life, with the fan running at full. I checked in SysPref to check the battery, and it wasn't listed; therefore, when I unplugged the power cable, the device died. It refused to turn on again unless I re-seated the battery logic cable. I feared the logic cable had been damaged during the repair, as without that cable, the system won't recognize the battery.
If this happens to you, understand it is very important that you turn back on the Auto Boot feature!
With Auto Boot enabled, I was able to perform an SMC reset by:
1. Plugging in the laptop to the charger, with the lid closed
2. Opening the lid and quickly holding Shift+Control+Option+Power for 10 seconds
3. Pressing the power button again
This calmed the fans and the battery now charges and is displayed.
Aaron Dalziel - 回复
I recommend that you have an organizer tray for all the small parts, and label it in advance with the numbered “step” associated with each removal of screws and other parts. It really helped me when I needed to put everything back in reverse order, after the new battery is glued in place.
tommy404 - 回复
Finished the repair last week. Some key comments that helped me:
- Step 12, Robert
- Step 13, MikeG1
- Step 13, Rick Jaffe (take a photo when disassembling)
Also added some own comments on Steps 15, 18, 22
Per Haglund - 回复