跳转到主内容

当前版本的文档还未经巡查,您可以查看最新的已查核版本

你所需要的

  1. , 底壳: 步骤 1 中的图像 1,1
    在这个步骤中使用的工具:
    P5 Pentalobe Screwdriver Retina MacBook Pro and Air
    $5.99
    购买
    • 在开始更换之前,关机,合上屏幕然后把机器正面朝上平放在软面上。

    • 使用P5 Pentalobe 螺丝刀将底部的十颗螺丝移除,有下面两种规格:

    • 两个9mm 梅花形螺丝

    • 八个2.6mm梅花形螺丝

  2. : 步骤 2 中的图像 1,1
    • 把手指插进显示器和底壳之间的缝隙然后向上拉,即可拆下底壳。

    • 请小心地取下底壳并放在保证安全的地方。

  3. , 电池排线: 步骤 3 中的图像 1,2 , 电池排线: 步骤 3 中的图像 2,2
    • 确保你在维修时一切都处于断电状态,请先断开电池。

    • 抓住连接到电池接口的透明塑料拉片,将其平行于电路板拉向 MacBook Air 的前缘。

    • 断开连接时请勿向上提起接口,否则可能会损坏接口插座。

  4. : 步骤 4 中的图像 1,1
    • 使用撬棒的平端撬开 在I/O 板上的延长线

  5. : 步骤 5 中的图像 1,1
    • 小心地将 I/O 板延长线从风扇上的粘合剂上剥开。

    • 在重新组装过程中,请确保此排线处于正确的方向。如果颠倒过来, 虽然能够适合, 但笔记本电脑不会启动。

  6. : 步骤 6 中的图像 1,2 : 步骤 6 中的图像 2,2
    • 以下排线座具有特别深的插座。请小心的把他断开

    • 轻轻地将 I/O 板延长线向上挑起,则使用撬棒的平端撬动排线的侧面,以帮助将其从插座中拿出来。

    • 拆下 I/O 板电缆。

  7. 这个步骤还没有翻译 帮忙翻译一下

    : 步骤 7 中的图像 1,1
    • Use the tip of a spudger to carefully flip up the retaining flap on the fan cable ZIF socket.

    • Be sure you are prying up on the hinged retaining flap, not the socket itself.

  8. 这个步骤还没有翻译 帮忙翻译一下

    : 步骤 8 中的图像 1,1
    • Peel the rubber gasket off the adhesive on the top of the fan.

  9. 这个步骤还没有翻译 帮忙翻译一下

    : 步骤 9 中的图像 1,1
    • Remove the following three screws securing the fan to the upper case:

    • One 3.6 mm T5 Torx screw

    • One 2.7 mm T5 Torx screw

    • One 3.6 mm T5 Torx screw with a short head

  10. 这个步骤还没有翻译 帮忙翻译一下

    : 步骤 10 中的图像 1,2 : 步骤 10 中的图像 2,2
    • Lift the fan from the I/O board side and pull it free from the upper case.

    • Removing the fan will also disconnect the fan ribbon cable. Be careful not to snag it.

  11. 这个步骤还没有翻译 帮忙翻译一下

    : 步骤 11 中的图像 1,1
    • Disconnect the I/O board by pulling its power cable away from its socket on the logic board.

    • Pull the cable parallel to the face of the logic board toward the right edge of the Air.

  12. 这个步骤还没有翻译 帮忙翻译一下

    : 步骤 12 中的图像 1,2 : 步骤 12 中的图像 2,2
    • Use the flat end of a spudger to pry the left speaker cable connector up and out of its socket on the I/O board.

    • Pry up from beneath the wires.

  13. 这个步骤还没有翻译 帮忙翻译一下

    : 步骤 13 中的图像 1,2 : 步骤 13 中的图像 2,2
    • Use the tip of a spudger to carefully flip up the retaining flap on the microphone ribbon cable ZIF socket.

    • Make sure you are flipping up the retaining flap, not the socket itself.

  14. 这个步骤还没有翻译 帮忙翻译一下

    : 步骤 14 中的图像 1,1
    • Remove the single 3.6 mm T5 Torx screw securing the I/O board to the upper case.

  15. 这个步骤还没有翻译 帮忙翻译一下

    : 步骤 15 中的图像 1,2 : 步骤 15 中的图像 2,2
    • Gently de-route the camera cable from its notch on the I/O board and push it out of the way with the tip of a spudger.

  16. 这个步骤还没有翻译 帮忙翻译一下

    : 步骤 16 中的图像 1,1
    • Lift the I/O board from the logic board side and pull it free from the upper case.

    • Removing the I/O board will also disconnect the microphone ribbon cable. Be careful not to snag it.

  17. 这个步骤还没有翻译 帮忙翻译一下

    : 步骤 17 中的图像 1,2 : 步骤 17 中的图像 2,2
    • Use the flat end of a spudger to pry each of the antenna connectors up from their sockets on the AirPort/Bluetooth card.

  18. 这个步骤还没有翻译 帮忙翻译一下

    : 步骤 18 中的图像 1,2 : 步骤 18 中的图像 2,2
    • Disconnect the camera cable connector with the tip of a spudger.

    • Push first on one side of the connector, then on the other side to carefully "walk" it out of its socket.

    • Pull the camera cable parallel to the face of the I/O board toward the front edge of the Air to disconnect it from its socket.

    • Do not lift upward on this cable as you disconnect it, as its socket may break off the logic board.

  19. 这个步骤还没有翻译 帮忙翻译一下

    : 步骤 19 中的图像 1,2 : 步骤 19 中的图像 2,2
    • Pull the plastic tab on the display data cable connector to unlock it.

  20. 这个步骤还没有翻译 帮忙翻译一下

    : 步骤 20 中的图像 1,2 : 步骤 20 中的图像 2,2
    • Pull the display data cable connector straight out of its socket.

    • Make sure to pull the connector parallel to the logic board, do not lift straight up from its socket.

  21. 这个步骤还没有翻译 帮忙翻译一下

    : 步骤 21 中的图像 1,2 : 步骤 21 中的图像 2,2
    • Remove the inner four (two on each side) 4.9 mm T8 Torx screws securing the right and left display hinges to the upper case.

    • Leaving the outer screws in place for now will aid in disassembly.

  22. 这个步骤还没有翻译 帮忙翻译一下

    : 步骤 22 中的图像 1,1
    • Gently de-route the antenna cables out of the channel cut into the upper case.

  23. 这个步骤还没有翻译 帮忙翻译一下

    : 步骤 23 中的图像 1,1
    • Open the display so that it is perpendicular to the upper case and place it on a table as shown.

  24. 这个步骤还没有翻译 帮忙翻译一下

    : 步骤 24 中的图像 1,1
    • While holding the Air steady, remove the remaining 4.9 mm T8 Torx screw from the left display bracket.

  25. 这个步骤还没有翻译 帮忙翻译一下

    : 步骤 25 中的图像 1,1
    • Turn the computer onto its opposite edge so the right display screw is now easily accesible.

    • Before removing the last display screw, be sure to hold the display and upper case steady with your other hand. Failure to do so may allow the components to fall onto the table, causing potentially expensive damage.

    • Remove the last 4.9 mm T8 Torx screw securing the display to the upper case.

  26. 这个步骤还没有翻译 帮忙翻译一下

    : 步骤 26 中的图像 1,3 : 步骤 26 中的图像 2,3 : 步骤 26 中的图像 3,3
    • Open the Air slightly to allow room for the hinges to slide out of their notches.

    • Push the upper case slightly toward the display assembly, then push it back from the hinges.

    • Once the two display hinges have cleared the upper case, remove the display and set it aside.

  27. 这个步骤还没有翻译 帮忙翻译一下

    : 步骤 27 中的图像 1,2 : 步骤 27 中的图像 2,2
    • During reassembly, use the flat end of a spudger to tuck the Wi-Fi/Bluetooth antenna back into its channel.

终点

77等其他人完成本指南。

17条评论

Just a reminder that you DO NOT want to touch the battery with your hands or a screw driver you can compromise the integrity of the battery and possibly cause a thermal event. Always use proper battery cover kit.

http://www.macpalace.com/076-1372-batter...

Corey - 回复

It's not written to remove the screen cable connector (at the top left corner, looking to the lower surface). Please add this step

Emilio - 回复

This step is still needed (before step 18, which shows it disconnected). I didn't notice this until I attempted to remove the display.

Stuart Mc -

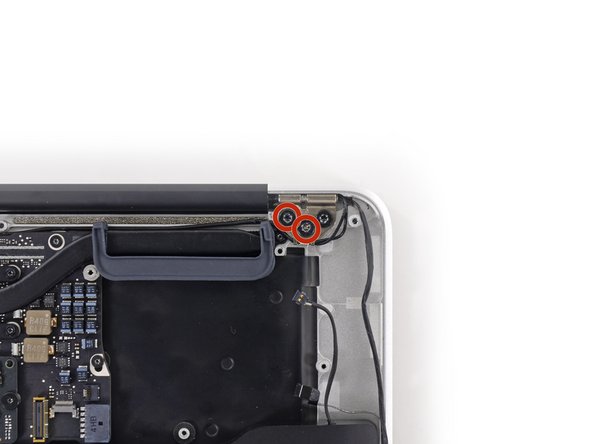
When reassembling the device, keep in mind that the holes in the hinges are relatively big compared to the T8 screws, so there will be a certain play. Check if display and body are in line when the MacBook is closed, then tighten the screws.

Marcel - 回复

When I noticed this (also similar issue when installing the trackpad), I thought "what an inferior engineering for such an expensive product".

Gene Pavlovsky -

添加评论

浏览统计数据:

过去 24 小时: 13

过去 7 天: 71

过去 30 天: 258

总计 87,201