跳转到主内容

MacBook Air 13" Late 2010 Fan Replacement

你所需要的

视频概述

  1. MacBook Air 13" Late 2010 Fan Replacement, Lower Case: 步骤 1 中的图像 1,1
    在这个步骤中使用的工具:
    P5 Pentalobe Screwdriver Retina MacBook Pro and Air
    $5.99
    购买
    • Before proceeding, power off the device, close the lid and lay it on a soft surface top-side down.

    • Remove the following ten screws:

    • Two 9 mm 5-point Pentalobe screws

    • Eight 2.6 mm 5-point Pentalobe screws

    • The special screwdriver needed to remove the eight 5-point Pentalobe screws can be found here.

  2. MacBook Air 13" Late 2010 Fan Replacement: 步骤 2 中的图像 1,1
    • Wedge your fingers between the display and the lower case and pull upward to pop the lower case off the Air.

    • Remove the lower case and set it aside.

  3. MacBook Air 13" Late 2010 Fan Replacement, Battery: 步骤 3 中的图像 1,1
    • For precautionary purposes, we advise that you disconnect the battery connector from the logic board to avoid any electrical discharge. This step is optional and is not required.

    • Grab the clear plastic pull tab attached to the battery connector and pull it toward the front edge of the Air to disconnect the battery from the logic board.

    • Do not lift upward on the connector as you disconnect it.

  4. MacBook Air 13" Late 2010 Fan Replacement, I/O Board Cable: 步骤 4 中的图像 1,1
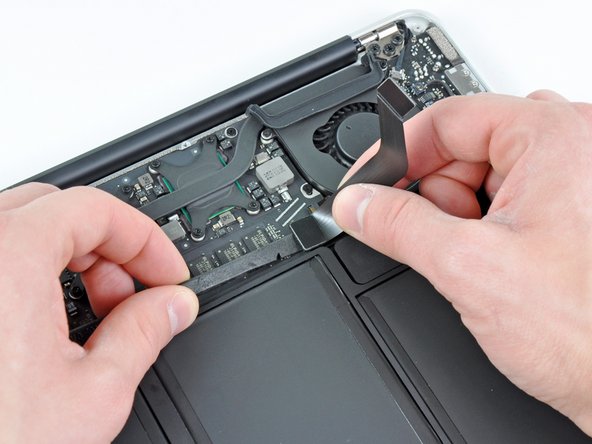
    • Use the flat end of a spudger to pry the I/O board cable connector upward out of its socket on the I/O board.

  5. MacBook Air 13" Late 2010 Fan Replacement: 步骤 5 中的图像 1,2 MacBook Air 13" Late 2010 Fan Replacement: 步骤 5 中的图像 2,2
    • The following connector has an especially deep socket. Use care when disconnecting it.

    • Carefully peel the I/O board cable from the top of the fan.

    • While gently pulling the I/O board cable upward near its connection to the logic board, use the tip of a spudger to pry upward on alternating sides of the connector to help "walk" it out of its socket.

    • Remove the I/O board cable.

  6. MacBook Air 13" Late 2010 Fan Replacement, Fan: 步骤 6 中的图像 1,1
    • Use the tip of a spudger to carefully flip up the retaining flap on the fan cable ZIF socket.

    • Be sure you are prying up on the hinged retaining flap, not the socket itself.

  7. MacBook Air 13" Late 2010 Fan Replacement: 步骤 7 中的图像 1,1
    • Peel the rubber gasket off the adhesive on the top of the fan.

  8. MacBook Air 13" Late 2010 Fan Replacement: 步骤 8 中的图像 1,1
    • Remove the following three screws securing the fan to the upper case:

    • One 3.6 mm T5 Torx screw

    • One 2.7 mm T5 Torx screw

    • One 3.6 mm T5 Torx screw with a short head

  9. MacBook Air 13" Late 2010 Fan Replacement: 步骤 9 中的图像 1,1
    • Lift the fan out of the upper case and carefully pull the fan ribbon cable out of its socket as you remove it from the Air.

结论

To reassemble your device, follow these instructions in reverse order.

19等其他人完成本指南。

4条评论

Plugging the fan back in is a huge pain in the ass, do you have a tip for that?

Robert Westman - 回复

I screwed up and my fan cable ZIF socket lifted out. I destroyed it trying to solder it back on. Can I buy a replacement?

Janine Maddock - 回复

This is actually an interesting question. I was looking into this issue and watched most of your video and the fan did not spin up and everything was quiet and perfect. If I watch a youtube video, it spins up like crazy. Any suggestions?

Jerry Garcia - 回复

I broke the latch on the ZIF connector. Brittle plastic. :-( What can I do to get the new fan to receive power?

Charles Carpenter - 回复

添加评论

浏览统计数据:

过去 24 小时: 0

过去 7 天: 4

过去 30 天: 27

总计 21,914