跳转到主内容

此翻译可能不反映源指南的最新更新。 帮助更新翻译查看源指南

2020年初13寸MacBook Air 显示屏更换

你所需要的

  1. 2020年初13寸MacBook Air 显示屏更换, 卸下固定下壳的螺丝: 步骤 1 中的图像 1,1
    • 在开始此过程之前,你应该禁用 Mac 的自动启动功能。当你打开盖子时,自动启动会打开你的 Mac,并且可能会在拆卸过程中意外触发。使用本指南禁用自动启动。

    • 如果你的 MacBook 运行的是 Big Sur v11.1 或更高版本,则禁用自动启动可能不起作用。你可以正常进行,但请确保在你进入后立即断开电池连接。

    • 在开始之前,请完全关闭 MacBook Air 的电源并拔下插头。合上显示屏并将整个笔记本电脑倒置。

    • 使用 P5 螺丝刀卸下以下螺丝:

    • 两颗 7.9 毫米螺丝

    • 两颗 7.1 毫米螺丝

    • 六颗 2.6 毫米螺丝

    • 在整个维修过程中,请跟踪每个螺丝并确保它准确地回到原来的位置,以避免损坏你的 MacBook。

  2. 2020年初13寸MacBook Air 显示屏更换, 移除底壳: 步骤 2 中的图像 1,3 2020年初13寸MacBook Air 显示屏更换, 移除底壳: 步骤 2 中的图像 2,3 2020年初13寸MacBook Air 显示屏更换, 移除底壳: 步骤 2 中的图像 3,3
    • 将手指夹在显示屏和下壳之间,然后向上拉以将底壳从 Air 中弹出。

    • 取下底壳。

    • 要重新安装小写字母:

    • 将其固定到位并用力按压以接合下方的两个隐藏夹子。你应该感觉到并听到它们卡入到位。

  3. 2020年初13寸MacBook Air 显示屏更换, 断开电池: 步骤 3 中的图像 1,1
    • 剥开覆盖电池接口的胶带,足以露出下面的接口。

  4. 2020年初13寸MacBook Air 显示屏更换: 步骤 4 中的图像 1,2 2020年初13寸MacBook Air 显示屏更换: 步骤 4 中的图像 2,2
    • 使用撬棒将平行于主板的电池接口从主板上的插槽中滑出。

  5. 2020年初13寸MacBook Air 显示屏更换, 断开天线条: 步骤 5 中的图像 1,2 2020年初13寸MacBook Air 显示屏更换, 断开天线条: 步骤 5 中的图像 2,2
    • 使用 T4 Torx 螺丝刀卸下固定天线电缆盖的 1.4 毫米螺丝。

    • 取下天线电缆盖。

  6. 2020年初13寸MacBook Air 显示屏更换: 步骤 6 中的图像 1,3 2020年初13寸MacBook Air 显示屏更换: 步骤 6 中的图像 2,3 2020年初13寸MacBook Air 显示屏更换: 步骤 6 中的图像 3,3
    • 使用一把镊子夹住靠近底座的天线接口。

    • 直接向上拉以断开电缆。

    • 对第二根天线电缆重复此操作。

  7. 2020年初13寸MacBook Air 显示屏更换: 步骤 7 中的图像 1,2 2020年初13寸MacBook Air 显示屏更换: 步骤 7 中的图像 2,2
    • 使用 T3 Torx 螺丝刀卸下用于固定显示屏电缆接口盖的两颗 1.5 毫米螺丝。

    • 卸下显示屏电缆接口盖。

  8. 2020年初13寸MacBook Air 显示屏更换: 步骤 8 中的图像 1,2 2020年初13寸MacBook Air 显示屏更换: 步骤 8 中的图像 2,2
    • 使用撬棒扁平的一端直接从天线板上撬下显示屏电缆接口以断开它。

    • 要重新连接这样的压接接口,请小心对齐并向下按压一侧,直至其卡入到位,然后在另一侧重复。不要压在中间。如果连接器未对准,针脚可能会弯曲,从而造成永久性损坏。

  9. 2020年初13寸MacBook Air 显示屏更换: 步骤 9 中的图像 1,1
    • 使用 T5 Torx 螺丝刀卸下固定天线条的六颗螺丝:

    • 四颗 7.4 毫米螺丝

    • 两个 4.5 毫米螺丝

  10. 2020年初13寸MacBook Air 显示屏更换, 取下天线条: 步骤 10 中的图像 1,3 2020年初13寸MacBook Air 显示屏更换, 取下天线条: 步骤 10 中的图像 2,3 2020年初13寸MacBook Air 显示屏更换, 取下天线条: 步骤 10 中的图像 3,3
    • 将撬棒的尖端插入天线条和显示屏铰链之间的间隙。

    • 对着铰链旋转撬棒以撬起天线杆的末端。

    • 对天线杆的另一端重复此操作。

  11. 2020年初13寸MacBook Air 显示屏更换: 步骤 11 中的图像 1,3 2020年初13寸MacBook Air 显示屏更换: 步骤 11 中的图像 2,3 2020年初13寸MacBook Air 显示屏更换: 步骤 11 中的图像 3,3
    • 用手指将天线杆垂直向上撬离外壳。

    • 天线杆用一些轻质粘合剂固定,可能需要用力才能移开。

    • 将天线板穿过天线条中间的开口。

    • 小心不要对天线条的带状电缆施加任何压力。

    • 取下天线杆。

  12. 2020年初13寸MacBook Air 显示屏更换, 卸下铰链螺丝: 步骤 12 中的图像 1,2 2020年初13寸MacBook Air 显示屏更换, 卸下铰链螺丝: 步骤 12 中的图像 2,2
    • 使用 T8 Torx 螺丝刀从每个铰链上卸下三颗 4.9 毫米螺丝(总共六颗螺丝)。

  13. 2020年初13寸MacBook Air 显示屏更换, 完全打开 MacBook: 步骤 13 中的图像 1,2 2020年初13寸MacBook Air 显示屏更换, 完全打开 MacBook: 步骤 13 中的图像 2,2
    • 在 MacBook 仍然屏幕朝下的情况下,小心地抬起上壳以尽可能打开 MacBook。

  14. 2020年初13寸MacBook Air 显示屏更换, 取下显示器: 步骤 14 中的图像 1,3 2020年初13寸MacBook Air 显示屏更换, 取下显示器: 步骤 14 中的图像 2,3 2020年初13寸MacBook Air 显示屏更换, 取下显示器: 步骤 14 中的图像 3,3
    • 提起 MacBook 并小心地开始合上显示屏,直到它与上壳成约 90 度角。

    • 当显示器向外壳移动时,铰链应从外壳中轻轻拉出。

    • 保持显示器与外壳成 90 度角,在保持外壳静止的同时笔直向下移动显示器,以便铰链从外壳底部滑出。
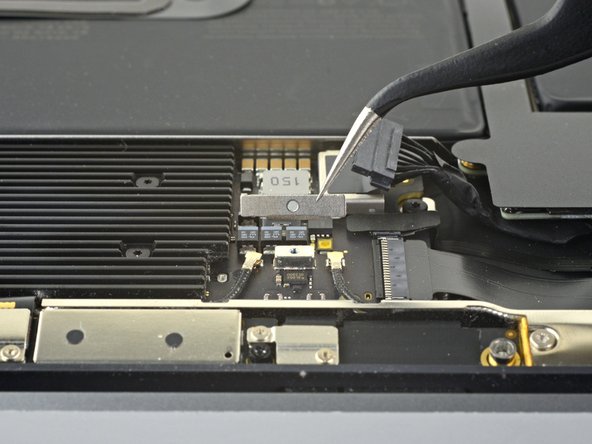
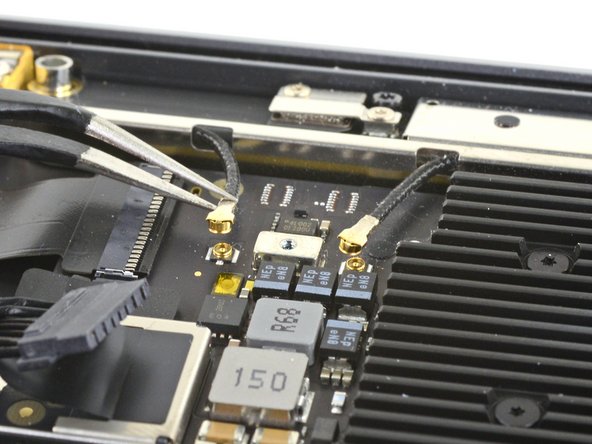
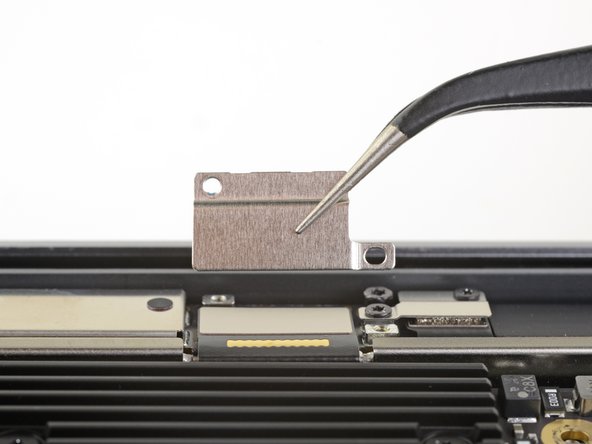
    • 取下显示器。

结论

将你的新更换零件与原始零件进行比较——你可能需要在安装前转移剩余的组件或去除新零件上的背胶。

要重新组装你的设备,请按逆序执行上述步骤。

将你的电子垃圾送到 R2 或 e-Stewards 认证回收商

维修没有按计划进行?查看我们的 [链接|https://www.ifixit.com/Answers/Device/Ma...|论坛] 以获取故障排除帮助。

38等其他人完成本指南。

由衷感谢以下译者:

en zh

90%

Yuting Zhao正在帮助我们修复这个世界! 您也想加入吗?
开始翻译 ›

Carsten Frauenheim

于03/10/20注册

112,911 声望

创作了338篇指南

团队

iFixit iFixit 的会员

Staff

135 名成员

创作了16,757篇指南

11条评论

Thank you so much for this awesome walkthrough! I can’t believe how much I saved doing this myself. Works beautifully! If I could only suggest a more comprehensive “reassembly” page. There are a couple of missteps I made (eg. trying to install the antenna bar and accidentally leaving the display cable connector under it) that would have helped. In any event, thank you so much!

Laurie McCall - 回复

Thanks for the tip! I’ve added a reminder to that step.

Carsten Frauenheim -

when starting the process of installation, make sure that at least the inside hinge screw is installed and mostly tightened. once the antenna is installed, there is almost no room for that screw to be inserted without a tight scrape against the end of the antenna. a very tight fit. i sometimes only install one hinge screw, usually the center ones, and then align the lid before adding the others and tightening everything up. in this case, would save you some concern to address this beforehand.

greg - 回复

Is that instruction can be used for Macbookpro 2010 with touch bar?

Aung Min - 回复

Definitely not. Also, there is no such thing, perhaps you meant 2020? Also no.

maccentric -

添加评论

浏览统计数据:

过去 24 小时: 37

过去 7 天: 256

过去 30 天: 1,121

总计 36,570