跳转到主内容

MacBook Air 11" Mid 2013 Logic Board Assembly Replacement

仅作为前提条件
本指南仅用作其他指南的先决条件。不能单独食用。

你所需要的

  1. MacBook Air 11" Mid 2013 Logic Board Assembly Replacement, Logic Board Assembly: 步骤 1 中的图像 1,3 MacBook Air 11" Mid 2013 Logic Board Assembly Replacement, Logic Board Assembly: 步骤 1 中的图像 2,3 MacBook Air 11" Mid 2013 Logic Board Assembly Replacement, Logic Board Assembly: 步骤 1 中的图像 3,3
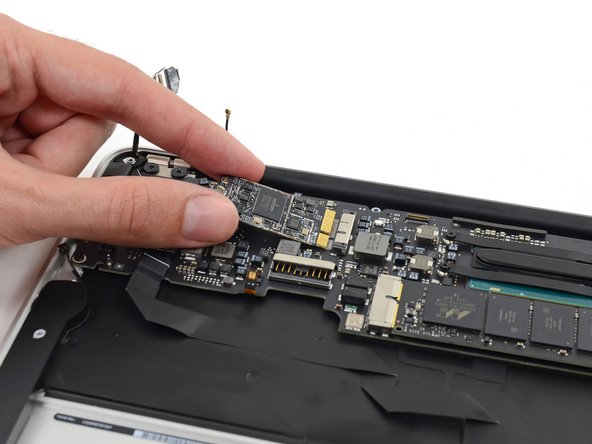
    • Use the flat end of a spudger to pry both antenna connectors up from their sockets on the AirPort/Bluetooth card, and move them out of the way.

  2. MacBook Air 11" Mid 2013 Logic Board Assembly Replacement: 步骤 2 中的图像 1,1
    • Remove the following five screws securing the battery to the upper case:

    • Two 5.2 mm T5 Torx screws

    • One 6 mm T5 Torx screw

    • Two 2.6 mm T5 Torx screws

  3. MacBook Air 11" Mid 2013 Logic Board Assembly Replacement: 步骤 3 中的图像 1,1
    • When handling the battery, avoid squeezing or touching the six exposed lithium polymer cells.

    • Lift the battery from its edge nearest the logic board and remove it from the upper case.

  4. MacBook Air 11" Mid 2013 Logic Board Assembly Replacement: 步骤 4 中的图像 1,2 MacBook Air 11" Mid 2013 Logic Board Assembly Replacement: 步骤 4 中的图像 2,2
    • Disconnect the I/O board by pulling the power cable away from its socket on the logic board.

    • Pull the cable parallel to the face of the logic board toward the front edge of the Air.

  5. MacBook Air 11" Mid 2013 Logic Board Assembly Replacement: 步骤 5 中的图像 1,3 MacBook Air 11" Mid 2013 Logic Board Assembly Replacement: 步骤 5 中的图像 2,3 MacBook Air 11" Mid 2013 Logic Board Assembly Replacement: 步骤 5 中的图像 3,3
    • Use the tip of a spudger to de-route the antenna cables from their notches in the logic board.

  6. MacBook Air 11" Mid 2013 Logic Board Assembly Replacement: 步骤 6 中的图像 1,3 MacBook Air 11" Mid 2013 Logic Board Assembly Replacement: 步骤 6 中的图像 2,3 MacBook Air 11" Mid 2013 Logic Board Assembly Replacement: 步骤 6 中的图像 3,3
    • Gently push the tip of a spudger under the black plastic flap stuck to the display data cable lock to make the lock pop upward and away from the socket.

    • While holding the lock away from the socket, gently pull the display data cable out of its socket.

    • Do not pull upward on the display data cable as you disconnect it, as its socket may break off the logic board.

  7. MacBook Air 11" Mid 2013 Logic Board Assembly Replacement: 步骤 7 中的图像 1,3 MacBook Air 11" Mid 2013 Logic Board Assembly Replacement: 步骤 7 中的图像 2,3 MacBook Air 11" Mid 2013 Logic Board Assembly Replacement: 步骤 7 中的图像 3,3
    • Use the tip of a spudger to pry under the speaker cable connector, lifting it straight up from its socket.

    • De-route the cable from its notch in the logic board.

  8. MacBook Air 11" Mid 2013 Logic Board Assembly Replacement: 步骤 8 中的图像 1,3 MacBook Air 11" Mid 2013 Logic Board Assembly Replacement: 步骤 8 中的图像 2,3 MacBook Air 11" Mid 2013 Logic Board Assembly Replacement: 步骤 8 中的图像 3,3
    • Use the tip of a spudger or your fingernail to flip up the retaining flap on the trackpad ribbon cable ZIF socket.

    • Be sure you are prying up on the hinged retaining flap, not the socket itself.

    • Pull the trackpad ribbon cable straight out of its socket toward the front edge of the Air.

  9. MacBook Air 11" Mid 2013 Logic Board Assembly Replacement: 步骤 9 中的图像 1,3 MacBook Air 11" Mid 2013 Logic Board Assembly Replacement: 步骤 9 中的图像 2,3 MacBook Air 11" Mid 2013 Logic Board Assembly Replacement: 步骤 9 中的图像 3,3
    • Use the tip of a spudger to flip up the retaining flap on the keyboard backlight ribbon cable ZIF socket.

    • Be sure you are prying up on the hinged retaining flap, not the socket itself.

    • Pull the keyboard backlight ribbon cable out of its socket.

  10. MacBook Air 11" Mid 2013 Logic Board Assembly Replacement: 步骤 10 中的图像 1,1
    • Remove the single 2.9 mm T5 Torx screw securing the AirPort/Bluetooth card to the logic board.

  11. MacBook Air 11" Mid 2013 Logic Board Assembly Replacement: 步骤 11 中的图像 1,3 MacBook Air 11" Mid 2013 Logic Board Assembly Replacement: 步骤 11 中的图像 2,3 MacBook Air 11" Mid 2013 Logic Board Assembly Replacement: 步骤 11 中的图像 3,3
    • Slightly lift the free end of the AirPort/Bluetooth board and pull it out of its socket on the logic board.

    • To avoid damaging its socket on the logic board, do not excessively lift the free end of the AirPort/Bluetooth card.

  12. MacBook Air 11" Mid 2013 Logic Board Assembly Replacement: 步骤 12 中的图像 1,1
    • Remove the three 3.6 mm T5 Torx screws securing the logic board to the upper case.

    • In some models these are 3.1 mm T5 Torx screws.

  13. MacBook Air 11" Mid 2013 Logic Board Assembly Replacement: 步骤 13 中的图像 1,3 MacBook Air 11" Mid 2013 Logic Board Assembly Replacement: 步骤 13 中的图像 2,3 MacBook Air 11" Mid 2013 Logic Board Assembly Replacement: 步骤 13 中的图像 3,3
    • Gently lift the logic board assembly from the heat sink end and pull it away from the port side of the case to remove it from the Air.

    • When replacing the logic board, insert the board's rubber edge under the port-side rubber gasket, then lower the board into place.

结论

To reassemble your device, follow these instructions in reverse order.

另外一个人完成了本指南。

Sam Goldheart

于10/18/12注册

465,738 声望

创作了538篇指南

团队

iFixit iFixit 的会员

Staff

135 名成员

创作了16,767篇指南

0条评论

添加评论

浏览统计数据:

过去 24 小时: 0

过去 7 天: 0

过去 30 天: 0

总计 122