跳转到主内容

当前版本的文档还未经巡查,您可以查看最新的已查核版本

仅作为前提条件
本指南仅用作其他指南的先决条件。不能单独食用。

你所需要的

  1. 这个步骤还没有翻译 帮忙翻译一下

    : 步骤 1 中的图像 1,3 : 步骤 1 中的图像 2,3 : 步骤 1 中的图像 3,3
    • Remove the small rubber gasket from the corner of the upper case nearest the the I/O board.

    • Remove the gasket from the corner nearest display cable connector.

  2. 这个步骤还没有翻译 帮忙翻译一下

    : 步骤 2 中的图像 1,2 : 步骤 2 中的图像 2,2
    • If necessary, use tweezers to remove any tape covering the microphone cable ZIF connector.

  3. 这个步骤还没有翻译 帮忙翻译一下

    : 步骤 3 中的图像 1,3 : 步骤 3 中的图像 2,3 : 步骤 3 中的图像 3,3
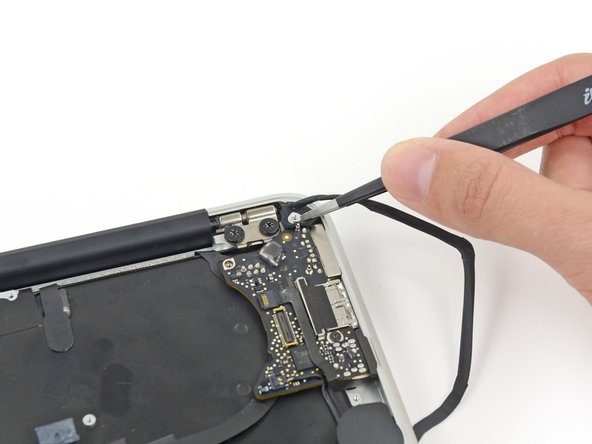
    • Use the tip of a spudger to carefully flip up the retaining flap on the microphone cable ZIF socket.

    • Be sure you are prying up on the retaining flap, not the socket itself.

    • With a pair of tweezers, pull the microphone ribbon cable straight out of its socket.

  4. 这个步骤还没有翻译 帮忙翻译一下

    : 步骤 4 中的图像 1,3 : 步骤 4 中的图像 2,3 : 步骤 4 中的图像 3,3
    • Use the tip of a spudger to pry under the speaker cable near the connector, lifting it straight up from its socket.

    • De-route the cable from its notch in the logic board.

  5. 这个步骤还没有翻译 帮忙翻译一下

    : 步骤 5 中的图像 1,1
    • Remove the single 3.6 mm T5 Torx screw securing the I/O board to the upper case.

  6. 这个步骤还没有翻译 帮忙翻译一下

    : 步骤 6 中的图像 1,3 : 步骤 6 中的图像 2,3 : 步骤 6 中的图像 3,3
    • Carefully lift the I/O board by its power cable and pull it away from the edge of the case.

终点

Sam Goldheart

于10/18/12注册

465,854 声望

创作了538篇指南

团队

iFixit iFixit 的会员

Staff

135 名成员

创作了17,199篇指南

0条评论

添加评论

浏览统计数据:

过去 24 小时: 1

过去 7 天: 10

过去 30 天: 11

总计 99