跳转到主内容

此翻译可能不反映源指南的最新更新。 帮助更新翻译查看源指南

Mac mini 2014后期主板更换

你所需要的

  1. Mac mini 2014后期主板更换, 底盖: 步骤 1 中的图像 1,1
    • 底盖由3个卡扣卡在底部。

    • 在卡扣的附近而不是正对着卡扣撬开。

  2. Mac mini 2014后期主板更换: 步骤 2 中的图像 1,3 Mac mini 2014后期主板更换: 步骤 2 中的图像 2,3 Mac mini 2014后期主板更换: 步骤 2 中的图像 3,3
    • 用塑料撬棍来撬开Mac Mini的底盖。

  3. Mac mini 2014后期主板更换: 步骤 3 中的图像 1,2 Mac mini 2014后期主板更换: 步骤 3 中的图像 2,2
    • 抬起,移除底盖。

  4. Mac mini 2014后期主板更换, 天线盘: 步骤 4 中的图像 1,1
    • 从天线盘上扭下6个六角螺丝:

    • 3个4.1毫米的螺丝

    • 3个1.9毫米的螺丝

  5. Mac mini 2014后期主板更换: 步骤 5 中的图像 1,2 Mac mini 2014后期主板更换: 步骤 5 中的图像 2,2
    • 现在千万不要着急把天线盘给拔了!!Mac Mini上还插着连接线呢!

    • 在机身接口对着你的时候,把天线盘翻到右边去,这样就可以看到连接线了。

  6. Mac mini 2014后期主板更换: 步骤 6 中的图像 1,1
    • 移除一个3.4毫米的六角螺丝,以及连接线的垫脚。

    • 移除时别丢了垫脚!

  7. Mac mini 2014后期主板更换: 步骤 7 中的图像 1,2 Mac mini 2014后期主板更换: 步骤 7 中的图像 2,2
    • 用撬棒的头子,在连接板上抬起天线连接线。

  8. Mac mini 2014后期主板更换: 步骤 8 中的图像 1,2 Mac mini 2014后期主板更换: 步骤 8 中的图像 2,2
    • 小心地从电源和盖子之间的缝隙拉出连接线。

  9. Mac mini 2014后期主板更换: 步骤 9 中的图像 1,1
    • 拆下天线盘。

  10. Mac mini 2014后期主板更换, 风扇: 步骤 10 中的图像 1,1
    • 移除两个12毫米T6六角螺丝。

    • 松开一个27毫米 不会脱落的T6六角螺丝。

  11. Mac mini 2014后期主板更换: 步骤 11 中的图像 1,3 Mac mini 2014后期主板更换: 步骤 11 中的图像 2,3 Mac mini 2014后期主板更换: 步骤 11 中的图像 3,3
    • 风扇连接器卡在风扇的角落,拔掉后永远也不能装回去了。

    • 千万不要尝试拆下整个风扇!

    • 抬起风扇来松掉在主板上的不脱落螺丝。

    • 把风扇从SSD上拿开直到你可以轻易的移动风扇连接器。

  12. Mac mini 2014后期主板更换: 步骤 12 中的图像 1,2 Mac mini 2014后期主板更换: 步骤 12 中的图像 2,2
    • 用撬棒的头子来从主板上拔掉风扇连接器。

  13. Mac mini 2014后期主板更换: 步骤 13 中的图像 1,1
    • 移除风扇。

  14. Mac mini 2014后期主板更换, 主板组件: 步骤 14 中的图像 1,1
    • 扭下保护着SATA连接线的2.6毫米的六角螺丝。

  15. Mac mini 2014后期主板更换: 步骤 15 中的图像 1,2 Mac mini 2014后期主板更换: 步骤 15 中的图像 2,2
    • 移除SATA连接线支架。

  16. Mac mini 2014后期主板更换: 步骤 16 中的图像 1,2 Mac mini 2014后期主板更换: 步骤 16 中的图像 2,2
    • 用撬棒平的一面从主板拔掉SATA连接线。

  17. Mac mini 2014后期主板更换: 步骤 17 中的图像 1,2 Mac mini 2014后期主板更换: 步骤 17 中的图像 2,2
    • 用撬棒尖的一端直接从插口撬开红外感应器连接线。

  18. Mac mini 2014后期主板更换: 步骤 18 中的图像 1,1
    • 扭下保护PCIe SSD连接线的盖子上的两个2.6毫米 T6 六角螺丝。

  19. Mac mini 2014后期主板更换: 步骤 19 中的图像 1,2 Mac mini 2014后期主板更换: 步骤 19 中的图像 2,2
    • 把盖子拿走。

  20. Mac mini 2014后期主板更换: 步骤 20 中的图像 1,2 Mac mini 2014后期主板更换: 步骤 20 中的图像 2,2
    • 从插头上撬开PCIe SSD连接线。

  21. Mac mini 2014后期主板更换: 步骤 21 中的图像 1,1
    • 扭下固定着主板的一个16毫米六角螺丝。

  22. Mac mini 2014后期主板更换: 步骤 22 中的图像 1,1
    在这个步骤中使用的工具:
    Mac mini Logic Board Removal Tool
    $4.99
    购买
    • 为了移除主板,Mac Mini主板移除工具的两个圆形的头子必须插入图上红色圆圈标注的口里。如果插到任何一个其他主板上的口里,有可能会损坏主板。

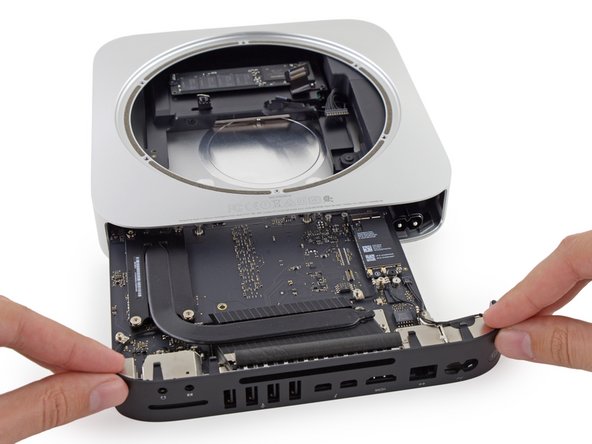
    • 插入Mac Mini主板移除工具。在进行下一步之前请确保移除工具已经接触到了下面的壳子。

  23. Mac mini 2014后期主板更换: 步骤 23 中的图像 1,3 Mac mini 2014后期主板更换: 步骤 23 中的图像 2,3 Mac mini 2014后期主板更换: 步骤 23 中的图像 3,3
    • 轻轻地向插孔面板这边按压工具。主板和插孔面板应该会平稳地滑出来。

    • 当Mac Mini主板移除工具接触到了上方外壳后,停止下来。

    • 可以移除工具了。

  24. Mac mini 2014后期主板更换: 步骤 24 中的图像 1,2 Mac mini 2014后期主板更换: 步骤 24 中的图像 2,2
    • 把电源适配器的线从主板的插头上拔掉。

  25. Mac mini 2014后期主板更换: 步骤 25 中的图像 1,2 Mac mini 2014后期主板更换: 步骤 25 中的图像 2,2
    • 小心地拉出主板组件,记得留意有没有线卡住。

  26. Mac mini 2014后期主板更换, 散热器: 步骤 26 中的图像 1,2 Mac mini 2014后期主板更换, 散热器: 步骤 26 中的图像 2,2
    • 卸下将散热器固定到主板上的螺丝如下:

    • 四个8.6毫米T8 Torx螺钉

    • 一个2.9毫米T6 Torx螺钉

    • 小心不要丢失固定在每个T8散热器螺钉下方的弹簧,当它们卸下时,它们可能从螺钉上脱落。

    • 在重组时,均匀拧紧这些螺丝,以保证散热片平贴在CPU上。

  27. Mac mini 2014后期主板更换: 步骤 27 中的图像 1,3 Mac mini 2014后期主板更换: 步骤 27 中的图像 2,3 Mac mini 2014后期主板更换: 步骤 27 中的图像 3,3
  28. Mac mini 2014后期主板更换, I/O 挡板: 步骤 28 中的图像 1,1
    • 从I / O端口天线电缆下面卸下一些T6 Torx螺钉:

    • 三个2.8毫米螺丝垫圈

    • 一个3.4毫米螺钉

    • 一个2.7毫米螺钉

  29. 这个步骤还没有翻译 帮忙翻译一下

    Mac mini 2014后期主板更换: 步骤 29 中的图像 1,2 Mac mini 2014后期主板更换: 步骤 29 中的图像 2,2
    • Use the point of a spudger to lift the power switch cable connector straight up out of its socket on the logic board.

  30. 这个步骤还没有翻译 帮忙翻译一下

    Mac mini 2014后期主板更换: 步骤 30 中的图像 1,3 Mac mini 2014后期主板更换: 步骤 30 中的图像 2,3 Mac mini 2014后期主板更换: 步骤 30 中的图像 3,3
    • Use the point of a spudger to lift the antenna connectors up off of their sockets on the AirPort card.

  31. 这个步骤还没有翻译 帮忙翻译一下

    Mac mini 2014后期主板更换: 步骤 31 中的图像 1,1
    • Remove the four 2.7 mm T6 Torx screws holding the I/O bezel to the logic board.

  32. 这个步骤还没有翻译 帮忙翻译一下

    Mac mini 2014后期主板更换: 步骤 32 中的图像 1,2 Mac mini 2014后期主板更换: 步骤 32 中的图像 2,2
    • Remove the foam bumper from between the I/O bezel and USB ports.

  33. 这个步骤还没有翻译 帮忙翻译一下

    Mac mini 2014后期主板更换: 步骤 33 中的图像 1,2 Mac mini 2014后期主板更换: 步骤 33 中的图像 2,2
    • Pull the I/O bezel off of the logic board, minding any cables that may get caught.

    • Try not to handle the small steel tabs on the logic board and I/O bezel, as oils from your fingers may cause interference issues. Before installing the logic board assembly, clean the metal tabs to remove any oils transferred during the removal process.

  34. 这个步骤还没有翻译 帮忙翻译一下

    Mac mini 2014后期主板更换, 主板: 步骤 34 中的图像 1,1
    • Remove the following T6 Torx screws securing the speaker to the logic board:

    • One 3.6 mm screw

    • One 3.6 mm large headed screw

  35. 这个步骤还没有翻译 帮忙翻译一下

    Mac mini 2014后期主板更换: 步骤 35 中的图像 1,2 Mac mini 2014后期主板更换: 步骤 35 中的图像 2,2
    • Do not attempt to remove the speaker entirely as it is still attached to the logic board.

    • Nudge the speaker gently out of the way to allow access to the speaker's connector.

  36. 这个步骤还没有翻译 帮忙翻译一下

    Mac mini 2014后期主板更换: 步骤 36 中的图像 1,3 Mac mini 2014后期主板更换: 步骤 36 中的图像 2,3 Mac mini 2014后期主板更换: 步骤 36 中的图像 3,3
    • Use the flat end of a spudger to carefully lift the speaker connector up out of its socket on the logic board.

    • Remove the speaker from the logic board.

  37. 这个步骤还没有翻译 帮忙翻译一下

    Mac mini 2014后期主板更换: 步骤 37 中的图像 1,1
    • Remove the 2.7 mm T5 screw securing the AirPort card.

  38. 这个步骤还没有翻译 帮忙翻译一下

    Mac mini 2014后期主板更换: 步骤 38 中的图像 1,3 Mac mini 2014后期主板更换: 步骤 38 中的图像 2,3 Mac mini 2014后期主板更换: 步骤 38 中的图像 3,3
    • Lift the free end of the AirPort card enough to grasp it by the edges.

    • Pull the AirPort card straight out of its socket on the logic board and remove it from the Mac Mini.

结论

请倒序重组您的设备。

16等其他人完成本指南。

由衷感谢以下译者:

en zh

44%

这些译者帮助我们修补全世界! 您也想加入吗?
开始翻译 ›

Sam Goldheart

于10/18/12注册

465,762 声望

创作了538篇指南

团队

iFixit iFixit 的会员

Staff

135 名成员

创作了16,817篇指南

4条评论

is there any internal battery on the logic board..

sokratis162 - 回复

Are all Mac Mini cases the same from 2011 on? Could I take out my 2011 guts and put in one from 2014?

jbasa - 回复

hello a question as it is called the piece that contains the hard disk?

Miguel - 回复

It is called a hard drive tray or hard drive carrier. You can find the guide to remove it here.

Arthur Shi -

添加评论

浏览统计数据:

过去 24 小时: 5

过去 7 天: 51

过去 30 天: 236

总计 38,877