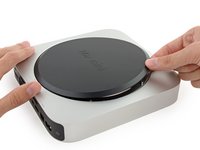
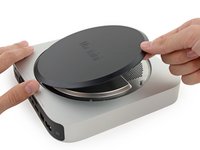
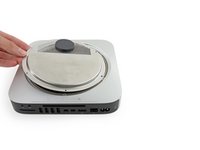
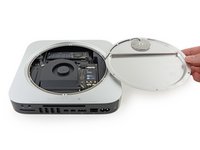
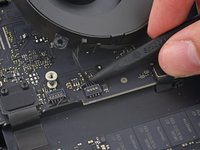
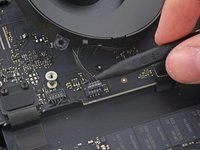
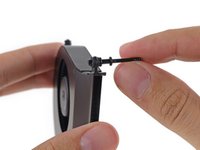
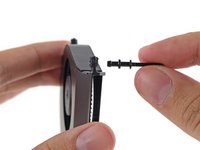
跳转到主内容

Mac mini 2014年末风扇更换

你所需要的

  1. Mac mini 2014年末风扇更换, 底盖: 步骤 1 中的图像 1,1
    • 底盖由3个卡扣卡在底部。

    • 在卡扣的附近而不是正对着卡扣撬开。

  2. Mac mini 2014年末风扇更换: 步骤 2 中的图像 1,3 Mac mini 2014年末风扇更换: 步骤 2 中的图像 2,3 Mac mini 2014年末风扇更换: 步骤 2 中的图像 3,3
    • 用塑料撬棍来撬开Mac Mini的底盖。

  3. Mac mini 2014年末风扇更换: 步骤 3 中的图像 1,2 Mac mini 2014年末风扇更换: 步骤 3 中的图像 2,2
    • 抬起,移除底盖。

  4. Mac mini 2014年末风扇更换, 天线盘: 步骤 4 中的图像 1,1
    • 从天线盘上扭下6个六角螺丝:

    • 3个4.1毫米的螺丝

    • 3个1.9毫米的螺丝

  5. Mac mini 2014年末风扇更换: 步骤 5 中的图像 1,2 Mac mini 2014年末风扇更换: 步骤 5 中的图像 2,2
    • 现在千万不要把天线盘全部移除了!!Mac Mini上还插着连接线呢!

    • 在机身接口对着你的时候,把天线盘翻到右边去,这样就可以看到连接线了。

  6. Mac mini 2014年末风扇更换: 步骤 6 中的图像 1,1
    • 移除一个3.4毫米的六角螺丝,以及连接线的垫脚。

    • 移除时别丢了垫脚!

  7. Mac mini 2014年末风扇更换: 步骤 7 中的图像 1,2 Mac mini 2014年末风扇更换: 步骤 7 中的图像 2,2
    • 用撬棒的头子,在连接板上抬起天线连接线。

  8. Mac mini 2014年末风扇更换: 步骤 8 中的图像 1,2 Mac mini 2014年末风扇更换: 步骤 8 中的图像 2,2
    • 小心地从电源和盖子之间的缝隙拉出连接线。

  9. Mac mini 2014年末风扇更换: 步骤 9 中的图像 1,1
    • 拆下天线盘。

  10. Mac mini 2014年末风扇更换, 风扇: 步骤 10 中的图像 1,1
    • 移除两个12毫米T6六角螺丝。

    • 松开一个27毫米 不会脱落的T6六角螺丝。

  11. Mac mini 2014年末风扇更换: 步骤 11 中的图像 1,3 Mac mini 2014年末风扇更换: 步骤 11 中的图像 2,3 Mac mini 2014年末风扇更换: 步骤 11 中的图像 3,3
    • 风扇连接器卡在风扇的角落,拔掉后永远也不能装回去了。

    • 千万不要尝试拆下整个风扇!

    • 抬起风扇来松掉在主板上的不脱落螺丝。

    • 把风扇从SSD拿开直到你可以轻易动风扇连接器。

  12. Mac mini 2014年末风扇更换: 步骤 12 中的图像 1,2 Mac mini 2014年末风扇更换: 步骤 12 中的图像 2,2
    • 用撬棒的头子来从主板上拔掉风扇连接器。

  13. Mac mini 2014年末风扇更换: 步骤 13 中的图像 1,1
    • 移除风扇。

  14. Mac mini 2014年末风扇更换, 风扇: 步骤 14 中的图像 1,2 Mac mini 2014年末风扇更换, 风扇: 步骤 14 中的图像 2,2
    • 从风扇螺丝孔橡胶密封圈处取下固定螺钉。

结论

如要重新组装设备,请按照倒序进行。

23等其他人完成本指南。

由衷感谢以下译者:

en zh

100%

Tim Brain正在帮助我们修复这个世界! 您也想加入吗?
开始翻译 ›

Sam Goldheart

于10/18/12注册

465,762 声望

创作了538篇指南

团队

iFixit iFixit 的会员

Staff

135 名成员

创作了16,817篇指南

3条评论

Had a problem with a noisy fan. Apparently the blades were scratching its housing, so i just bend the aluminium housing a bit and spin the fan to see if its still had a contact. It works like a charm.

Syahmie Ramley - 回复

Just got my first ever Mac yesterday, used it all day without realizing the fan wasn't working. Opened it up this morning to find the fan completely unplugged from the board. Plugged it back in and now it's working great! Thanks so much!

Jacob Begley - 回复

good instruction, thanks. But: the replacement fan from iFixit is lots more louder than the orig from Apple - sad.

M. Hanke - 回复

添加评论

浏览统计数据:

过去 24 小时: 11

过去 7 天: 38

过去 30 天: 155

总计 16,495