跳转到主内容

本指南有最近更改,您可查看未经巡查的最新版本

Mac Pro Late 2013 Fan Assembly Replacement

仅作为前提条件
本指南仅用作其他指南的先决条件。不能单独食用。

你所需要的

  1. Mac Pro Late 2013 Fan Assembly Replacement, Fan Assembly: 步骤 1 中的图像 1,3 Mac Pro Late 2013 Fan Assembly Replacement, Fan Assembly: 步骤 1 中的图像 2,3 Mac Pro Late 2013 Fan Assembly Replacement, Fan Assembly: 步骤 1 中的图像 3,3
    • Remove five 5.1 mm T10 Torx screws from around the outer perimeter of the fan assembly.

  2. Mac Pro Late 2013 Fan Assembly Replacement: 步骤 2 中的图像 1,2 Mac Pro Late 2013 Fan Assembly Replacement: 步骤 2 中的图像 2,2
    • The fan assembly is attached to the rest of the computer by two cables on the IO board side.

    • Tilt the assembly up away from the IO board.

    • Do not try to remove the fan assembly yet, as it is still attached by two cables.

  3. Mac Pro Late 2013 Fan Assembly Replacement: 步骤 3 中的图像 1,1
    • While supporting the fan assembly with one hand, loosen the two T7 captive screws in the fan cable bracket.

    • These screws are captive in the Mac Pro. Do not try to remove these screws from your Mac Pro.

  4. Mac Pro Late 2013 Fan Assembly Replacement: 步骤 4 中的图像 1,1
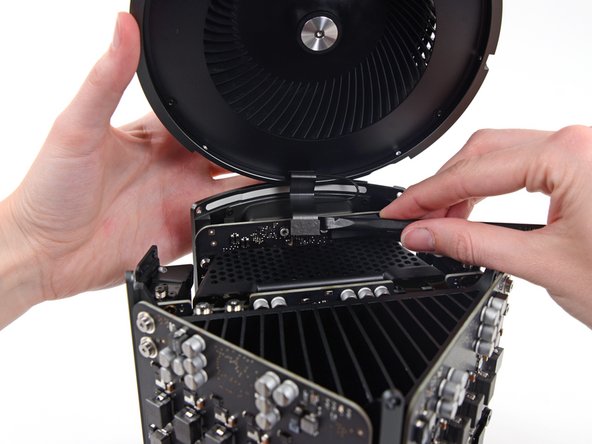
    • Use a pair of tweezers to pull the fan cable bracket away from the fan assembly.

  5. Mac Pro Late 2013 Fan Assembly Replacement: 步骤 5 中的图像 1,2 Mac Pro Late 2013 Fan Assembly Replacement: 步骤 5 中的图像 2,2
    • Use the flat end of a spudger to disconnect the fan assembly ribbon cable from the IO board.

  6. Mac Pro Late 2013 Fan Assembly Replacement: 步骤 6 中的图像 1,1
    • Disconnect the fan assembly antenna cable from the IO board.

    • Remove the fan assembly from the Mac Pro.

结论

To reassemble your device, follow these instructions in reverse order.

团队

iFixit iFixit 的会员

Staff

135 名成员

创作了16,732篇指南

0条评论

添加评论

浏览统计数据:

过去 24 小时: 0

过去 7 天: 0

过去 30 天: 0

总计 92