跳转到主内容

当前版本的文档还未经巡查,您可以查看最新的已查核版本

你所需要的

  1. , 外壳: 步骤 1 中的图像 1,2 , 外壳: 步骤 1 中的图像 2,2
    • 拨动图中所示的闩子至右侧“unlocked”位置。

  2. : 步骤 2 中的图像 1,3 : 步骤 2 中的图像 2,3 : 步骤 2 中的图像 3,3
    • 向上垂直提起Mac pro外壳。

    • 提起外壳时,可以按着顶部的散热风扇。

  3. 这个步骤还没有翻译 帮忙翻译一下

    : 步骤 3 中的图像 1,3 : 步骤 3 中的图像 2,3 : 步骤 3 中的图像 3,3
    • Remove five 5.1 mm T10 Torx screws from around the outer perimeter of the fan assembly.

  4. 这个步骤还没有翻译 帮忙翻译一下

    : 步骤 4 中的图像 1,2 : 步骤 4 中的图像 2,2
    • The fan assembly is attached to the rest of the computer by two cables on the IO board side.

    • Tilt the assembly up away from the IO board.

    • Do not try to remove the fan assembly yet, as it is still attached by two cables.

  5. 这个步骤还没有翻译 帮忙翻译一下

    : 步骤 5 中的图像 1,1
    • While supporting the fan assembly with one hand, loosen the two T8 captive screws in the fan cable bracket.

    • These screws are captive in the Mac Pro. Do not try to remove these screws from your Mac Pro.

  6. 这个步骤还没有翻译 帮忙翻译一下

    : 步骤 6 中的图像 1,1
    • Use a pair of tweezers to pull the fan cable bracket away from the fan assembly.

  7. 这个步骤还没有翻译 帮忙翻译一下

    : 步骤 7 中的图像 1,2 : 步骤 7 中的图像 2,2
    • Use the flat end of a spudger to disconnect the fan assembly ribbon cable from the IO board.

  8. 这个步骤还没有翻译 帮忙翻译一下

    : 步骤 8 中的图像 1,1
    • Disconnect the fan assembly antenna cable from the IO board.

    • Remove the fan assembly from the Mac Pro.

  9. 这个步骤还没有翻译 帮忙翻译一下

    : 步骤 9 中的图像 1,3 : 步骤 9 中的图像 2,3 : 步骤 9 中的图像 3,3
    • Use the flat end of a spudger to pry the fan assembly lid up off the fan assembly.

    • Remove the fan assembly lid.

  10. 这个步骤还没有翻译 帮忙翻译一下

    : 步骤 10 中的图像 1,1
    • Remove the three 3.7 mm T4 screws securing the metal cover to the AirPort board bay.

  11. 这个步骤还没有翻译 帮忙翻译一下

    : 步骤 11 中的图像 1,1
    • Lift and remove the metal cover from the AirPort board bay.

  12. 这个步骤还没有翻译 帮忙翻译一下

    : 步骤 12 中的图像 1,3 : 步骤 12 中的图像 2,3 : 步骤 12 中的图像 3,3
    • Use the tip of a spudger to flip the ZIF retaining tab on the fan assembly ribbon cable connector.

    • Remove the fan assembly ribbon cable from its ZIF socket.

  13. 这个步骤还没有翻译 帮忙翻译一下

    : 步骤 13 中的图像 1,3 : 步骤 13 中的图像 2,3 : 步骤 13 中的图像 3,3
    • Use the tip of a spudger to flip the ZIF retaining tab on the fan ribbon cable.

    • Disconnect the fan ribbon cable.

  14. 这个步骤还没有翻译 帮忙翻译一下

    : 步骤 14 中的图像 1,3 : 步骤 14 中的图像 2,3 : 步骤 14 中的图像 3,3
    • Use the tip of a spudger to disconnect the four AirPort antenna cables from the AirPort card.

  15. 这个步骤还没有翻译 帮忙翻译一下

    : 步骤 15 中的图像 1,1
    • Remove three 3.7 mm T4 screws securing the AirPort board to the fan assembly.

  16. 这个步骤还没有翻译 帮忙翻译一下

    : 步骤 16 中的图像 1,1
    • Remove the AirPort board and card from the fan assembly.

  17. 这个步骤还没有翻译 帮忙翻译一下

    : 步骤 17 中的图像 1,1
    • Remove the two 3.7 mm T4 Torx screws securing the AirPort card to the AirPort board.

  18. 这个步骤还没有翻译 帮忙翻译一下

    : 步骤 18 中的图像 1,2 : 步骤 18 中的图像 2,2
    • Slide the AirPort card out of its socket in the AirPort board.

终点

3等其他人完成本指南。

团队

iFixit iFixit 的会员

Staff

135 名成员

创作了16,731篇指南

4条评论

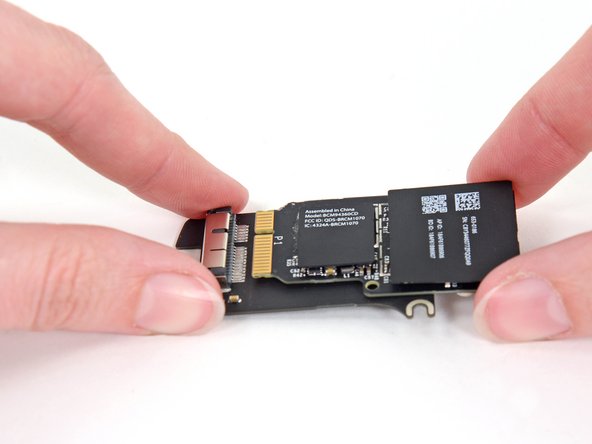
Is there a way to replace the Mac Pro Airport card with a more recent one, like when you insert a recent one in an old macbook pro to get new features such as "unlock my mac with my apple watch" ? This is an interesting question that remains unanswered (until now ?)

Vincent Monteil - 回复

You show how to replace it but I can’t buy it from ifixit….why?

Sanong - 回复

Why not start at step 9 and leave the lid attached?

dillonrw - 回复

I wondered the exact same thing. I can see zero reason to remove the fan assembly from the top of the machine just to replace the wifi card. The only reason I can see for doing it would be if you drop a screw it’s at least easy to get to, because everything is separate from the core unit.

David Orriss Jr -

添加评论

浏览统计数据:

过去 24 小时: 4

过去 7 天: 24

过去 30 天: 101

总计 10,154