跳转到主内容

MSI GS63VR 7RF Stealth Pro SSD Replacement

你所需要的

  1. MSI GS63VR 7RF Stealth Pro SSD Replacement, Battery: 步骤 1 中的图像 1,1
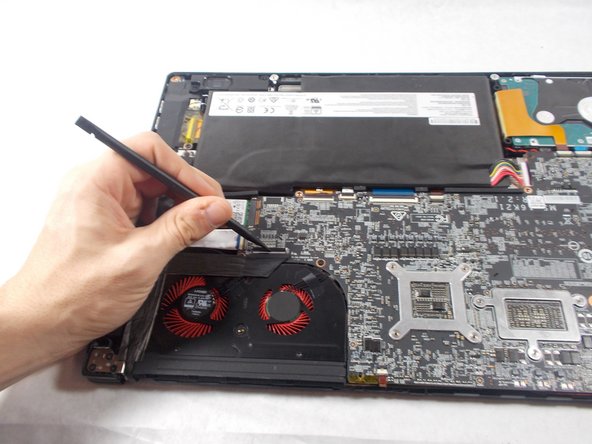
    • Use the spudger to separate the back plate from the rest of the computer with the screen up like in the picture.

    • Once the back plate is loose, close the screen for an easier time properly removing it.

  2. MSI GS63VR 7RF Stealth Pro SSD Replacement: 步骤 2 中的图像 1,1
    • Using a Phillips Head #1 screwdriver, unscrew the 15 screws on the bottom of the device

    • After all the screws are unscrewed, remove the bottom plate. If this is the first time that you are removing this back cover, the last screw is hidden under the "factory seal" label. You will need to break that label to reach that screw.

    • Keep track of all the screws and which slot they came from, as they slightly differ. We recommend this system: lay out on a piece of paper and pretending the paper is the device. Place the screws on the paper approximately where they would go.

    • Another method for keeping track of all the screws would be to secure each removed screw near the hole that it was removed from with a piece of painters or masking tape. This type of tape is easy to remove from the fuzzy surface but strong enough to secure the screw to the back cover.

  3. MSI GS63VR 7RF Stealth Pro SSD Replacement: 步骤 3 中的图像 1,3 MSI GS63VR 7RF Stealth Pro SSD Replacement: 步骤 3 中的图像 2,3 MSI GS63VR 7RF Stealth Pro SSD Replacement: 步骤 3 中的图像 3,3
    • Locate the battery.

    • Wedge the spudger underneath the battery, and apply pressure to lift it away from the rest of the device.

    • Gently pull and wiggle the multiple colored wired connector out from the socket.

    • If you are removing the original battery, the back has a couple foam strips that were installed for cushioning. Those can be carefully removed and placed on the new replacement battery, but it is not necessary.

  4. MSI GS63VR 7RF Stealth Pro SSD Replacement, Hard Drive: 步骤 4 中的图像 1,2 MSI GS63VR 7RF Stealth Pro SSD Replacement, Hard Drive: 步骤 4 中的图像 2,2
    • Locate the hard drive.

    • Using a spudger lift the ribbon cable connector.

  5. MSI GS63VR 7RF Stealth Pro SSD Replacement: 步骤 5 中的图像 1,2 MSI GS63VR 7RF Stealth Pro SSD Replacement: 步骤 5 中的图像 2,2
    • Use the tweezers to lift the back tab and pull it back until the ribbon cable disconnects.

    • Wedge the spudger between the hard drive and the device and apply pressure to pry the two apart, and then remove the hard drive.

  6. MSI GS63VR 7RF Stealth Pro SSD Replacement, Speakers: 步骤 6 中的图像 1,3 MSI GS63VR 7RF Stealth Pro SSD Replacement, Speakers: 步骤 6 中的图像 2,3 MSI GS63VR 7RF Stealth Pro SSD Replacement, Speakers: 步骤 6 中的图像 3,3
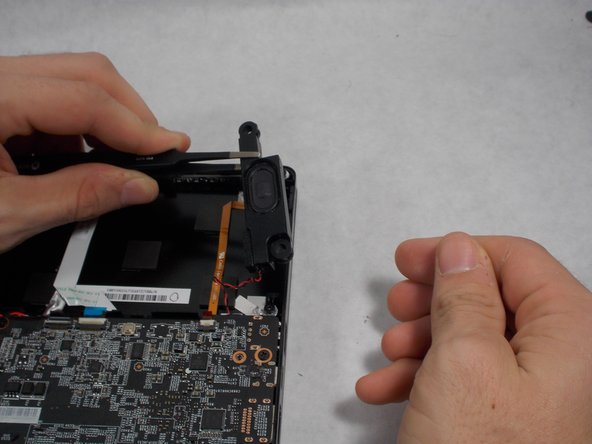
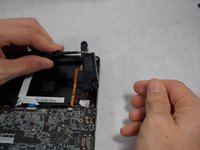
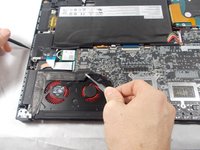
    • First locate the speaker(s).

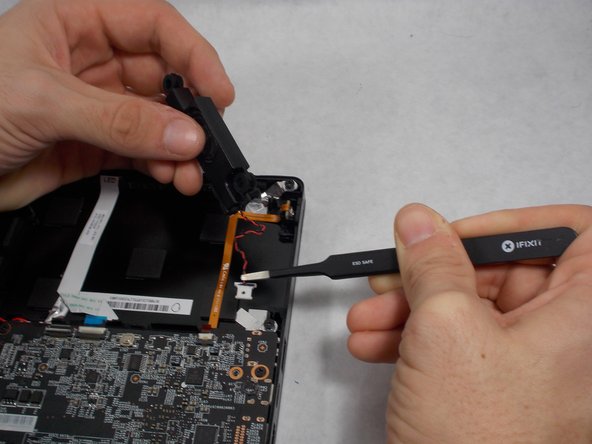
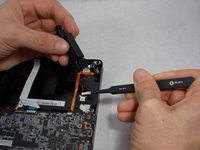
    • Use the tweezers to lift the speaker from its position.

    • Grab the multi-colored wire with the tweezers and gently pull back until the speakers releases from its socket.

    • Applies for both speakers.

    • Keep track of which speaker went where. The connectors for the speakers are unique; you cannot use a speaker that should go on the right side on the left side and vice versa.

  7. MSI GS63VR 7RF Stealth Pro SSD Replacement, SSD: 步骤 7 中的图像 1,3 MSI GS63VR 7RF Stealth Pro SSD Replacement, SSD: 步骤 7 中的图像 2,3 MSI GS63VR 7RF Stealth Pro SSD Replacement, SSD: 步骤 7 中的图像 3,3
    • First, locate all the ribbon cables that are connected to the motherboard.

    • Lift the ribbon cable connector tabs with the spudger gently.

    • Using the tweezers, gently pull back on the ribbon cable until it is completely out of the socket.

    • Be very gentle while dealing with ribbon cables. If one gets damaged the component it links to will not function.

  8. MSI GS63VR 7RF Stealth Pro SSD Replacement: 步骤 8 中的图像 1,1
    • First, locate all the screws holding down the Motherboard.

    • Remove all the screws using the #1 Phillips head screw driver.

  9. MSI GS63VR 7RF Stealth Pro SSD Replacement: 步骤 9 中的图像 1,2 MSI GS63VR 7RF Stealth Pro SSD Replacement: 步骤 9 中的图像 2,2
    • Next, locate the Wi-Fi chip.

    • Use the #1 Phillips head screwdriver to remove the screw attaching the Wi-fi chip to the motherboard.

  10. MSI GS63VR 7RF Stealth Pro SSD Replacement: 步骤 10 中的图像 1,3 MSI GS63VR 7RF Stealth Pro SSD Replacement: 步骤 10 中的图像 2,3 MSI GS63VR 7RF Stealth Pro SSD Replacement: 步骤 10 中的图像 3,3
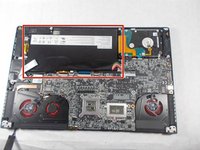
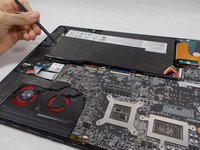
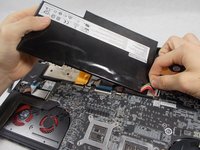
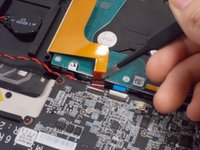
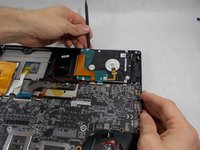
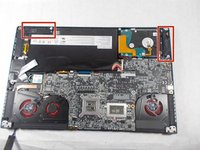
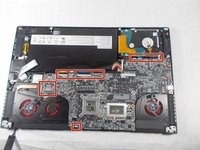
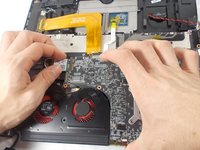
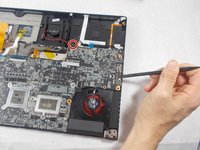
    • Use the spudger to lift the motherboard up and remove it from the laptop, then flip the now separated motherboard over.

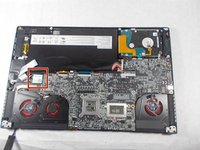
    • Using tweezers, disconnect the red wire circled in the picture; where the hard drive would be.

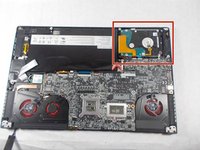
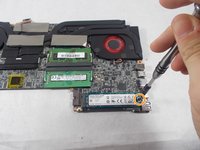
    • Locate the SSD and the screw holding it in.

    • Unscrew the one Screw using a #1 Phillips Head screwdriver.

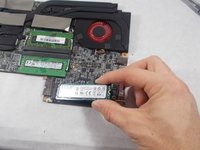
    • The SSD will want to lift with that screw being removed, from here grab it and pull it out gently.

结论

To reassemble your device, follow these instructions in reverse order.

13等其他人完成本指南。

Nicholas Perry

于10/20/17注册

543 声望

创作了2篇指南

团队

UMass Dartmouth, Team S2-G1, Julie Fall 2017 UMass Dartmouth, Team S2-G1, Julie Fall 2017 的会员

UMASSD-JULIE-F17S2G1

3 名成员

创作了5篇指南

5条评论

This was not super hard. I’d say moderate since the mobo needs little finesse to pull out. Some firm gentleness.

bw_b_dub - 回复

Thanks. I’ve seen some videos on YouTube regarding the MSI Stealth Pro GS63VR. This helps a lot.

Tom Roholm - 回复

I notice the stock SSD is an M-B key type. Does the board support M-key SSDs?

Nicholas Pinney - 回复

This was a great guide. My only suggestion for Step 9 would be to clarify removing the wifi chip. I found that lifting the motherboard helped me better access the chip for removal. It’s a tight fit.

Jonathan C - 回复

Thanks for the guide, I need some replacement screws for my MSI GS73VR Stealth Pro. Any idea what size they are? Or where I could find out? Thanks you, I’d really appreciate any help!

beanyharrris - 回复

添加评论

浏览统计数据:

过去 24 小时: 6

过去 7 天: 26

过去 30 天: 96

总计 18,195