跳转到主内容

MSI GS60 6QE GHOST PRO 4K RAM Replacement

你所需要的

  1. MSI GS60 6QE GHOST PRO 4K RAM Replacement, Battery: 步骤 1 中的图像 1,2 MSI GS60 6QE GHOST PRO 4K RAM Replacement, Battery: 步骤 1 中的图像 2,2
    • Remove the eleven 5mm screws with a Phillips #0 bit.

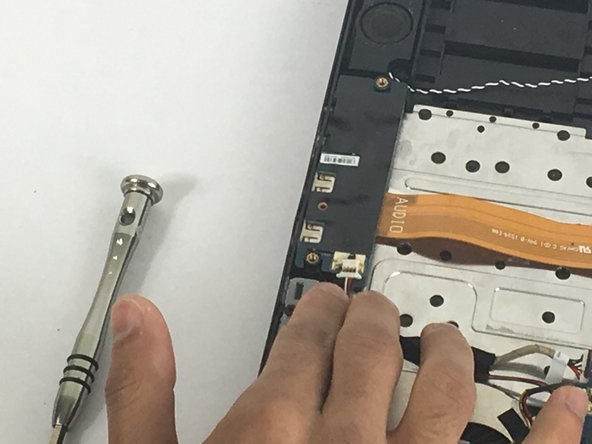
    • Remove the four 2.5mm screws with a Phillips #0 bit.

  2. MSI GS60 6QE GHOST PRO 4K RAM Replacement: 步骤 2 中的图像 1,2 MSI GS60 6QE GHOST PRO 4K RAM Replacement: 步骤 2 中的图像 2,2
    • After opening the bottom plate, locate the battery and the battery connection.

  3. MSI GS60 6QE GHOST PRO 4K RAM Replacement: 步骤 3 中的图像 1,2 MSI GS60 6QE GHOST PRO 4K RAM Replacement: 步骤 3 中的图像 2,2
    • Unplug the battery connection carefully from the motherboard, and remove the old battery.

  4. MSI GS60 6QE GHOST PRO 4K RAM Replacement, Motherboard: 步骤 4 中的图像 1,1
    • Remove the four 2.5 mm screws from the motherboard.

  5. MSI GS60 6QE GHOST PRO 4K RAM Replacement: 步骤 5 中的图像 1,1
    • Unplug the speaker wire.

  6. MSI GS60 6QE GHOST PRO 4K RAM Replacement: 步骤 6 中的图像 1,2 MSI GS60 6QE GHOST PRO 4K RAM Replacement: 步骤 6 中的图像 2,2
    • Gently lift the selected black tab that connects the cable onto the board and then slide out the cable.

    • Be careful not to break the black cover.

  7. MSI GS60 6QE GHOST PRO 4K RAM Replacement: 步骤 7 中的图像 1,2 MSI GS60 6QE GHOST PRO 4K RAM Replacement: 步骤 7 中的图像 2,2
    • Gently lift the selected black tab that connects the cable onto the board and then slide out the cable.

    • Be careful not to break the black cover because it can be broken easily

  8. MSI GS60 6QE GHOST PRO 4K RAM Replacement: 步骤 8 中的图像 1,1
    • Gently lift the selected black tab that connects the cable onto the board and then slide out the cable.

    • Be careful not to break the black cover. lift it up gently

  9. MSI GS60 6QE GHOST PRO 4K RAM Replacement: 步骤 9 中的图像 1,2 MSI GS60 6QE GHOST PRO 4K RAM Replacement: 步骤 9 中的图像 2,2
    • Gently lift the selected black tab that connects the cable onto the board and then slide out the cable.

  10. MSI GS60 6QE GHOST PRO 4K RAM Replacement: 步骤 10 中的图像 1,2 MSI GS60 6QE GHOST PRO 4K RAM Replacement: 步骤 10 中的图像 2,2
    • Gently lift the selected black tab that connects the cable onto the board and then slide out the cable.

  11. MSI GS60 6QE GHOST PRO 4K RAM Replacement: 步骤 11 中的图像 1,2 MSI GS60 6QE GHOST PRO 4K RAM Replacement: 步骤 11 中的图像 2,2
    • Unplug the selected cable

  12. MSI GS60 6QE GHOST PRO 4K RAM Replacement: 步骤 12 中的图像 1,3 MSI GS60 6QE GHOST PRO 4K RAM Replacement: 步骤 12 中的图像 2,3 MSI GS60 6QE GHOST PRO 4K RAM Replacement: 步骤 12 中的图像 3,3
    • Locate and unplug the selected cables.

  13. MSI GS60 6QE GHOST PRO 4K RAM Replacement: 步骤 13 中的图像 1,2 MSI GS60 6QE GHOST PRO 4K RAM Replacement: 步骤 13 中的图像 2,2
    • Gently lift the selected black tab that connects the cable onto the board and then slide out the cable.

    • Unplug it carefully without breaking the black cover.

  14. MSI GS60 6QE GHOST PRO 4K RAM Replacement: 步骤 14 中的图像 1,2 MSI GS60 6QE GHOST PRO 4K RAM Replacement: 步骤 14 中的图像 2,2
    • Gently unplug the selected cable

  15. MSI GS60 6QE GHOST PRO 4K RAM Replacement: 步骤 15 中的图像 1,2 MSI GS60 6QE GHOST PRO 4K RAM Replacement: 步骤 15 中的图像 2,2
    • Gently remove the electronic component by sliding it out and lifting it up after unscrewing the 2.5 mm screw

    • Make sure your unscrew the screw first and unplug the chip from the motherboard. Do not disconnect the wires connected to the chip

  16. MSI GS60 6QE GHOST PRO 4K RAM Replacement: 步骤 16 中的图像 1,1
    • After unplugging all of the cables and unscrewing all of the screws, gently remove the motherboard out of the computer chassis

    • This part will take some effort but remember not to apply to much pressure on the motherboard as to not damage any of the small electrical components on the board

  17. MSI GS60 6QE GHOST PRO 4K RAM Replacement, RAM: 步骤 17 中的图像 1,1
    • After removing the motherboard from the laptop chassis locate the RAM chips indicated by the red rectangle.

  18. MSI GS60 6QE GHOST PRO 4K RAM Replacement: 步骤 18 中的图像 1,2 MSI GS60 6QE GHOST PRO 4K RAM Replacement: 步骤 18 中的图像 2,2
    • Firmly grip the two rectangular Ram components, one at a time, and pull them up from the Motherboard, be gentle. Once this process is complete, you have successfully removed the Ram.

结论

To reassemble your device, follow these instructions in reverse order.

3等其他人完成本指南。

Justin Pelley

于09/28/17注册

161 声望

撰写一个指南

团队

USF Tampa, Team S1-G4, Nance Fall 2017 USF Tampa, Team S1-G4, Nance Fall 2017 的会员

USFT-NANCE-F17S1G4

3 名成员

创作了5篇指南

一条评论

Thank you very much for this guide. I’ve successfully managed to replace my RAM with 16GB module.

Ondřej Kyzek - 回复

添加评论

浏览统计数据:

过去 24 小时: 1

过去 7 天: 4

过去 30 天: 23

总计 2,935