跳转到主内容

MSI GE72 2QF Apache Pro Motherboard Replacement

你所需要的

  1. MSI GE72 2QF Apache Pro Motherboard Replacement, Motherboard: 步骤 1 中的图像 1,2 MSI GE72 2QF Apache Pro Motherboard Replacement, Motherboard: 步骤 1 中的图像 2,2
    • What You Will Need:

    • A new MSI GE72 2QF Apache Pro motherboard

  2. MSI GE72 2QF Apache Pro Motherboard Replacement: 步骤 2 中的图像 1,2 MSI GE72 2QF Apache Pro Motherboard Replacement: 步骤 2 中的图像 2,2
    • First, take your Phillips head screw driver and begin removing the 19 screws on the back cover of the laptop.

    • Be sure to keep the screws organized. We'll be using a magnetic whiteboard so we can label each set of screws.

  3. MSI GE72 2QF Apache Pro Motherboard Replacement: 步骤 3 中的图像 1,1
    • Pry off the back cover using the spudger or your fingers.

    • There will be a series of plastic clasps that pop out of place, so don't worry if you start to hear cracking noises.

  4. MSI GE72 2QF Apache Pro Motherboard Replacement: 步骤 4 中的图像 1,2 MSI GE72 2QF Apache Pro Motherboard Replacement: 步骤 4 中的图像 2,2
    • Remove the battery from the computer. Make sure the computer is turned off before you do this step.

    • There will be one PH#1 screw holding it in place.

    • Slide the battery up so it releases from the port.

  5. MSI GE72 2QF Apache Pro Motherboard Replacement: 步骤 5 中的图像 1,2 MSI GE72 2QF Apache Pro Motherboard Replacement: 步骤 5 中的图像 2,2
    • Highlighted in red are a set of cords you have to unplug. Simply do so in order to remove the fan.

    • The screws here have washers you need to remove as well.

    • The rest of the screws, highlighted in yellow are just normal PH#1 screws.

    • Once all the screws are removed and the wires are unplugged, carefully lift the fan out of the laptop.

  6. MSI GE72 2QF Apache Pro Motherboard Replacement: 步骤 6 中的图像 1,2 MSI GE72 2QF Apache Pro Motherboard Replacement: 步骤 6 中的图像 2,2
    • Remove the disk drive. The tray will slide out easily because there is nothing holding it down at this point. The screw that was holding it originally was taken out when you took off the back case.

  7. MSI GE72 2QF Apache Pro Motherboard Replacement: 步骤 7 中的图像 1,2 MSI GE72 2QF Apache Pro Motherboard Replacement: 步骤 7 中的图像 2,2
    • Now that you have the disk drive removed, we will move onto the hard drive.

    • There will be two PH#1 screws that need to be removed.

    • Once you remove the screws, slide it down out of the port and place it aside.

  8. MSI GE72 2QF Apache Pro Motherboard Replacement: 步骤 8 中的图像 1,3 MSI GE72 2QF Apache Pro Motherboard Replacement: 步骤 8 中的图像 2,3 MSI GE72 2QF Apache Pro Motherboard Replacement: 步骤 8 中的图像 3,3
    • Once you have the hard drive removed, we will move onto the RAM. There will be two clasps holding it down.

    • To take out the RAM, push down on the two metal clasps out until the RAM pops up out of place.

    • Repeat this for the second RAM card.

  9. MSI GE72 2QF Apache Pro Motherboard Replacement: 步骤 9 中的图像 1,2 MSI GE72 2QF Apache Pro Motherboard Replacement: 步骤 9 中的图像 2,2
    • Once the RAM is removed, move onto the SSD.

    • Remove the PH#1 screw and allow the SSD to pop up out of place. Next, carefully pull out the SSD.

  10. MSI GE72 2QF Apache Pro Motherboard Replacement: 步骤 10 中的图像 1,2 MSI GE72 2QF Apache Pro Motherboard Replacement: 步骤 10 中的图像 2,2
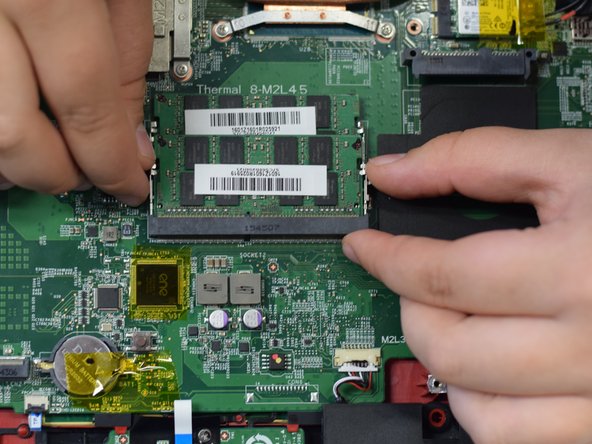
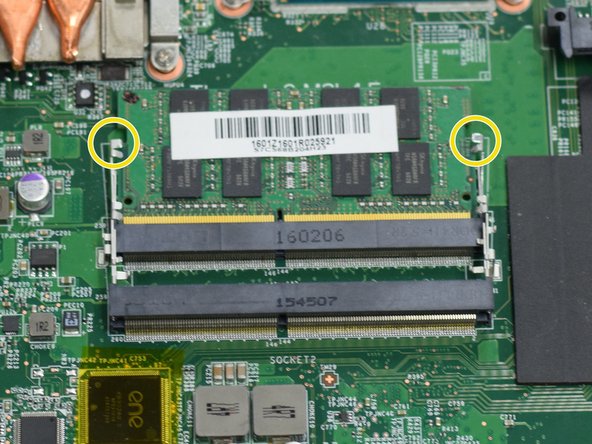
    • Finally, we will remove the motherboard for replacement. Highlighted in yellow are the screw we will need to be removing.

    • Here, highlighted in red are a series of plugs you will have to remove. Once you have completely detached the motherboard from any remaining items, carefully pull it out.

结论

To reassemble your device, follow these instructions in reverse order.

3等其他人完成本指南。

2条评论

This was done thoroughly and clearly. Wonderful job!

Dan Hartzell - 回复

Very helpful. Thanks

vann herren - 回复

添加评论

浏览统计数据:

过去 24 小时: 0

过去 7 天: 8

过去 30 天: 25

总计 3,525