跳转到主内容

Logitech M125 Scroll Wheel Replacement

你所需要的

  1. Logitech M125 Scroll Wheel Replacement, Button Plate: 步骤 1 中的图像 1,3 Logitech M125 Scroll Wheel Replacement, Button Plate: 步骤 1 中的图像 2,3 Logitech M125 Scroll Wheel Replacement, Button Plate: 步骤 1 中的图像 3,3
    • Turn the device over and remove the two 0.5mm screws near the front of the mouse by using a Phillips #0 screwdriver.

    • The black screws used in the Logitech M125 frame are all the same size and do not need special consideration for keeping them separated. Silver colored screws are used on the circuit board and have broader heads.

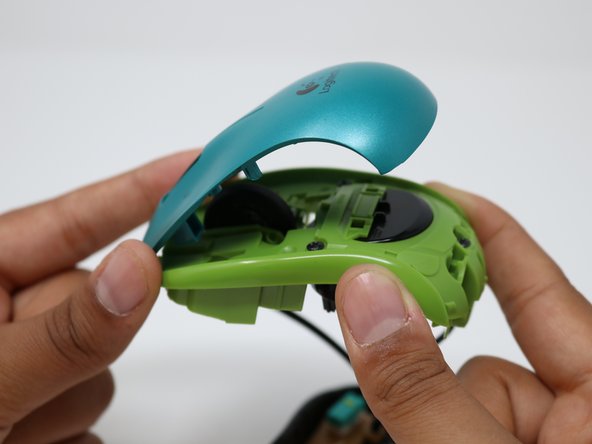
    • Once the screws are removed, open the mouse from the front as it pivots at the rear.

  2. Logitech M125 Scroll Wheel Replacement: 步骤 2 中的图像 1,2 Logitech M125 Scroll Wheel Replacement: 步骤 2 中的图像 2,2
    • Once the mouse is opened, remove the two black 0.5mm screws located towards the back of the mouse. These are the retention screws for the mouse button plate.

    • These screws will also require the Phillips #0 screwdriver.

  3. Logitech M125 Scroll Wheel Replacement: 步骤 3 中的图像 1,3 Logitech M125 Scroll Wheel Replacement: 步骤 3 中的图像 2,3 Logitech M125 Scroll Wheel Replacement: 步骤 3 中的图像 3,3
    • There are two tabs that further secure the mouse buttons to the frame. They are located on either side of the mouse cord retracting mechanism.

    • The tighter confines of the mouse interior will be easier to navigate with metal prying tools. While plastic tools are preferred for most plastic devices, they are too large to access the left tab in the picture.

    • To dislodge the tabs, use a prying tool while pressing down on the back of the mouse. When prying, push the tab towards the outside of the mouse.

  4. Logitech M125 Scroll Wheel Replacement: 步骤 4 中的图像 1,2 Logitech M125 Scroll Wheel Replacement: 步骤 4 中的图像 2,2
    • To finish removing the button plate, continue lifting the rear of the plate until the tabs have fully left their slots.

    • Once the tabs are clear, push the plate towards the front of the mouse and lift.

  5. Logitech M125 Scroll Wheel Replacement: 步骤 5 中的图像 1,1
    • The mouse button plate has now been fully removed. In order to install the replacement, follow the instructions for this guide in reverse.

  6. Logitech M125 Scroll Wheel Replacement, Scroll Wheel: 步骤 6 中的图像 1,3 Logitech M125 Scroll Wheel Replacement, Scroll Wheel: 步骤 6 中的图像 2,3 Logitech M125 Scroll Wheel Replacement, Scroll Wheel: 步骤 6 中的图像 3,3
    • The scroll wheel is on a pivoting mechanism that allows it to perform middle-clicks.

    • It is best to brace the bottom of this mechanism as you're holding the frame in order to keep it steady and prevent it from hyper extending and breaking.

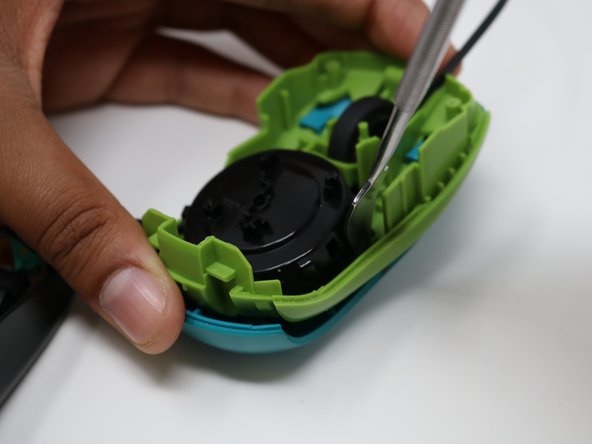
    • Insert a spudger between the left side of the scroll wheel and the housing. Then, rotate the spudger clockwise, so that it is pushing the center of the housing away from the wheel. Do this while pressing down on the wheel with your thumb.

    • Use firm, but gentle pressure when applying leverage to avoid breaking the scroll wheel housing.

  7. Logitech M125 Scroll Wheel Replacement: 步骤 7 中的图像 1,1
    • Once you feel some give while pressing down on the wheel with your thumb, turn it over to ensure that the wheel has fully separated from the housing.

    • Be very careful with the spring while removing the wheel. If it is bent out of the original shape it will not prevent the mouse wheel from spinning freely when reassembled.

  8. Logitech M125 Scroll Wheel Replacement: 步骤 8 中的图像 1,1
    • With the old scroll wheel removed, perform these steps in reverse using the replacement.

    • The open side of the wheel will be where the spring is inserted, and will need to be aligned facing the spring when being installed.

结论

To reassemble your device, follow these instructions in reverse order.

Rob Myrick

于07/17/19注册

267 声望

创作了2篇指南

团队

UW Tacoma, Team S1-G2, Liner Summer 2019 UW Tacoma, Team S1-G2, Liner Summer 2019 的会员

UWT-LINER-SU19S1G2

5 名成员

创作了9篇指南

0条评论

添加评论

浏览统计数据:

过去 24 小时: 0

过去 7 天: 0

过去 30 天: 4

总计 508