跳转到主内容

Lenovo ThinkPad Yoga 260 Repair Heat Sink Replacement

你所需要的

  1. Lenovo ThinkPad Yoga 260 Repair Heat Sink Replacement, Back Cover: 步骤 1 中的图像 1,1
    • Ensure the device is off and unplugged.

    • Remove the stylus from its port and set aside.

  2. Lenovo ThinkPad Yoga 260 Repair Heat Sink Replacement: 步骤 2 中的图像 1,2 Lenovo ThinkPad Yoga 260 Repair Heat Sink Replacement: 步骤 2 中的图像 2,2
    • Using a Phillips #1 screwdriver, gently unscrew the eight 1.3 mm Phillips #1 screws until you hear an audible click.

    • The screws will not separate from the bottom cover when loose.

  3. Lenovo ThinkPad Yoga 260 Repair Heat Sink Replacement: 步骤 3 中的图像 1,2 Lenovo ThinkPad Yoga 260 Repair Heat Sink Replacement: 步骤 3 中的图像 2,2
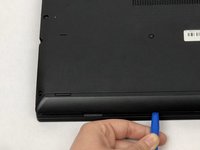
    • The bottom cover is attached via several plastic clips located around the edges of the bottom cover.

    • Using a plastic opening tool, gently pry the bottom cover from the laptop.

    • Work the plastic opening tool around the edges of the bottom cover undoing all of the plastic clips, as shown in the picture.

  4. Lenovo ThinkPad Yoga 260 Repair Heat Sink Replacement: 步骤 4 中的图像 1,2 Lenovo ThinkPad Yoga 260 Repair Heat Sink Replacement: 步骤 4 中的图像 2,2
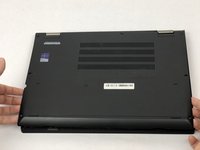
    • Place your fingers around the edges of the cover and remove it.

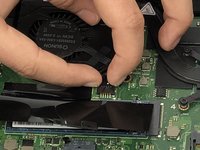
  5. Lenovo ThinkPad Yoga 260 Repair Heat Sink Replacement, Heat Sink: 步骤 5 中的图像 1,2 Lenovo ThinkPad Yoga 260 Repair Heat Sink Replacement, Heat Sink: 步骤 5 中的图像 2,2
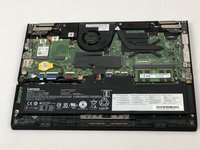
    • Heatsink should be cool to the touch.

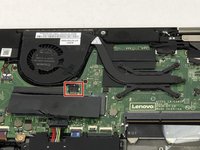
    • Using your index fingers, gently remove the fan’s power connection.

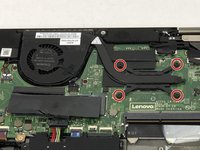
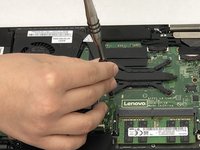
  6. Lenovo ThinkPad Yoga 260 Repair Heat Sink Replacement: 步骤 6 中的图像 1,2 Lenovo ThinkPad Yoga 260 Repair Heat Sink Replacement: 步骤 6 中的图像 2,2
    • Using a Phillips #1 screwdriver, remove the four 1.3 mm Phillips #1 screws and set them aside.

    • The screws will not separate from the mounting when loose.

  7. Lenovo ThinkPad Yoga 260 Repair Heat Sink Replacement: 步骤 7 中的图像 1,1
    • Using your index finger and thumb, gently pry the cooler from its mountings and remove the assembly.

结论

To reassemble your device, follow these instructions in reverse order.

3等其他人完成本指南。

团队

USF Tampa, Team S2-G3, Eyestone Spring 2018 USF Tampa, Team S2-G3, Eyestone Spring 2018 的会员

USFT-EYESTONE-S18S2G3

4 名成员

创作了5篇指南

一条评论

Good guide, thank you. Clear and concise with very easy to follow pictures and instruction. As usual, iFixit to the rescue :-)

Mark Taylor (wodin69) - 回复

添加评论

浏览统计数据:

过去 24 小时: 0

过去 7 天: 2

过去 30 天: 6

总计 1,191