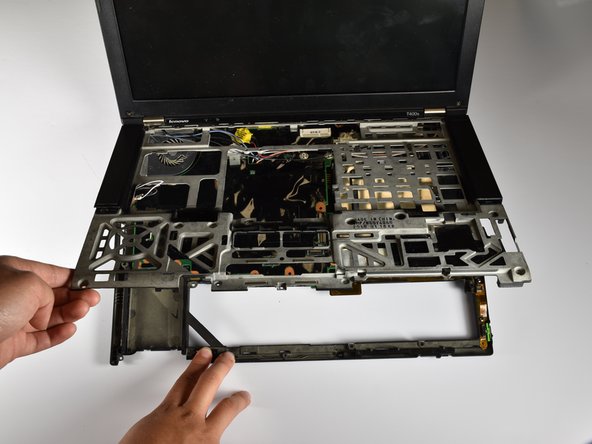
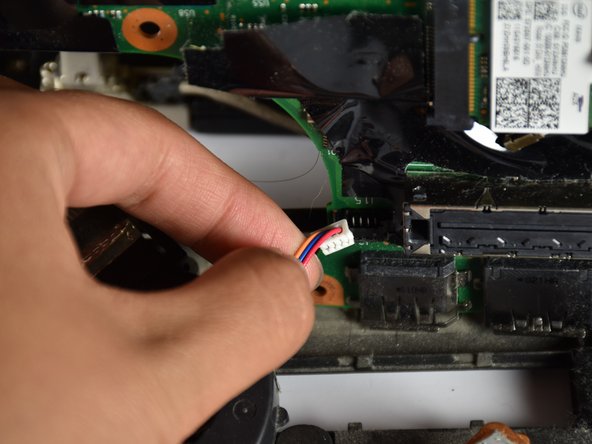
跳转到主内容

Lenovo ThinkPad T400s Heatsink & Fan Replacement

你所需要的

  1. Lenovo ThinkPad T400s Heatsink & Fan Replacement, Keyboard: 步骤 1 中的图像 1,2 Lenovo ThinkPad T400s Heatsink & Fan Replacement, Keyboard: 步骤 1 中的图像 2,2
    • Remove the Phillips #0-6mm screw.

    • Lift up the back cover to the RAM cards.

  2. Lenovo ThinkPad T400s Heatsink & Fan Replacement: 步骤 2 中的图像 1,2 Lenovo ThinkPad T400s Heatsink & Fan Replacement: 步骤 2 中的图像 2,2
    • Pull the lock for the baterry to the left to unlock.

    • While holding the tab in the unlocked position, remove the battery.

  3. Lenovo ThinkPad T400s Heatsink & Fan Replacement: 步骤 3 中的图像 1,1
    • Remove the three Phillips #0-6mm screws on the back panel.

    • These screws are marked with a keyboard symbol next to them.

  4. Lenovo ThinkPad T400s Heatsink & Fan Replacement: 步骤 4 中的图像 1,3 Lenovo ThinkPad T400s Heatsink & Fan Replacement: 步骤 4 中的图像 2,3 Lenovo ThinkPad T400s Heatsink & Fan Replacement: 步骤 4 中的图像 3,3
    • Turn the computer over and open the lid.

    • Wedge the small metal spudger between the palm rest and the keyboard.

  5. Lenovo ThinkPad T400s Heatsink & Fan Replacement: 步骤 5 中的图像 1,3 Lenovo ThinkPad T400s Heatsink & Fan Replacement: 步骤 5 中的图像 2,3 Lenovo ThinkPad T400s Heatsink & Fan Replacement: 步骤 5 中的图像 3,3
    • Lift up the keyboard, but be careful not to completely remove.

    • Don't lift the keyboard too quickly, there is a connector cable you must disconnect first.

    • Wedge the small plastic opening tool underneath copper band and tilt back.

    • Remove keyboard to replace.

  6. Lenovo ThinkPad T400s Heatsink & Fan Replacement, Heatsink/Fan: 步骤 6 中的图像 1,1
    • Remove the 7 Phillips#0-4mm screws.

  7. Lenovo ThinkPad T400s Heatsink & Fan Replacement: 步骤 7 中的图像 1,1
    • Remove the SSD/HDD cover from the lower right corner of the laptop.

  8. Lenovo ThinkPad T400s Heatsink & Fan Replacement: 步骤 8 中的图像 1,1
    • Remove the nine Phillips #0-6mm screws on the back panel.

  9. Lenovo ThinkPad T400s Heatsink & Fan Replacement: 步骤 9 中的图像 1,2 Lenovo ThinkPad T400s Heatsink & Fan Replacement: 步骤 9 中的图像 2,2
    • Pull up on the unlock button while pushing left on the sliding tab.

    • Do not be discouraged if it takes some force.

  10. Lenovo ThinkPad T400s Heatsink & Fan Replacement: 步骤 10 中的图像 1,2 Lenovo ThinkPad T400s Heatsink & Fan Replacement: 步骤 10 中的图像 2,2
    • Use the plastic opening tool to lift the black tab up and remove the palm rest connection.

    • Remove the palm rest by lifting the side nearest to you.

  11. Lenovo ThinkPad T400s Heatsink & Fan Replacement: 步骤 11 中的图像 1,2 Lenovo ThinkPad T400s Heatsink & Fan Replacement: 步骤 11 中的图像 2,2
    • Rotate the laptop 90 degrees counter-clockwise.

    • Remove the safety screw on the bottom corner of the laptop by holding the gold cap in place with the tweezers and unscrewing the Phillips screw with the other hand.

  12. Lenovo ThinkPad T400s Heatsink & Fan Replacement: 步骤 12 中的图像 1,2 Lenovo ThinkPad T400s Heatsink & Fan Replacement: 步骤 12 中的图像 2,2
    • Flip the computer over and open the lid. Unscrew the seven Phillips#0-4mm screws.

    • Lift the frame up by the front and pull towards you to remove.

  13. Lenovo ThinkPad T400s Heatsink & Fan Replacement: 步骤 13 中的图像 1,2 Lenovo ThinkPad T400s Heatsink & Fan Replacement: 步骤 13 中的图像 2,2
    • Remove the two Phillips #0-6.5mm screws from the back side of the laptop to detach the screen.

    • Lift the laptop down facing you, and place the screen down flat behind the laptop.

    • The screen will still be connected to the base by wires.

  14. Lenovo ThinkPad T400s Heatsink & Fan Replacement: 步骤 14 中的图像 1,1
    • Remove the eight Phillips #0-3mm screws.

    • Remove the two Phillips #0-6mm screws.

    • The circuit board will still be attached by the colored wires.

  15. Lenovo ThinkPad T400s Heatsink & Fan Replacement: 步骤 15 中的图像 1,2 Lenovo ThinkPad T400s Heatsink & Fan Replacement: 步骤 15 中的图像 2,2
    • Tilt up the circuit board to access the heatsink and fan.

    • Disconnect the white connector to remove.

结论

To reassemble your device, follow these instructions in reverse order.

3等其他人完成本指南。

Matthew Lee

于04/14/15注册

247 声望

撰写一个指南

团队

Cal Poly, Team 6-18, Maness Spring 2015 Cal Poly, Team 6-18, Maness Spring 2015 的会员

CPSU-MANESS-S15S6G18

4 名成员

创作了5篇指南

0条评论

添加评论

浏览统计数据:

过去 24 小时: 0

过去 7 天: 3

过去 30 天: 18

总计 3,521