跳转到主内容

Lenovo Tab S8 Camera Replacement

你所需要的

  1. Lenovo Tab S8 Camera Replacement, Battery: 步骤 1 中的图像 1,2 Lenovo Tab S8 Camera Replacement, Battery: 步骤 1 中的图像 2,2
    • Make sure the device is powered off.

    • Gently insert a spudger into one of the bottom corners between the screen and body case.

    • Slide the spudger along the inside of the crack in order to pry the case open.

    • Be careful of the small volume and power buttons when prying the case with the spudger. They are connected with small pieces of plastic that break easily.

  2. Lenovo Tab S8 Camera Replacement: 步骤 2 中的图像 1,3 Lenovo Tab S8 Camera Replacement: 步骤 2 中的图像 2,3 Lenovo Tab S8 Camera Replacement: 步骤 2 中的图像 3,3
    • After removing the cover, remove the M1.6 x 2 mm screw from the battery cable with the JIS J000 screwdriver.

    • Using screwdriver bits that do not fit in the screw head might strip the screw and render it unusable.

    • Remove the tape by gently scraping the edges up with the spudger.

  3. Lenovo Tab S8 Camera Replacement: 步骤 3 中的图像 1,3 Lenovo Tab S8 Camera Replacement: 步骤 3 中的图像 2,3 Lenovo Tab S8 Camera Replacement: 步骤 3 中的图像 3,3
    在这个步骤中使用的工具:
    Plastic Cards
    $2.99
    购买
    • Before removing the battery, be sure to disconnect the ribbon cables underneath it. The cables might stick to the battery during removal and cause damage.

    • Gently lift the flaps on the four ZIF connectors to disconnect the cables.

    • Use the plastic card to gently pry the battery from the device.

    • There may be glue holding the battery to the device. Use the spudger to detach any glue while the battery is partially raised by the card.

  4. Lenovo Tab S8 Camera Replacement, Camera: 步骤 4 中的图像 1,3 Lenovo Tab S8 Camera Replacement, Camera: 步骤 4 中的图像 2,3 Lenovo Tab S8 Camera Replacement, Camera: 步骤 4 中的图像 3,3
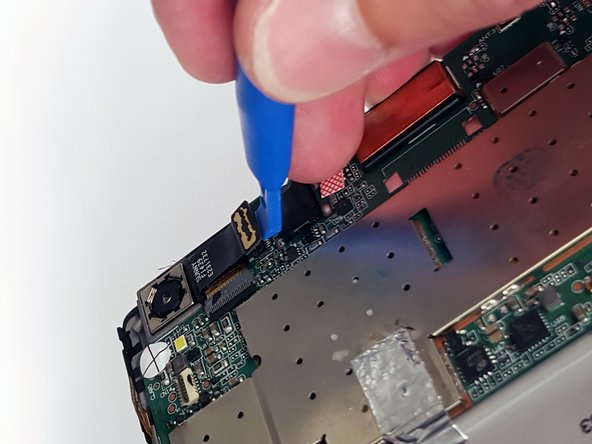
    • Use a plastic opening tool to gently pry the end of the camera's black ribbon cable (opposite the camera lens) off of the motherboard.

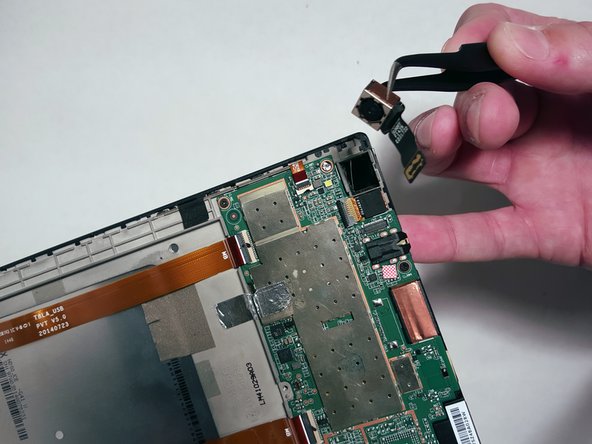
    • Once the cable is free, use tweezers to pull the camera from the body.

    • The camera may be stuck in place with a piece rubber foam. Take care to not damage the camera by applying too much pressure.

结论

To reassemble your device, follow these instructions in reverse order.

另外一个人完成了本指南。

Thomas Rill

于08/26/15注册

338 声望

创作了2篇指南

团队

USF Tampa, Team 3-6, Eyestone Fall 2015 USF Tampa, Team 3-6, Eyestone Fall 2015 的会员

USFT-EYESTONE-F15S3G6

3 名成员

创作了11篇指南

0条评论

添加评论

浏览统计数据:

过去 24 小时: 0

过去 7 天: 5

过去 30 天: 9

总计 620