跳转到主内容

Lenovo Ideapad 320-15ABR Hard Drive Replacement

你所需要的

  1. Lenovo Ideapad 320-15ABR Hard Drive Replacement, Back Panel: 步骤 1 中的图像 1,1
    • Before you proceed, make sure your computer is turned off and is not connected to any power source.

    • Remove the single 7 mm Phillips #1 screw securing the optical drive.

    • Be sure to store the screws carefully as they are easy to lose. A magnetic project mat is recommended

  2. Lenovo Ideapad 320-15ABR Hard Drive Replacement: 步骤 2 中的图像 1,3 Lenovo Ideapad 320-15ABR Hard Drive Replacement: 步骤 2 中的图像 2,3 Lenovo Ideapad 320-15ABR Hard Drive Replacement: 步骤 2 中的图像 3,3
    • Carefully remove the optical drive bracket by pulling the bezel away from the laptop.

  3. Lenovo Ideapad 320-15ABR Hard Drive Replacement: 步骤 3 中的图像 1,2 Lenovo Ideapad 320-15ABR Hard Drive Replacement: 步骤 3 中的图像 2,2
    • Using the Phillips #1 screwdriver, remove the twelve screws around the back panel from the laptop.

  4. Lenovo Ideapad 320-15ABR Hard Drive Replacement: 步骤 4 中的图像 1,3 Lenovo Ideapad 320-15ABR Hard Drive Replacement: 步骤 4 中的图像 2,3 Lenovo Ideapad 320-15ABR Hard Drive Replacement: 步骤 4 中的图像 3,3
    • Use an opening tool to pry out the back cover.

  5. Lenovo Ideapad 320-15ABR Hard Drive Replacement: 步骤 5 中的图像 1,3 Lenovo Ideapad 320-15ABR Hard Drive Replacement: 步骤 5 中的图像 2,3 Lenovo Ideapad 320-15ABR Hard Drive Replacement: 步骤 5 中的图像 3,3
    • Remove the back panel by pulling it up and away from the laptop.

  6. Lenovo Ideapad 320-15ABR Hard Drive Replacement, Hard Drive: 步骤 6 中的图像 1,2 Lenovo Ideapad 320-15ABR Hard Drive Replacement, Hard Drive: 步骤 6 中的图像 2,2
    • Before removing the drive, make a backup copy of all the information on it if possible. Never remove the drive while the system is operating or in suspend mode.

    • Gently lift up the hard disk from the left.

  7. Lenovo Ideapad 320-15ABR Hard Drive Replacement: 步骤 7 中的图像 1,3 Lenovo Ideapad 320-15ABR Hard Drive Replacement: 步骤 7 中的图像 2,3 Lenovo Ideapad 320-15ABR Hard Drive Replacement: 步骤 7 中的图像 3,3
    • Do not lift hard drive straight up as it risks breaking the connection port.

    • Carefully pull the hard drive away and out of the connection port.

    Sir, and how to fix ssd after removing hdd in it.

    Zikrullah Ansari - 回复

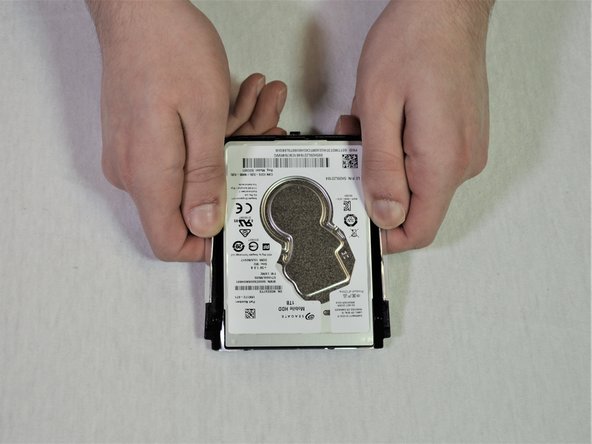
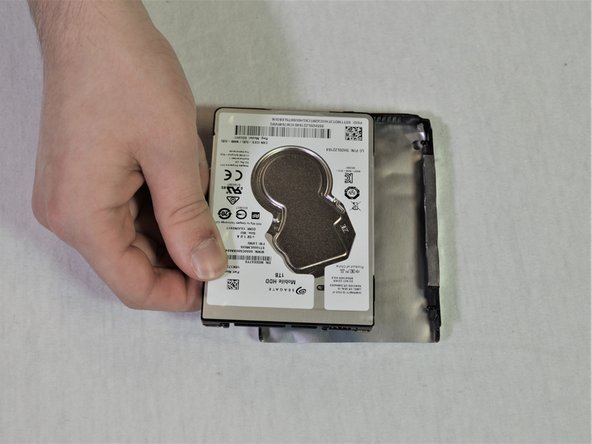
  8. Lenovo Ideapad 320-15ABR Hard Drive Replacement: 步骤 8 中的图像 1,3 Lenovo Ideapad 320-15ABR Hard Drive Replacement: 步骤 8 中的图像 2,3 Lenovo Ideapad 320-15ABR Hard Drive Replacement: 步骤 8 中的图像 3,3
    • Detach the bracket from the hard drive by pulling the bracket edges apart.

结论

To reassemble your device, follow these instructions in reverse order.

25等其他人完成本指南。

4条评论

What is the maximum thickness of the replacement Hard Drive/SSD.

Drew Howden - 回复

It takes a standard 2.5” laptop HDD/SSD. They do not vary in thickness.

TheSolderSnake -

@TheSolderSnake You might want to use google to see the variation in 2.5” laptop drive thickness before making such a confident statement. ;)

Ben - 回复

This is gonna be fun! lol. I’ll be doing this in 5-15 minutes. Wish me luck!!!

Paul Hucik Jr - 回复

添加评论

浏览统计数据:

过去 24 小时: 7

过去 7 天: 36

过去 30 天: 216

总计 23,713