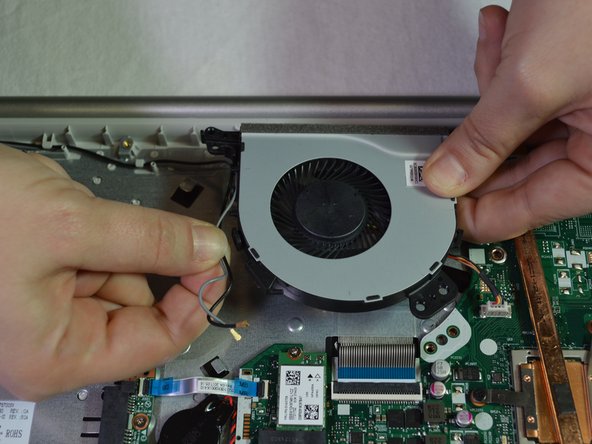
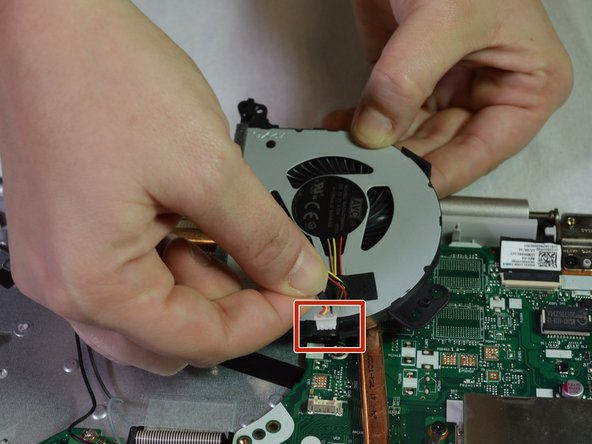
跳转到主内容

Lenovo Ideapad 320-15ABR Fan Replacement

你所需要的

  1. Lenovo Ideapad 320-15ABR Fan Replacement, Back Panel: 步骤 1 中的图像 1,1
    • Before you proceed, make sure your computer is turned off and is not connected to any power source.

    • Remove the single 7 mm Phillips #1 screw securing the optical drive.

    • Be sure to store the screws carefully as they are easy to lose. A magnetic project mat is recommended

  2. Lenovo Ideapad 320-15ABR Fan Replacement: 步骤 2 中的图像 1,3 Lenovo Ideapad 320-15ABR Fan Replacement: 步骤 2 中的图像 2,3 Lenovo Ideapad 320-15ABR Fan Replacement: 步骤 2 中的图像 3,3
    • Carefully remove the optical drive bracket by pulling the bezel away from the laptop.

  3. Lenovo Ideapad 320-15ABR Fan Replacement: 步骤 3 中的图像 1,2 Lenovo Ideapad 320-15ABR Fan Replacement: 步骤 3 中的图像 2,2
    • Using the Phillips #1 screwdriver, remove the twelve screws around the back panel from the laptop.

  4. Lenovo Ideapad 320-15ABR Fan Replacement: 步骤 4 中的图像 1,3 Lenovo Ideapad 320-15ABR Fan Replacement: 步骤 4 中的图像 2,3 Lenovo Ideapad 320-15ABR Fan Replacement: 步骤 4 中的图像 3,3
    • Use an opening tool to pry out the back cover.

  5. Lenovo Ideapad 320-15ABR Fan Replacement: 步骤 5 中的图像 1,3 Lenovo Ideapad 320-15ABR Fan Replacement: 步骤 5 中的图像 2,3 Lenovo Ideapad 320-15ABR Fan Replacement: 步骤 5 中的图像 3,3
    • Remove the back panel by pulling it up and away from the laptop.

  6. Lenovo Ideapad 320-15ABR Fan Replacement, Battery: 步骤 6 中的图像 1,1
    • Remove the four 6mm screws using the Phillips #1 screwdriver.

  7. Lenovo Ideapad 320-15ABR Fan Replacement: 步骤 7 中的图像 1,2 Lenovo Ideapad 320-15ABR Fan Replacement: 步骤 7 中的图像 2,2
    • Disconnect the battery connector by pulling toward the battery parallel to the motherboard.

  8. Lenovo Ideapad 320-15ABR Fan Replacement: 步骤 8 中的图像 1,1
    • Remove the battery.

  9. Lenovo Ideapad 320-15ABR Fan Replacement, Fan: 步骤 9 中的图像 1,2 Lenovo Ideapad 320-15ABR Fan Replacement, Fan: 步骤 9 中的图像 2,2
    • Disconnect black and grey wires by simply giving them a light tug.

  10. Lenovo Ideapad 320-15ABR Fan Replacement: 步骤 10 中的图像 1,1
    • Remove the 6mm Phillips #1 screw connecting the fan to the laptop.

  11. Lenovo Ideapad 320-15ABR Fan Replacement: 步骤 11 中的图像 1,3 Lenovo Ideapad 320-15ABR Fan Replacement: 步骤 11 中的图像 2,3 Lenovo Ideapad 320-15ABR Fan Replacement: 步骤 11 中的图像 3,3
    • Lift the fan slightly and straight upward and unwind the black and grey wires from the fan.

  12. Lenovo Ideapad 320-15ABR Fan Replacement: 步骤 12 中的图像 1,1
    • Identify the red, black, yellow, and brown wire coming from the back of the fan connecting to the motherboard with a white connector piece.

  13. Lenovo Ideapad 320-15ABR Fan Replacement: 步骤 13 中的图像 1,2 Lenovo Ideapad 320-15ABR Fan Replacement: 步骤 13 中的图像 2,2
    • Slowly pull and wiggle the white connector piece until it comes loose from the laptop.

  14. Lenovo Ideapad 320-15ABR Fan Replacement: 步骤 14 中的图像 1,1
    • Replace the new fan.

结论

To reassemble your device, follow these instructions in reverse order.

另外一个人完成了本指南。

0条评论

添加评论

浏览统计数据:

过去 24 小时: 0

过去 7 天: 1

过去 30 天: 44

总计 5,071