跳转到主内容

你所需要的

这个拆解是不是维修指南。 要维修你的的Lenovo IdeaTab S2107A-F Android 7",请使用我们的维修手册

  1. 这个步骤还没有翻译 帮忙翻译一下

    : 步骤 1 中的图像 1,2 : 步骤 1 中的图像 2,2
    • Ready to start tearing it apart. It was a cheap tablet several years ago, it's wifi is really slow, so it's not useable these days. Let's see what's inside.

  2. 这个步骤还没有翻译 帮忙翻译一下

    : 步骤 2 中的图像 1,2 : 步骤 2 中的图像 2,2
    • We're looking at the rear top here. It just slides toward the top of the tablet and lifts off, exposing the camera and micro SD card holder.

  3. 这个步骤还没有翻译 帮忙翻译一下

    : 步骤 3 中的图像 1,3 : 步骤 3 中的图像 2,3 : 步骤 3 中的图像 3,3
    • A number 0 phillips screw driver works for all of these screws, and all steps going forward.

  4. 这个步骤还没有翻译 帮忙翻译一下

    : 步骤 4 中的图像 1,1
    • Insert wisdom here.

  5. 这个步骤还没有翻译 帮忙翻译一下

    : 步骤 5 中的图像 1,3 : 步骤 5 中的图像 2,3 : 步骤 5 中的图像 3,3
    • The rear cover wouldn't pull off, even when prying with my "spudger". I didn't want to break the tablet (yet). Then I noticed the round white spot. I scraped away the brittle white paint, exposing another phillips screw, and removed it. (There goes my warranty! They made it tamper evident.)

  6. 这个步骤还没有翻译 帮忙翻译一下

    : 步骤 6 中的图像 1,1
    • Total 5 so far, 1 tiny, 4 small

  7. 这个步骤还没有翻译 帮忙翻译一下

    : 步骤 7 中的图像 1,2 : 步骤 7 中的图像 2,2
    • With the hidden screw removed, the rear cover easily slides off. Push it towards the bottom of the tablet with your thumbs. It moves 1/4 inch and stops, shown in the second picture. Then it is freely lifted off the back.

    • Sorry for the blurry pictures. My photos get sharper as we go along. Really

  8. 这个步骤还没有翻译 帮忙翻译一下

    : 步骤 8 中的图像 1,1
    • Stero speakers are at the tablet's bottom. The 3.7 VDC Lithium Polymer battery is right there. 13.7 Wh / 3700 mAh. Fairly large for a cheap tablet. It adds to the heft of this tablet.

  9. 这个步骤还没有翻译 帮忙翻译一下

    : 步骤 9 中的图像 1,1
    • I pried the battery up slowly, it's sticky rubber type glue, but it was a warm day, so it came loose with some patience. (I don't have a proper spudger, a plastic picnic knife had to do instead.)

  10. 这个步骤还没有翻译 帮忙翻译一下

    : 步骤 10 中的图像 1,1
    • With the main back cover off, there are lots of phillips screws scattered around the case, surrounding the battery. I counted 10 more screws.

    • 1 at the tablet's top above the battery, 3 across (2 small and 1 tiny), 2 across at the midpoint of the battery, 2 across, and 2 across below the battery at the tablet's bottom.

  11. 这个步骤还没有翻译 帮忙翻译一下

    : 步骤 11 中的图像 1,3 : 步骤 11 中的图像 2,3 : 步骤 11 中的图像 3,3
    • With all those screws out, I tried prying it apart to expose the motherboard, but it would come all the way off. There's something still holding it together . . .

  12. 这个步骤还没有翻译 帮忙翻译一下

    : 步骤 12 中的图像 1,3 : 步骤 12 中的图像 2,3 : 步骤 12 中的图像 3,3
    • Something was holding it together at the tablet's top. So, I pealed away the innocent looking serial number sticker, and there it was. One more phillips screw. With that gone, the plastic inside cover lifted off easily. It's apart, and there's the motherboard.

  13. 这个步骤还没有翻译 帮忙翻译一下

    : 步骤 13 中的图像 1,2 : 步骤 13 中的图像 2,2
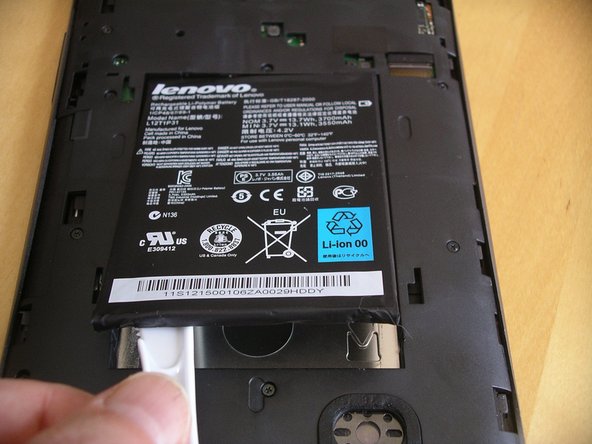
    • The battery has 5 wires, 2 red hot wire, 2 black ground, and 1 white. I assume the white is used by the cpu to monitor charging? battery temperature?

    • I measured 3.9 VDC red-black on battery power, and 4.1 VDC when the battery was charging through its USB port.

    • And 3.9 VDC red-white on battery power, 2.7 VDC when charging. While white-black was 0.0 VDC on battery, and 1.3 VDC when charging.

  14. 这个步骤还没有翻译 帮忙翻译一下

    : 步骤 14 中的图像 1,2 : 步骤 14 中的图像 2,2
    • With the glue loose, and the wires removed, the battery is available as a spare for me.

  15. 这个步骤还没有翻译 帮忙翻译一下

    : 步骤 15 中的图像 1,3 : 步骤 15 中的图像 2,3 : 步骤 15 中的图像 3,3
    • The rear camera has a short cable that pries off easily.

    • The haptic motor sits on the side of the tablet. I used it with the on-screen keyboard to help me when typing on the tablet

    • The microphone is on the other side of the tablet, also easily removeable.

  16. 这个步骤还没有翻译 帮忙翻译一下

    : 步骤 16 中的图像 1,2 : 步骤 16 中的图像 2,2
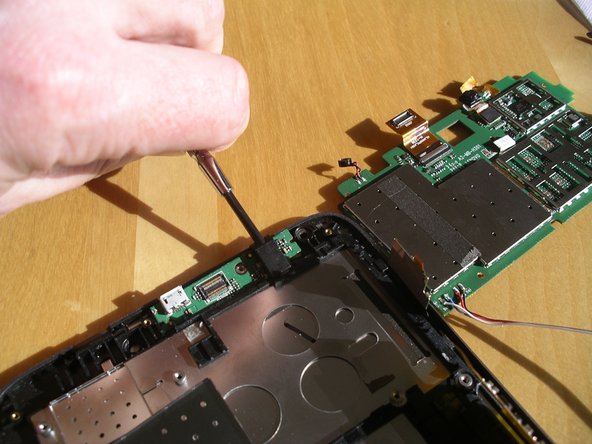
    • There's one phillips screw in the middle of the motherboard, near to where the battery was. Remove that and then the circuit board pries apart. It's a tight fit, but with the screw removed it's just a friction fit.

    • And there it is flopped over on it's back, still attached by ribbon cables.

  17. 这个步骤还没有翻译 帮忙翻译一下

    : 步骤 17 中的图像 1,2 : 步骤 17 中的图像 2,2
    • Mediatek CPU

  18. 这个步骤还没有翻译 帮忙翻译一下

    : 步骤 18 中的图像 1,3 : 步骤 18 中的图像 2,3 : 步骤 18 中的图像 3,3
    • Video and Touch Screen cables, I assume.

  19. 这个步骤还没有翻译 帮忙翻译一下

    : 步骤 19 中的图像 1,1
    • The tablet's screen is tightly held in the plastic case. I tried prying it apart, but didn't want to crack it. You can see the metal backing, this screen is heavy with all that metal. I stopped here so that I wouldn't break the glass on the front.

    • I really wanted to see if the screen was usable in a future project. But the ribbon cable connections looked proprietary, so I'm not hopeful.

Allen

于01/02/18注册

1,461 声望

创作了4篇指南

0条评论

添加评论

浏览统计数据:

过去 24 小时: 4

过去 7 天: 8

过去 30 天: 11

总计 640