跳转到主内容

Lenovo IdeaTab A2109 Camera Assembly Replacement

你所需要的

  1. Lenovo IdeaTab A2109 Camera Assembly Replacement, Camera Assembly: 步骤 1 中的图像 1,1
    • Look at the back of the tablet and locate the speakers on top of the rear cover.

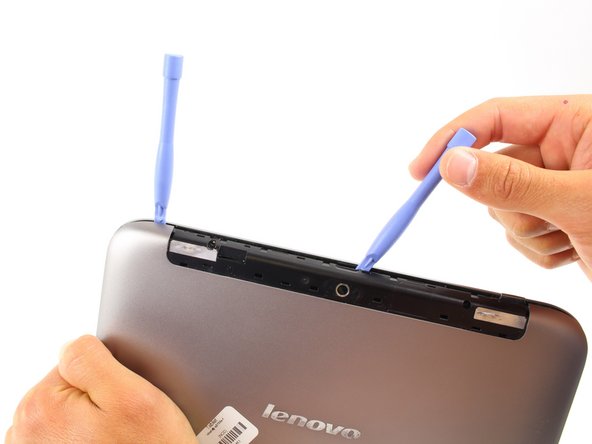
    • Locate the small indentation in the plastic cover that runs across the top of the device.

    • Wedge the plastic opening tool in this indentation, under the middle of the cover as shown.

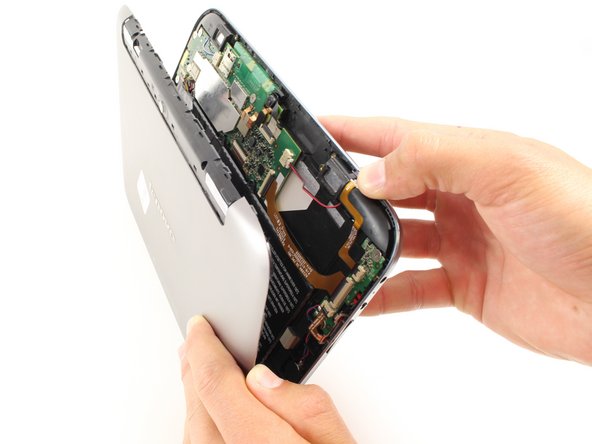
    • Pry up and push to remove the cover.

  2. Lenovo IdeaTab A2109 Camera Assembly Replacement: 步骤 2 中的图像 1,2 Lenovo IdeaTab A2109 Camera Assembly Replacement: 步骤 2 中的图像 2,2
    • Remove the following two screws:

    • M3.0 x 3.0 mm #00 phillips screws (black)

  3. Lenovo IdeaTab A2109 Camera Assembly Replacement: 步骤 3 中的图像 1,3 Lenovo IdeaTab A2109 Camera Assembly Replacement: 步骤 3 中的图像 2,3 Lenovo IdeaTab A2109 Camera Assembly Replacement: 步骤 3 中的图像 3,3
    • Pry open the front and rear faces using a plastic opening tool.

    • It may take a little force to separate the front and rear faces of the device.

    • Slide the plastic opening tool to one corner.

    • Place another plastic opening tool into the gap and slide it to the opposite corner as shown.

    • Pull the rear cover up and back to separate it from front face of the device.

  4. Lenovo IdeaTab A2109 Camera Assembly Replacement: 步骤 4 中的图像 1,1
    • Slide the rear camera ribbon from the system board.

    • Pull up on the black plastic lock on the system board for the front camera and slide the ribbon out.

    • Now, you are ready to remove the front and rear facing cameras.

结论

To reassemble your device, follow these instructions in reverse order.

另外一个人完成了本指南。

团队

Cal Poly, Team 7-19, Regan Spring 2014 Cal Poly, Team 7-19, Regan Spring 2014 的会员

CPSU-REGAN-S14S7G19

4 名成员

创作了15篇指南

0条评论

添加评论

浏览统计数据:

过去 24 小时: 0

过去 7 天: 9

过去 30 天: 14

总计 589