跳转到主内容

Lenovo IdeaPad S340-15IWL Camera Replacement

你所需要的

  1. Lenovo IdeaPad S340-15IWL Camera Replacement, Back Panel: 步骤 1 中的图像 1,2 Lenovo IdeaPad S340-15IWL Camera Replacement, Back Panel: 步骤 1 中的图像 2,2
    • Power off the laptop and place it face-down on a non-scratching surface.

    • Using a Torx T5 screwdriver head, remove all ten 6 mm screws holding the back panel in place.

  2. Lenovo IdeaPad S340-15IWL Camera Replacement: 步骤 2 中的图像 1,1
    • Slide a plastic opening tool underneath the back case near the screen hinges.

    • Gently pry up on either side of the case.

    • You may hear popping sounds as you pry up the back case. This is normal. If the case does not open, try prying at a different angle/position.

  3. Lenovo IdeaPad S340-15IWL Camera Replacement, Battery: 步骤 3 中的图像 1,2 Lenovo IdeaPad S340-15IWL Camera Replacement, Battery: 步骤 3 中的图像 2,2
    • Disconnect the battery cable by gently pulling it straight out of the connector.

    • Be sure to pull parallel to the device to avoid bending the motherboard connector.

    • The battery connector does not lock and only requires light pressure to insert and remove.

    • Remove the battery from the laptop.

  4. Lenovo IdeaPad S340-15IWL Camera Replacement, Fan: 步骤 4 中的图像 1,1
    • Remove the two 3 mm screws connecting the fan to the casing using a Phillips #0 screwdriver.

  5. Lenovo IdeaPad S340-15IWL Camera Replacement: 步骤 5 中的图像 1,2 Lenovo IdeaPad S340-15IWL Camera Replacement: 步骤 5 中的图像 2,2
    • Using a spudger, gently disconnect the fan's cable from the motherboard.

  6. Lenovo IdeaPad S340-15IWL Camera Replacement: 步骤 6 中的图像 1,1
    • Carefully unwind the black cable that runs between the top of the battery and the bottom of the fan from the grooves along the side of the fan.

    • In order to do so, you will need to pull up the metallic tape that holds the cable in place using either your fingers or a plastic prying tool to lift up the edge.

    • If you attempt to remove the device’s fan without removing the battery, the black cable may be wedged underneath the top of the battery. In this scenario, it is recommended that you at least loosen the screws holding the battery in place to allow for the cable to be removed with less resistance.

  7. Lenovo IdeaPad S340-15IWL Camera Replacement: 步骤 7 中的图像 1,3 Lenovo IdeaPad S340-15IWL Camera Replacement: 步骤 7 中的图像 2,3 Lenovo IdeaPad S340-15IWL Camera Replacement: 步骤 7 中的图像 3,3
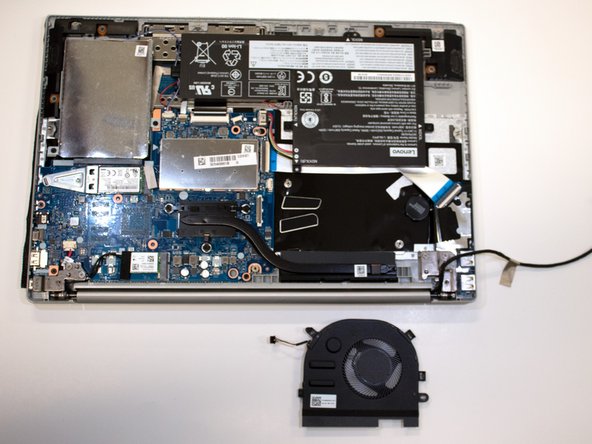
    • Carefully pick up the fan by the corners and detach the small connector wire by pulling parallel to the device.

    • Remove the fan from the laptop.

  8. Lenovo IdeaPad S340-15IWL Camera Replacement, Speakers: 步骤 8 中的图像 1,3 Lenovo IdeaPad S340-15IWL Camera Replacement, Speakers: 步骤 8 中的图像 2,3 Lenovo IdeaPad S340-15IWL Camera Replacement, Speakers: 步骤 8 中的图像 3,3
    • Unplug the wire connecting the speakers to the motherboard.

    • Remove the speakers from each side of the laptop.

  9. Lenovo IdeaPad S340-15IWL Camera Replacement, Hard Drive: 步骤 9 中的图像 1,3 Lenovo IdeaPad S340-15IWL Camera Replacement, Hard Drive: 步骤 9 中的图像 2,3 Lenovo IdeaPad S340-15IWL Camera Replacement, Hard Drive: 步骤 9 中的图像 3,3
    • Remove the four 3 mm screws holding the hard drive expansion slot in place using a Phillips #0 screwdriver.

  10. Lenovo IdeaPad S340-15IWL Camera Replacement, RAM: 步骤 10 中的图像 1,2 Lenovo IdeaPad S340-15IWL Camera Replacement, RAM: 步骤 10 中的图像 2,2
    • Using the opening tool, gently pop off the metal cover for the RAM stick.

  11. Lenovo IdeaPad S340-15IWL Camera Replacement: 步骤 11 中的图像 1,2 Lenovo IdeaPad S340-15IWL Camera Replacement: 步骤 11 中的图像 2,2
    • Using your thumbs, gently pull the two metal prongs that secure the RAM outwards.

    • The RAM will pop up at an angle.

    • Remove the RAM from the laptop.

  12. Lenovo IdeaPad S340-15IWL Camera Replacement, Heat Sink: 步骤 12 中的图像 1,3 Lenovo IdeaPad S340-15IWL Camera Replacement, Heat Sink: 步骤 12 中的图像 2,3 Lenovo IdeaPad S340-15IWL Camera Replacement, Heat Sink: 步骤 12 中的图像 3,3
    • Remove the three 3 mm screws that secure the black heat sink near the top of the computer using a Phillips #0 screwdriver.

    • Lift the heat sink vertically to remove it from the laptop.

  13. Lenovo IdeaPad S340-15IWL Camera Replacement, Video Cable: 步骤 13 中的图像 1,3 Lenovo IdeaPad S340-15IWL Camera Replacement, Video Cable: 步骤 13 中的图像 2,3 Lenovo IdeaPad S340-15IWL Camera Replacement, Video Cable: 步骤 13 中的图像 3,3
    • Using an opening tool, carefully flip up the retaining flaps holding the silver video cable in place.

    • Slide the ribbon cable out of each connector.

  14. Lenovo IdeaPad S340-15IWL Camera Replacement, Wi-Fi Card: 步骤 14 中的图像 1,2 Lenovo IdeaPad S340-15IWL Camera Replacement, Wi-Fi Card: 步骤 14 中的图像 2,2
    • Pull up the black foam adhesive that covers the screw and connectors holding the Wi-Fi card in place.

  15. Lenovo IdeaPad S340-15IWL Camera Replacement: 步骤 15 中的图像 1,2 Lenovo IdeaPad S340-15IWL Camera Replacement: 步骤 15 中的图像 2,2
    • Using an opening tool, lift up on the black and white coaxial cables on the Wi-Fi card and gently pull upward to unplug them.

    • When reconnecting the cables, be sure to match the colors to the arrows on the Wi-Fi card.

  16. Lenovo IdeaPad S340-15IWL Camera Replacement: 步骤 16 中的图像 1,2 Lenovo IdeaPad S340-15IWL Camera Replacement: 步骤 16 中的图像 2,2
    • Remove the single 3 mm screw holding the Wi-Fi card in place using a Phillips #0 screwdriver.

    • Gently lift the Wi-Fi card out of the computer.

  17. Lenovo IdeaPad S340-15IWL Camera Replacement, Motherboard: 步骤 17 中的图像 1,3 Lenovo IdeaPad S340-15IWL Camera Replacement, Motherboard: 步骤 17 中的图像 2,3 Lenovo IdeaPad S340-15IWL Camera Replacement, Motherboard: 步骤 17 中的图像 3,3
    • Using an opening tool, flip up the retaining flap that holds the connector to the thin black ribbon cable at the bottom of the motherboard.

    • Gently remove the ribbon cable from its connector.

    • The cable is folded over and connected to itself with an adhesive. Be careful to only pull at the top fold of the cable.

  18. Lenovo IdeaPad S340-15IWL Camera Replacement: 步骤 18 中的图像 1,2 Lenovo IdeaPad S340-15IWL Camera Replacement: 步骤 18 中的图像 2,2
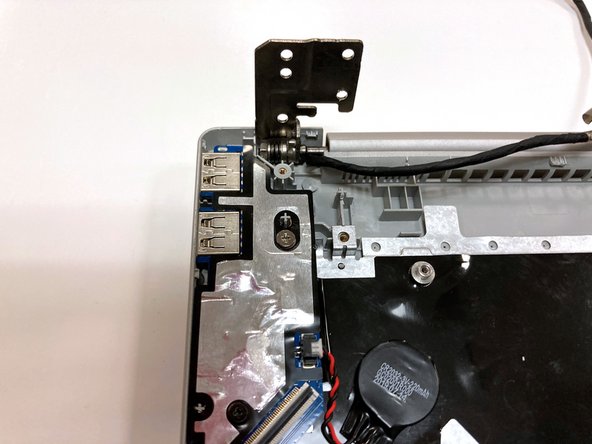
    • Remove the three total silver 6 mm screws from the hinges of the screen in the top corners of the device using a Phillips #0 screwdriver.

  19. Lenovo IdeaPad S340-15IWL Camera Replacement: 步骤 19 中的图像 1,3 Lenovo IdeaPad S340-15IWL Camera Replacement: 步骤 19 中的图像 2,3 Lenovo IdeaPad S340-15IWL Camera Replacement: 步骤 19 中的图像 3,3
    • Use an opening tool to flip up the hinges.

    • You may have to apply some force.

  20. Lenovo IdeaPad S340-15IWL Camera Replacement: 步骤 20 中的图像 1,2 Lenovo IdeaPad S340-15IWL Camera Replacement: 步骤 20 中的图像 2,2
    • Remove the three 3 mm screws holding the motherboard in place using a Phillips #0 screwdriver.

  21. Lenovo IdeaPad S340-15IWL Camera Replacement: 步骤 21 中的图像 1,2 Lenovo IdeaPad S340-15IWL Camera Replacement: 步骤 21 中的图像 2,2
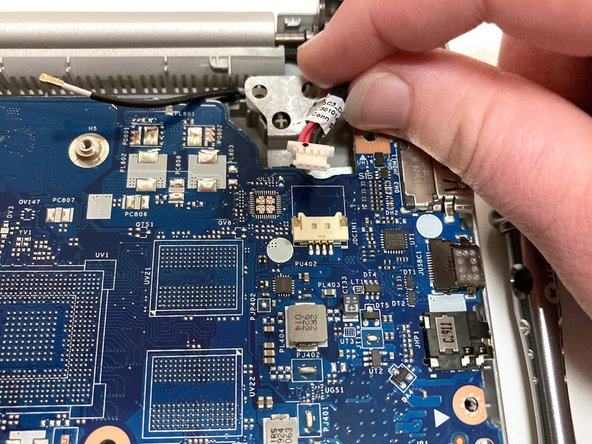
    • Carefully unplug the black and red wires connected to the upper right corner of the motherboard.

    • These wires connect to the device’s charging port.

  22. Lenovo IdeaPad S340-15IWL Camera Replacement: 步骤 22 中的图像 1,2 Lenovo IdeaPad S340-15IWL Camera Replacement: 步骤 22 中的图像 2,2
    • Carefully lift the motherboard from the base of the computer and remove it from the laptop.

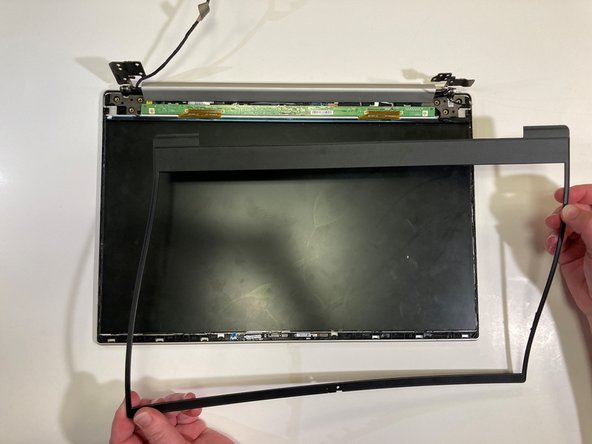
  23. Lenovo IdeaPad S340-15IWL Camera Replacement, Screen: 步骤 23 中的图像 1,3 Lenovo IdeaPad S340-15IWL Camera Replacement, Screen: 步骤 23 中的图像 2,3 Lenovo IdeaPad S340-15IWL Camera Replacement, Screen: 步骤 23 中的图像 3,3
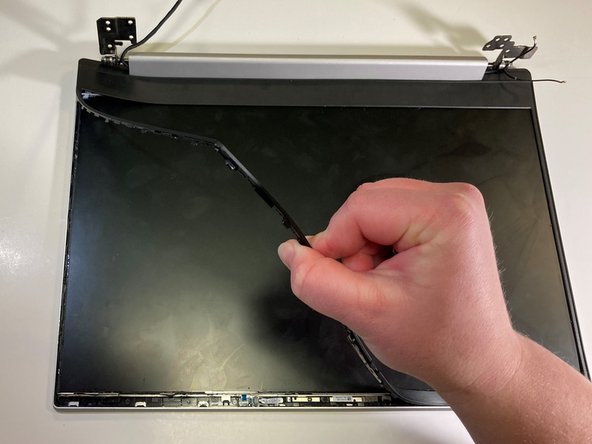
    • Using an opening tool, carefully pry up and remove the plastic bezel casing surrounding the screen.

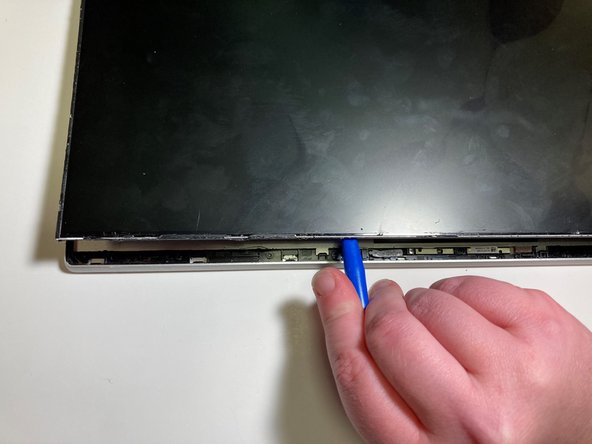
  24. Lenovo IdeaPad S340-15IWL Camera Replacement: 步骤 24 中的图像 1,2 Lenovo IdeaPad S340-15IWL Camera Replacement: 步骤 24 中的图像 2,2
    • Using a plastic opening tool, very carefully begin to remove its casing.

    • Be EXTREMELY careful when removing your screen. Make sure that your prying tool is wedged completely under the screen and the foundation holding it in place; it’s easy to accidentally insert the tool into the LCD itself and crack the screen.

    • The screen is held to the casing with a few strips of extremely strong foam adhesive. If possible, it is best to use the prying tool to separate the adhesive from the screen before attempting to remove it.

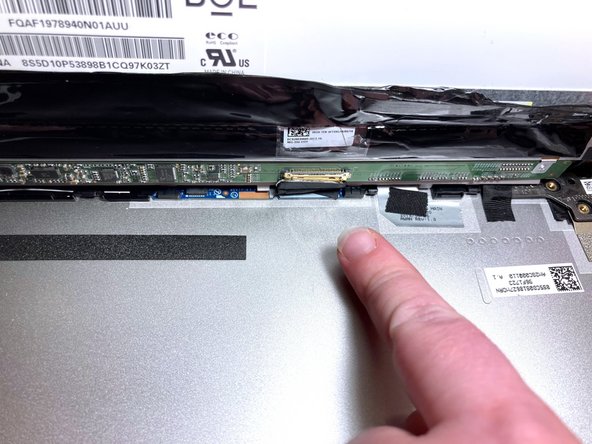
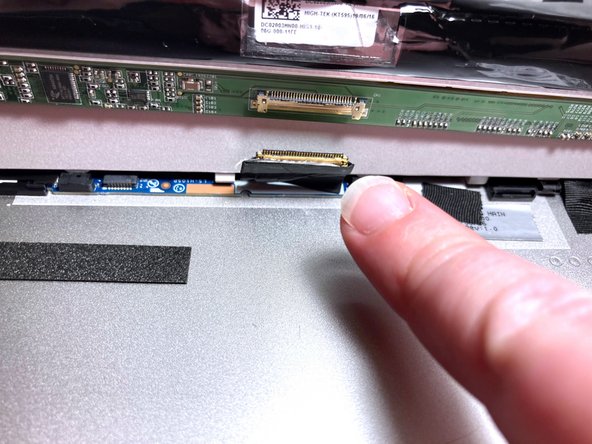
  25. Lenovo IdeaPad S340-15IWL Camera Replacement: 步骤 25 中的图像 1,3 Lenovo IdeaPad S340-15IWL Camera Replacement: 步骤 25 中的图像 2,3 Lenovo IdeaPad S340-15IWL Camera Replacement: 步骤 25 中的图像 3,3
    • Lift the display up very carefully.

    • Beneath the electrical tape protecting the circuit board is a small black and gold cable.

    • Gently unplug this cable, and then remove the screen from the casing.

  26. Lenovo IdeaPad S340-15IWL Camera Replacement, Camera: 步骤 26 中的图像 1,3 Lenovo IdeaPad S340-15IWL Camera Replacement, Camera: 步骤 26 中的图像 2,3 Lenovo IdeaPad S340-15IWL Camera Replacement, Camera: 步骤 26 中的图像 3,3
    • Under the device’s screen, there is a small cable running up the middle of the device which is connected to the device’s camera.

    • Using an opening tool, gently pop the camera off of the two plastic connection points holding it in place.

    • The camera itself is quite small and somewhat difficult to see.

    • In addition to the plastic connection points, the camera is also connected to the casing with a foam adhesive. You may have to pull this adhesive strip off instead of prying it out of place.

  27. Lenovo IdeaPad S340-15IWL Camera Replacement: 步骤 27 中的图像 1,2 Lenovo IdeaPad S340-15IWL Camera Replacement: 步骤 27 中的图像 2,2
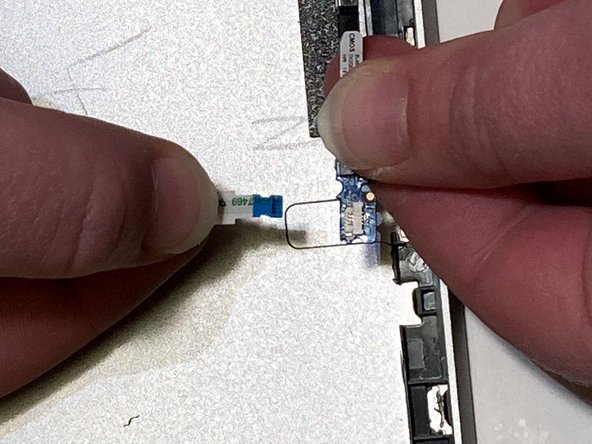
    • After loosening the connection cable from the casing, gently pull out the blue chip connecting the cable to the camera.

    • The blue chip is extremely small and bends easily. Apply as little force as possible while both removing and reinserting it.

结论

To reassemble your device, follow these instructions in reverse order.

2等其他人完成本指南。

0条评论

添加评论

浏览统计数据:

过去 24 小时: 2

过去 7 天: 28

过去 30 天: 112

总计 2,397