跳转到主内容

Lenovo IdeaPad S340-15IWL CMOS Battery Replacement

你所需要的

  1. Lenovo IdeaPad S340-15IWL CMOS Battery Replacement, Back Panel: 步骤 1 中的图像 1,2 Lenovo IdeaPad S340-15IWL CMOS Battery Replacement, Back Panel: 步骤 1 中的图像 2,2
    • Power off the laptop and place it face-down on a non-scratching surface.

    • Using a Torx T5 screwdriver head, remove all ten 6 mm screws holding the back panel in place.

  2. Lenovo IdeaPad S340-15IWL CMOS Battery Replacement: 步骤 2 中的图像 1,1
    • Slide a plastic opening tool underneath the back case near the screen hinges.

    • Gently pry up on either side of the case.

    • You may hear popping sounds as you pry up the back case. This is normal. If the case does not open, try prying at a different angle/position.

  3. Lenovo IdeaPad S340-15IWL CMOS Battery Replacement, CMOS Battery: 步骤 3 中的图像 1,3 Lenovo IdeaPad S340-15IWL CMOS Battery Replacement, CMOS Battery: 步骤 3 中的图像 2,3 Lenovo IdeaPad S340-15IWL CMOS Battery Replacement, CMOS Battery: 步骤 3 中的图像 3,3
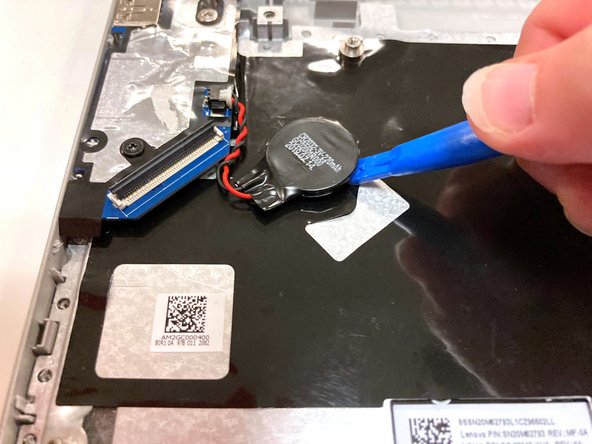
    • Remove the circular CMOS battery on the far left side of the computer by lifting it with your finger or an opening tool.

    • This is only attached with adhesive, so it does not require extensive force.

  4. Lenovo IdeaPad S340-15IWL CMOS Battery Replacement: 步骤 4 中的图像 1,2 Lenovo IdeaPad S340-15IWL CMOS Battery Replacement: 步骤 4 中的图像 2,2
    • Unplug the bundled red and black wires connecting the CMOS battery to the side of the device.

    • Remove the CMOS battery from the laptop.

结论

To reassemble your device, follow these instructions in reverse order.

2等其他人完成本指南。

Kristen Gismondi

于11/12/14注册

82,266 声望

创作了200篇指南

团队

iFixit iFixit 的会员

Staff

135 名成员

创作了17,277篇指南

0条评论

添加评论

浏览统计数据:

过去 24 小时: 1

过去 7 天: 13

过去 30 天: 135

总计 1,621