跳转到主内容

Lenovo IdeaCentre K410 CPU Replacement

你所需要的

  1. Lenovo IdeaCentre K410 CPU Replacement, Side Panel: 步骤 1 中的图像 1,1
    • Lay the computer down on its side as shown.

    • Remove the two 14mm screws shown. The screws are loose enough to unscrew with your hands.

  2. Lenovo IdeaCentre K410 CPU Replacement: 步骤 2 中的图像 1,1
    • Gently slide the side panel straight back and remove from the computer.

  3. Lenovo IdeaCentre K410 CPU Replacement, CPU Fan: 步骤 3 中的图像 1,1
    • Using the Phillips #00 Precision screwdriver, unscrew the four 12mm screws that hold the fan in place.

    • Be careful not to strip the screws.

  4. Lenovo IdeaCentre K410 CPU Replacement: 步骤 4 中的图像 1,1
    • Unplug the fan from the motherboard by gently pulling out the single plug. Then lift the fan up and out of the computer.

  5. Lenovo IdeaCentre K410 CPU Replacement, Heat Sink: 步骤 5 中的图像 1,1
    • Loosen the four screws that hold the heat sink in place using a Phillips #2 screwdriver.

    • The screws do not come all the way out of the heat sink

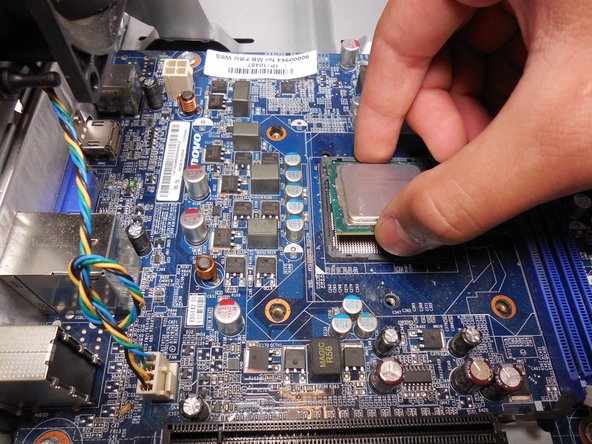
    • Pull the heat sink straight up to remove it.

  6. Lenovo IdeaCentre K410 CPU Replacement, CPU: 步骤 6 中的图像 1,2 Lenovo IdeaCentre K410 CPU Replacement, CPU: 步骤 6 中的图像 2,2
    • Remove the 2 8mm screws holding the CPU cover using a Torx #20 screwdriver.

    • Remove the 11 mm screw using a Torx #20 screwdriver.

    • Remove the cover and remove the CPU by gently pulling upward.

结论

To reassemble your device, follow these instructions in reverse order.

15等其他人完成本指南。

Timothy Grebe

于10/19/14注册

1,634 声望

创作了9篇指南

团队

Cal Poly, Team 10-39, Amido Fall 2014 Cal Poly, Team 10-39, Amido Fall 2014 的会员

CPSU-AMIDO-F14S10G39

4 名成员

创作了18篇指南

一条评论

Why would you remove the fan and the CPU fixation bracket when you could just remove the heatsink by unscrewing it and then lift up the bracket lever...

alphaLONE - 回复

添加评论

浏览统计数据:

过去 24 小时: 2

过去 7 天: 7

过去 30 天: 37

总计 3,806