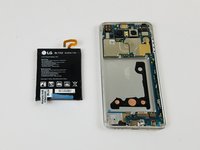
跳转到主内容

此翻译可能不反映源指南的最新更新。 帮助更新翻译查看源指南

LG G6 电池更换

已存档的指南
本指南只作为历史记录保留。请使用指南的最新版本来进行维修。

你所需要的

  1. LG G6 电池更换, 加热iOpener: 步骤 1 中的图像 1,2 LG G6 电池更换, 加热iOpener: 步骤 1 中的图像 2,2
    • 在操作前我们推荐你清空微波炉,在底部的任何讨厌的食物残渣最终都可能粘在iOpener上。

    • 将iOpener放在微波炉中央 。

    • 对于旋转式微波炉:确保盘子可以自由旋转。如果转盘卡住了,iOpener可能会过热并燃烧

  2. LG G6 电池更换: 步骤 2 中的图像 1,1
    • 加热iOpener三十秒

    • 在整个维修过程中,如果iOpener 冷却了,在微波炉中每次重新加热额外的三十秒。

    • 注意在维修过程中不要过度加热iOpener,过热可能会导致iOpener爆炸。

    • 如果iOpener过热膨胀,千万不要触碰iOpener。

    • 如果iOpener中间部分依然烫的没法碰,请等待冷却后再使用,加热好的iOpener 应该可以保持热度十分钟

  3. LG G6 电池更换: 步骤 3 中的图像 1,1
    • 把iOpener从微波炉中拿出来,捏着两边扁平边缘中的一个以避免碰到中心热的部分。

    • iOpener会非常烫,所以拿着它的时候千万要小心。必要的时候可以使用烤箱手套。

  4. LG G6 电池更换, 加热iOpener的替代方案: 步骤 4 中的图像 1,2 LG G6 电池更换, 加热iOpener的替代方案: 步骤 4 中的图像 2,2
    • 如果你没有微波炉,请按照此步骤在沸水中加热iOpener。

    • 在锅或平底锅里装满足够的水来完全淹没iOpener。

    • 把水加热到沸腾。关火。

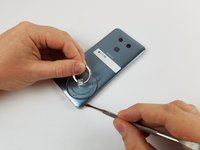
    • 将iOpener放入热水中2-3分钟。确保iOpener完全浸入水中。

    • 用钳子从热水中提取加热的iOpener。
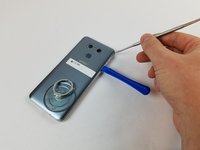
    • 用毛巾彻底擦干iOpener。

    • iOpener会很燙,所以拿取時請小心的從iOpener的邊邊拿

    • 你的iOpener已准备好使用!如果你需要重新加热iOpener,请将水加热到沸点,关火,并将iOpener放入水中2-3分钟。

  5. LG G6 电池更换, 电池: 步骤 5 中的图像 1,1
    • 把加热过的iOpener 包放在手机边缘大约两分钟。

  6. LG G6 电池更换: 步骤 6 中的图像 1,3 LG G6 电池更换: 步骤 6 中的图像 2,3 LG G6 电池更换: 步骤 6 中的图像 3,3
    • 背板加热好后,把吸盘贴在手机一角。拉起后玻璃背板后用撬棒卡住。

    • 沿手机边缘移动撬棒头分离黏胶。

    • 边移动撬棒使用另一个三角撬片或其它工具(如塑料卡)确保已开口不要重新粘合。

  7. LG G6 电池更换: 步骤 7 中的图像 1,2 LG G6 电池更换: 步骤 7 中的图像 2,2
    • 使用菲利普斯 000 号螺丝刀头,拆下如图示位置11个螺丝。

  8. LG G6 电池更换: 步骤 8 中的图像 1,2 LG G6 电池更换: 步骤 8 中的图像 2,2
    • 拆下螺丝后, 去除下层部件,紧接去除中上层。使用撬棒即可完成本步骤。

  9. LG G6 电池更换: 步骤 9 中的图像 1,1
    • 开始摘下电池。首要步骤是用撬棒或塑料卡片轻轻撬下电池与面板连接线。

  10. LG G6 电池更换: 步骤 10 中的图像 1,3 LG G6 电池更换: 步骤 10 中的图像 2,3 LG G6 电池更换: 步骤 10 中的图像 3,3
    • 然后拉图示蓝条。小心把电池拉离黏合剂时不要掰弯电池。

    • 不要用刀!你可能会捅破电池!

结论

重新组装设备时,反向执行所有步骤即可。

14等其他人完成本指南。

由衷感谢以下译者:

en zh

90%

这些译者帮助我们修补全世界! 您也想加入吗?
开始翻译 ›

团队

USF Tampa, Team S2-G6, Passmore Fall 2017 USF Tampa, Team S2-G6, Passmore Fall 2017 的会员

USFT-PASSMORE-F17S2G6

4 名成员

创作了11篇指南

7条评论

I found this article while searching for info on battery replacement. I’m considering purchasing this phone. I’m wondering if opening the back would wreck the waterproof rating.

brysonsemail - 回复

Yes, opening the back does remove the water sealant that is factory installed. You might be able to find the replacement “glue” that gives the phone the water proof rating but I’m not sure I would really trust it. Probably easier to just be really careful near liquids after the battery replacement. I’m looking at battery replacement in the next few months and that is my plan anyway, just keep the phone away from liquids like I’ve always tried to do with every phone I’ve owned.

Andrew McLendon -

Will this require new adhesive to put the back back on?

Gage Cook - 回复

I also need to know.

Albert Einstein -

I replaced the thermal paste, battery, USB port, and sim card tray. The Sim tray broke internally upon removal. Hopefully no pins were bent in the process. Everything else went together pretty well. The rear adhesive may be reusable but I would not recommend it. The precut adhesive I used I am not fond of and may have to redo the seal with some double-sided tape.

Gage Cook -

添加评论

浏览统计数据:

过去 24 小时: 0

过去 7 天: 6

过去 30 天: 9

总计 24,364