跳转到主内容

当前版本的文档还未经巡查,您可以查看最新的已查核版本

你所需要的

  1. , 后盖: 步骤 1 中的图像 1,1
    • 确保手机已经关机。

    • 将塑料开盖工具插入LG G4的左侧下方并轻轻撬动,拆除后盖。

  2. : 步骤 2 中的图像 1,2 : 步骤 2 中的图像 2,2
    • 将塑料撬棒放置于电池下方边缘处并向上翘起。用手小心地移除电池。

  3. : 步骤 3 中的图像 1,3 : 步骤 3 中的图像 2,3 : 步骤 3 中的图像 3,3
    • 移除手机背板上的 11 个 3.9mm Phillips #00 号螺丝。

  4. : 步骤 4 中的图像 1,3 : 步骤 4 中的图像 2,3 : 步骤 4 中的图像 3,3
    • 当所以螺丝已经被移除后,将塑料撬棒从左下角插入,用稳定的力量翘起盖板。

    • 当盖板被翘起后,用手指掀起盖板。

  5. , 主板: 步骤 5 中的图像 1,2 , 主板: 步骤 5 中的图像 2,2
    • 通过塑料撬棒末端的扁平部分来移除下列3个压接型连接器:

    • 前置摄像头接头

    • 后置摄像头接头

    • 触摸屏接头

    • 后置摄像头可能被两侧的带子固定在框架上。如果无法移动主板,应先考虑移动摄像头再试图撬起主板。使用塑料撬棒将摄像头从框架上移走来避免在下一个步骤中损坏连接线。

  6. : 步骤 6 中的图像 1,2 : 步骤 6 中的图像 2,2
    • 使用撬棒和手指来撬起主板并将其移走。

  7. , 屏幕总成: 步骤 7 中的图像 1,1
    • 在辅助接口上使用热风枪或者iOpener来软化粘胶,以便从塑料外壳上取下。

  8. : 步骤 8 中的图像 1,2 : 步骤 8 中的图像 2,2
    在这个步骤中使用的工具:
    Spudger
    $2.99
    购买
    • 在辅助接口处插入尼龙撬棒并轻撬来松动该接口。

  9. , 其他组件: 步骤 9 中的图像 1,1
    • 您可能需要拆掉振动马达(带有两个金色接触点的圆形小组件),耳机听筒及其正反面各一个共两个橡胶塞,并将这些组件转移到新的屏幕总成中。

    • 小心地使用撬棒来拆掉这些组件并将他们安装在新的屏幕总成中。

  10. 这个步骤还没有翻译 帮忙翻译一下

    : 步骤 10 中的图像 1,2 : 步骤 10 中的图像 2,2
    在这个步骤中使用的工具:
    Tweezers
    $3.99
    购买
    • Use a pair of tweezers to remove the adhesive strip that secures the digitizer ribbon cable.

  11. 这个步骤还没有翻译 帮忙翻译一下

    : 步骤 11 中的图像 1,2 : 步骤 11 中的图像 2,2
    • Insert the flat side of a nylon spudger below the digitizer ribbon cable to free it from the adhesive.

    • You may use your fingers to pull the ribbon cable gently as you free the panel from the adhesive with the spudger. It may be necessary to apply more heat if the adhesive is still too strong.

  12. 这个步骤还没有翻译 帮忙翻译一下

    : 步骤 12 中的图像 1,2 : 步骤 12 中的图像 2,2
    • Use a heat gun or an iOpener to soften the adhesive underneath the edges of the screen.

  13. 这个步骤还没有翻译 帮忙翻译一下

    : 步骤 13 中的图像 1,2 : 步骤 13 中的图像 2,2
    在这个步骤中使用的工具:
    Heavy-Duty Suction Cups (Pair)
    $14.95
    购买
    • Use a heavy duty suction cup and firmly pull the screen away from the frame to create a small gap.
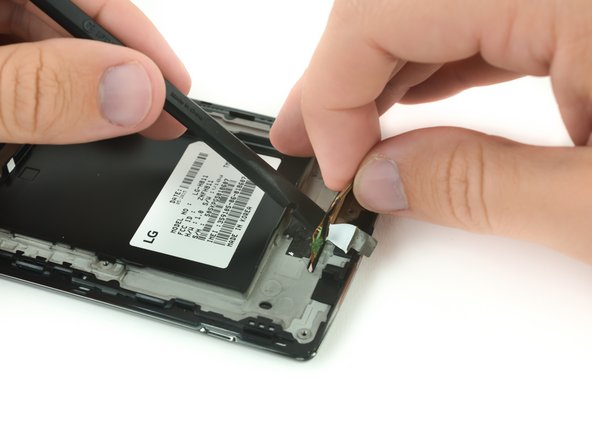
    • There is a very thin strip of adhesive that holds the screen to the frame; this step should not require excessive force. Apply additional heat along the edges of the phone if the screen is difficult to free.

  14. 这个步骤还没有翻译 帮忙翻译一下

    : 步骤 14 中的图像 1,3 : 步骤 14 中的图像 2,3 : 步骤 14 中的图像 3,3
    在这个步骤中使用的工具:
    iFixit Opening Picks (Set of 6)
    $4.99
    购买
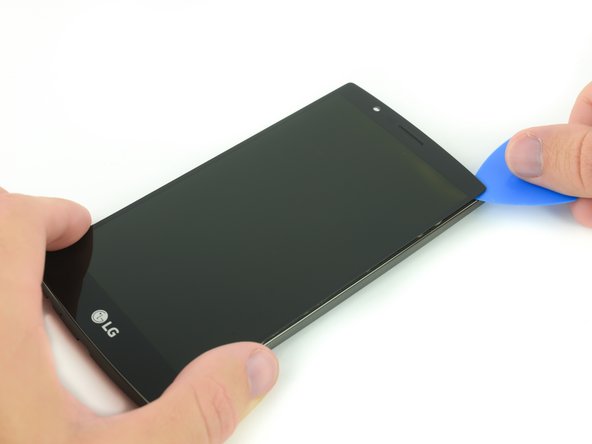
    • Insert a plastic opening pick into the gap between the screen and the plastic housing.

    • Slide the plastic opening pick along the border of the screen to break any additional adhesive and free the screen assembly.

  15. 这个步骤还没有翻译 帮忙翻译一下

    : 步骤 15 中的图像 1,3 : 步骤 15 中的图像 2,3 : 步骤 15 中的图像 3,3
终点

23等其他人完成本指南。

Richard

于02/07/17注册

29,916 声望

创作了11篇指南

团队

iFixit iFixit 的会员

Staff

135 名成员

创作了16,732篇指南

4条评论

It is possible replace the digitalizer only? Thanks

Nene indy - 回复

Per the LG G4 Teardown guide, the glass, digitizer, and LCD are all fused together, so you have to replace the whole assembly

Eric Clothier - 回复

Lorsqu’on remplace l’ensemble écran + LCD achetés ensemble et que l’on transfère les pièces de l’ancien cadre (caméra, vibreur…), il ne faut pas oublier de transférer également 3 petits caoutchoucs carrés noir ou gris (2 en haut de chaque coté du haut parleur, et 1 en bas à gauche de la prise jack), sinon le détecteur de proximité ne marche pas et l’écran s’éteint et le reste lorsqu’on téléphone…

Nevile - 回复

C'est bien qu'on fasse cette observation. Mon technicien avait omis ces neoprenes et j'ai pu les transférés.

My tech had omitted these pads. I am super grateful someone commented that the phone would black out on a call. Problem solved!

Sidney Stratton -

添加评论

浏览统计数据:

过去 24 小时: 0

过去 7 天: 2

过去 30 天: 22

总计 23,077