跳转到主内容

Keurig K10 MINI PLUS Handle Replacement

你所需要的

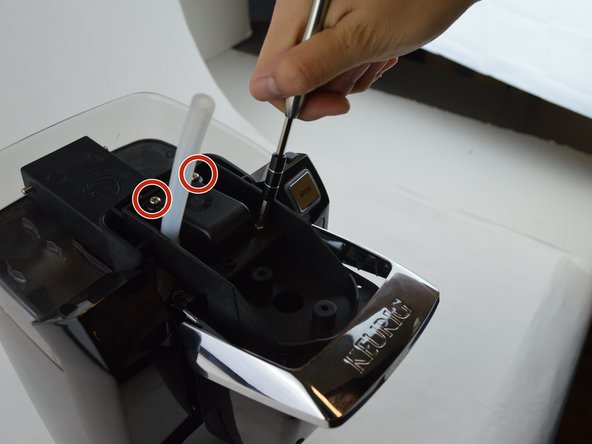
  1. Keurig K10 MINI PLUS Handle Replacement, Top Needle: 步骤 1 中的图像 1,2 Keurig K10 MINI PLUS Handle Replacement, Top Needle: 步骤 1 中的图像 2,2
    • Remove two 9 mm Phillips #1 screws.

    • Avoid the top needle if at all possible. The needle may cut you and/or penetrate your skin.

    • The screws are located on the top of where the K-Cup would be.

  2. Keurig K10 MINI PLUS Handle Replacement: 步骤 2 中的图像 1,3 Keurig K10 MINI PLUS Handle Replacement: 步骤 2 中的图像 2,3 Keurig K10 MINI PLUS Handle Replacement: 步骤 2 中的图像 3,3
    • Once you remove the screws, the top cover should come out.

    • You will then want to remove these screws which are the same size.

    • The needle is sharp, so be careful.

  3. Keurig K10 MINI PLUS Handle Replacement: 步骤 3 中的图像 1,1
    • Once you get those removed, you are going to want to pull on the hose until it pops off.

    • Once the hose comes off, the needle will fall out by itself.

    • Be careful when picking up the needle as the needle is sharp.

  4. Keurig K10 MINI PLUS Handle Replacement, Handle: 步骤 4 中的图像 1,1
    • Remove the two Phillips #1 screws.

    • The top needle is intact and there, so be careful when in this area.

  5. Keurig K10 MINI PLUS Handle Replacement: 步骤 5 中的图像 1,2 Keurig K10 MINI PLUS Handle Replacement: 步骤 5 中的图像 2,2
    • Next, after the removal of the hose on the top by simply pulling it off, remove the following four Phillips #1 screws.

  6. Keurig K10 MINI PLUS Handle Replacement: 步骤 6 中的图像 1,1
    • Once you take off the screws, this part of the handle will come off.

  7. Keurig K10 MINI PLUS Handle Replacement: 步骤 7 中的图像 1,1
    • To pull this part off, pull inwards with the these tabs located on both sides of the handle assembly.

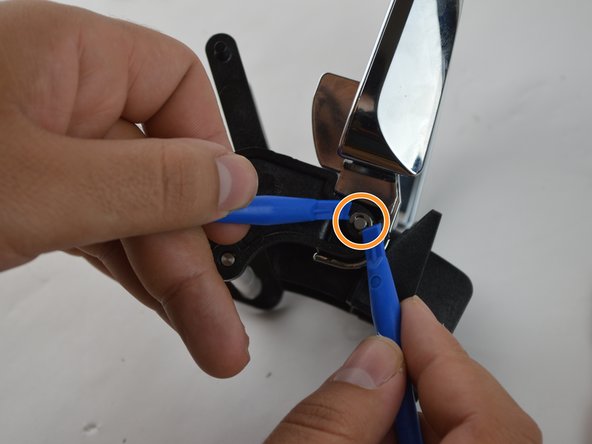
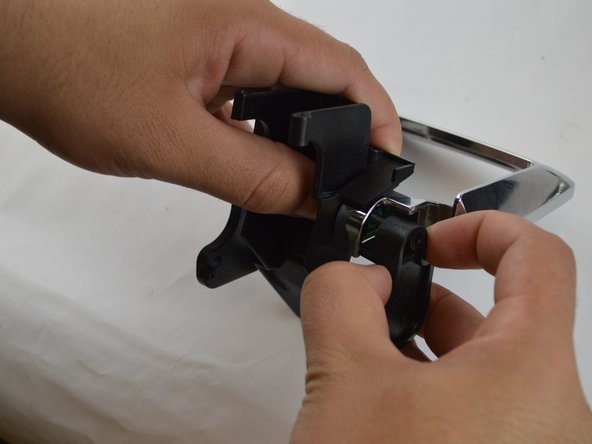
  8. Keurig K10 MINI PLUS Handle Replacement: 步骤 8 中的图像 1,3 Keurig K10 MINI PLUS Handle Replacement: 步骤 8 中的图像 2,3 Keurig K10 MINI PLUS Handle Replacement: 步骤 8 中的图像 3,3
    • Next, remove these two Phillips #1 screws to allow the release of the actual handle from the frame.

    • For the O rings, we used the plastic prying tools. Just keep in mind that you might want to hold one side of the O ring down while trying to pry off the other side with the other.

    • Once you get the O rings on both sides out, you can pull the handle by pulling on each side.

  9. Keurig K10 MINI PLUS Handle Replacement: 步骤 9 中的图像 1,1
    • Once you pull both sides, the handle will come off as shown.

结论

To reassemble your device, follow these instructions in reverse order.

团队

iFixit, Team 1-1, Weber Winter 2016 iFixit, Team 1-1, Weber Winter 2016 的会员

FIX-WEBER-W16S1G1

4 名成员

创作了37篇指南

0条评论

添加评论

浏览统计数据:

过去 24 小时: 3

过去 7 天: 11

过去 30 天: 18

总计 2,288