跳转到主内容

Jura Impressa S Model magnetic valve replacement

你所需要的

  1. Jura Impressa S Model magnetic valve replacement, How to open a Jura Impressa S model cover: 步骤 1 中的图像 1,2 Jura Impressa S Model magnetic valve replacement, How to open a Jura Impressa S model cover: 步骤 1 中的图像 2,2
    • Always remove the power cord from the wall outlet.

    • Lift out the coffee tray

    • Remove the lid sealing the coffee bean container

    • Remove all of the coffee beans you can possibly remove.

    • Pull the adjuster of the coffee bean grinder straight up

    • Remove the four T15 Torx screws

  2. Jura Impressa S Model magnetic valve replacement: 步骤 2 中的图像 1,2 Jura Impressa S Model magnetic valve replacement: 步骤 2 中的图像 2,2
    • Remove the cup heat plate.

    • It can be opened like a book.

    • Below the cup heat plate there are three more T15 Torx screws. Remove them.

  3. Jura Impressa S Model magnetic valve replacement: 步骤 3 中的图像 1,1
    • The top cover is now free. Lift ´er up and set ´er aside.

  4. Jura Impressa S Model magnetic valve replacement, Jura Impressa S model backpanel: 步骤 4 中的图像 1,3 Jura Impressa S Model magnetic valve replacement, Jura Impressa S model backpanel: 步骤 4 中的图像 2,3 Jura Impressa S Model magnetic valve replacement, Jura Impressa S model backpanel: 步骤 4 中的图像 3,3
    在这个步骤中使用的工具:
    iFixit Precision 4 mm Screwdriver Bit
    $2.99
    购买
    • The backpanel is secured with two proprietary screws with oval head. They seem to be rivets, but in fact are screws. The only purpose is, to keep us out of our own devices. You can remove them using an oval drive bit. (Part of some IFixit tool collections or available at a Jura provider or iFixit). In a pitch try needle nose pliers. Here a DIY guide.

    • Remove the two oval head screws on the lower edge of the backpanel.

    • Lift the panel up.

  5. Jura Impressa S Model magnetic valve replacement, Jura Impressa S model front cover: 步骤 5 中的图像 1,2 Jura Impressa S Model magnetic valve replacement, Jura Impressa S model front cover: 步骤 5 中的图像 2,2
    • Remove the knob for the steam valve by simply pulling it off.

    • The front cover is secured with a Torx T15 screw. Remove it.

  6. Jura Impressa S Model magnetic valve replacement: 步骤 6 中的图像 1,1
    • Now the front cover can be opened like a door for a few inches. The hinge is on the left.

  7. Jura Impressa S Model magnetic valve replacement: 步骤 7 中的图像 1,1
    • Various hoses hinder the further opening of the front cover. You need to remove the steam valve keypad from the cover.

    • Use a spudger to lift the two notches at the top of the front cover a bit to release the keypad at the top.

    • Lift the keypad upwards and pull it to the back. The steam pipe will slide out from its connection.

    • All hoses can remain connected.

  8. Jura Impressa S Model magnetic valve replacement: 步骤 8 中的图像 1,1
    • Remove the silicone hose leading from the steam valve to the coffee spout. If it is secured with a cable tie which must be removed first.

    • The front cover is now free and can be opened.

  9. Jura Impressa S Model magnetic valve replacement, Magnetic Valve: 步骤 9 中的图像 1,3 Jura Impressa S Model magnetic valve replacement, Magnetic Valve: 步骤 9 中的图像 2,3 Jura Impressa S Model magnetic valve replacement, Magnetic Valve: 步骤 9 中的图像 3,3
    • The solenoid valve is located at the top left rear of the machine. (Marked in orange). It is installed in the sloping part of the cage for the heaters. The valve can be easily removed without pulling out the cage. If you do want to pull out the cage, you can find the instructions here.

  10. Jura Impressa S Model magnetic valve replacement: 步骤 10 中的图像 1,2 Jura Impressa S Model magnetic valve replacement: 步骤 10 中的图像 2,2
    • The white support of the valve is fixed in two slotted holes in the slanted part of the metal cage. The carrier must be shifted upwards by about 1 cm, then the valve can be lifted out.

    • The carrier is held in place by two small plastic catches. Press the plastic catches in from below with an angled pointed tool, then the catches are free.

  11. Jura Impressa S Model magnetic valve replacement: 步骤 11 中的图像 1,2 Jura Impressa S Model magnetic valve replacement: 步骤 11 中的图像 2,2
    • Lift the valve out upwards.

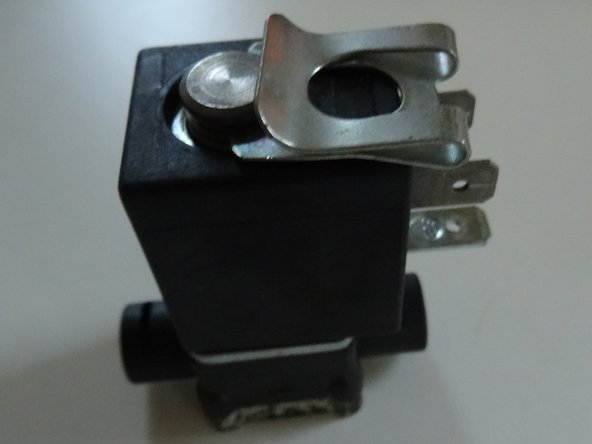
    • The valve is still connected to three cables. Pull off the cable lugs, note the position.

    • The valve is connected with hoses at the front and rear. Pull out the clamps and disconnect the hoses. An O-ring is attached to the hose for sealing. It gets stuck on the hose or in the valve. Replace it with a new one when reassembling.

    • There are valves that are equipped with Legris connections. Here there are no clamps, but the hoses must be pressed towards the valve, then the small ring on the connection must also be pressed towards the valve. Then the hose can be pulled out with a little force.

结论

Work through the steps in reverse order to reassemble your device.

另外一个人完成了本指南。

由衷感谢以下译者:

de en

100%

shingle正在帮助我们修复这个世界! 您也想加入吗?
开始翻译 ›

VauWeh

于10/19/15注册

202,975 声望

创作了246篇指南

团队

Repair is War on Entropy Repair is War on Entropy 的会员

Community

25 名成员

创作了1,114篇指南

一条评论

Very similar for the XS90, which has the acl 0045418 v32e.

In my case the rings were actually fine, but disassembly of the valve revealed chalk buildup on the stem which hampered movement.

Cleaning that off fixed it.

Mark - 回复

添加评论

浏览统计数据:

过去 24 小时: 1

过去 7 天: 6

过去 30 天: 50

总计 2,823